• Please use real names.

    Greetings to all who have registered to OPF and those guests taking a look around. Please use real names. Registrations with fictitious names will not be processed. REAL NAMES ONLY will be processed

    Firstname Lastname

    Register

    We are a courteous and supportive community. No need to hide behind an alia. If you have a genuine need for privacy/secrecy then let me know!
  • Welcome to the new site. Here's a thread about the update where you can post your feedback, ask questions or spot those nasty bugs!

Landscape and stitching

Michael Fontana

pro member
Hi, back again, after nasty things and short nights with my box, due to a badly coded firmwareupgrade of a internal S-ATA-card, but that's another story.

So just a few examples of some stitching's possibilities with landscapes; providing a interesting look and giving a different relation between buildings and nature, than singleshots could provide.

Sometimes, I think, they look like a photo wallpaper..
on the other hand, they give a very good overview of the position of the little "villages", how they relate together, the tracks, etc.
Any opinions about that?


haupt_n.jpg


beeing 181 x 78 degrees, as cylindrical panorama; it works fine.

haupt_h.jpg


this beeing 149 x 39 degs.

You like to use a spy-glass?
 

John_Nevill

New member
Michael.

What are you using to stitch, CS3 or a dedicated pano app? also, How many images have you sucessfully managed to stitch?. Are you using WA or standard lenses.

I've been using PTGUI and have just ordered a Nodal Ninja head, mainly to play with QTVR more accurately. I'm hoping to develop some stitching templates for my Sigma 12-24 (at various focal lengths) and EF 50mm f1.4 using the 5D, to make processing easier. Maybe even try some HDR QTVR.

With a bit of luck it the NN might be here by the weekend. Then its case of setting the entrance pupil up accurately using a 1" mesh set a few inches in front of the lens and minimising parallax.
 

Asher Kelman

OPF Owner/Editor-in-Chief
I shouldn't say, "Wow!' but it's late, 3:46 am and I should be asleep already. Still I had to Zoomify on you fascinating landscape as it is so inviting!

Then, "Lo and Behold", I see two people on the porch of the first house. Tiny figures at a table probably having a beer! Are they real people? What's the story about this place!

I think that it's important to consider cheating! I have no conscience about optimising a grayscale layer so that the row patterrs and hills are very well defined and delineated and then blending this back to make the picture pop. however, as it is, the pictures have a very peaceful nature.

Another dishonest thing I consider doing is to add a panorama of clouds. I store pictures of clouds whenever I have the chance just for something like this. However, from now on, I'll be taking a whole long series of cloud pictures so I'd have enough length for a super pano like yours.

Ansel Adams did this sort of thing by choosing development with the right chemicals and papers to make things more impressive than the human eye can see.

Thanks for sharing. You have shown once more the remarkable beauty of the pano format. I knew I needed a 7"x17" film camera.....but that's another story!

Asher

..and maybe that other story, the SATA firmware you could mention separately in the correct forum as there maybe lessons others could learn! I'm always scared to do firmware updates!
 

Ray West

New member
Hi Michael,

Sometimes, I think, they look like a photo wallpaper..
Is it linked to the fact that you are using a zoom lens, which tends to foreshorten distance) to create a wide angle view? I can't see that it may be much different for your scene, which could be sort of perpendicular to your line of sight, but I think stitching may also flatten more horizontal scenes, compared to a wide angle lens view (which increases distances, so to speak)

Maybe someone with a more techie background can translate what I am trying to say. Of course I could be quite wrong, just linked in my mind to how video guys typically show predators and prey.

So, what lens, how many shots, etc. (how long did it take)? wrt. Asher and the beer drinkers, that is the problem. always need to be able to read the bottle label ;-), and then some (like 'sell by' date).

Best wishes,

Ray
 

Michael Fontana

pro member
John

I've been using PTGui, too, which works for wide angles and FF better than APP.
The 7.3 pro version can even handle the nadirshot - with the tripod on it - better, with Viewpoint. I' ve to give it a try, but think its worths the update, if you do lots of QTVRs.

As far as HDR is concerned, using Photomatix is far better than PTGui.
I had done some QTVRs, in the alps, as well. Not ready yet...it's more work, it takes me about 5 hours, for high quality ones; its trickier than the segment-pano's!

If using stitching templates, make sure you use the NN-stops!

As for the stitches, above:
The first was with a distagon 28, a single-row with 7 images only, providing a 152 x 55 cm - image in excellent quality, at 300 dpi!

For the second' one, the canon 50 mm macro was used, again 7 images, in a singlerow.
This gives a more concentrate look than when using a wide lens.

These were taken with the Seitz-panohead.

The spy-glass used the 50 mm macro again; 4 images (x3, for HDR), but in landscape-orientation. I built myself a pano-adapter, easy to do, for keeping the images in horizontal orientation:

hor-panos.jpg


If you downscale the panos, for QTVR ot just little webjpgs, use Bart's downscaling hints, here at opf! They helped me a lot improving the downscale-quality, as PS bicubic smoother is not good, with big images. It creates nasty artefacts.
 

John_Nevill

New member
Thanks Michael,

I'm using Photomatix, seems to be the best out there for intial tone-mapping before curve tweaking in CS3.

For those new to the field of HDR, check out:
I see more and more photgraphers are using 50mm lenses for multi-row panos. Obviously the 50mm has less distortion to start with, so its a little easier to register and build big images.

The Sigma has unbeleivably low distortion, but does suffer from waviness. That's why I went for the adjustable NN (with stops). Talk of the devil, it just arrived :eek:)....Off to play!
 

Michael Fontana

pro member
Asher

Zoomify; yep the people there are real....
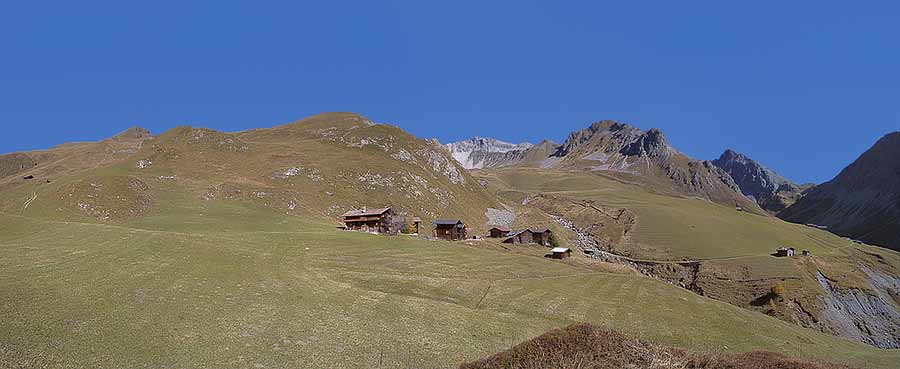
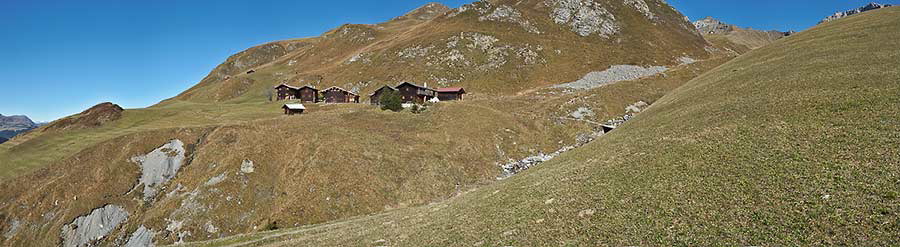
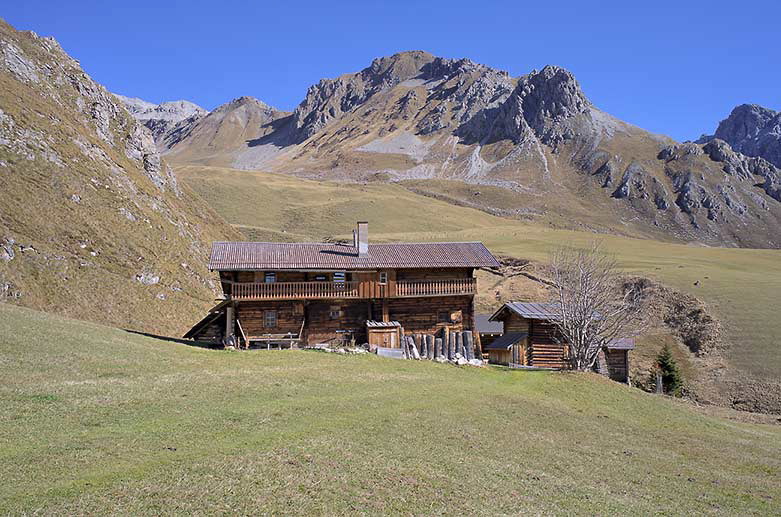
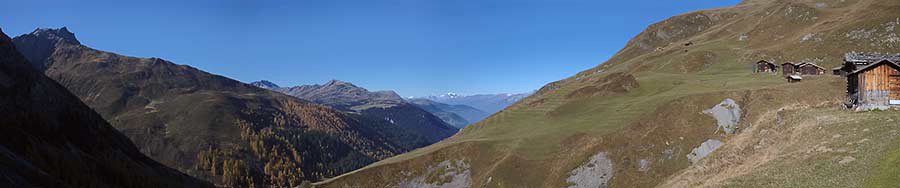
the place is at 6700 feets, somewhere in the swiss alps, with little chalets and barns, built some 300 years ago. Still no electricity, water just outside the houses, not all people like it..but the cell-phones work :)

The farmer used in the old days the chalets just temporarly; so it wasn't setteled all the year. Plus it's a place where the structure of the houses and the "villages" isn't dammaged by silly remouldings, hotels, etc, and off course not overcrowded, as no tourist goes there; it takes 2 hours by feet to get there. No, it's not a national parc, but "by nature" only a few people go there.

As a freind of mine is having one, I quite like to enjoy its calm, its quiteness; a good place to relax, after stressing working weeks.

As for the light; I think it's ok, that late autumn light is very smooth; and usually not very contrasty. Hmm, Panorama of clouds; that sounds like a good idea for changing the "wallpaper look", need some panos of clouds first; not easy, as they move; in "normal" pano's, I delete the clouds controllpoints, as they disturb the correct image geometry with their movements.

Ray, >think stitching may also flatten more horizontal scenes, compared to a wide angle lens view < I don't think so; stiching avoids in that case, aka cylindrical stitch, rather the ultrawide-effect.

I sometimes feel like seeing a "Heidiland-look"; which I don't like. But maybe; I' m just overdone with that stuff.

The shots for the stitches themselves are done pretty fast; about a minute, once everything is set-up properly. Most important is to find a good camera position; off course. The stitching itself, after the RAWconversion is pretty fast; about 10 minutes with a fast box, if the setup is fine.

John; >I see more and more photgraphers are using 50mm lenses for multi-row panos<

thats because you have - qualitywise - much better images with it, than using ultrawides: better contrast, definition, less CA, etc.

Good fun with the NN!
At the beginning, it takes a while to get used to that stuff; but once your familiar with it....

On jobs too, now I avoid usually everything less than 24 mm (on FF), and prefer stitching with better lenses. It's a accumulation of image data = information as well; as one has not 17 MP, but maybe 50 or hundert at disposition.

If someone wants really collect data, for high detailstitches, thats the way to go. Or even take a 100 mm macro....

But as this is much more work in post, - 5 rows with 10 images each, go figure ! -
I personally don't mind to have other options as well, as long as the lens quality is good.

The distagons are splendid for that purpose! 3 vertical shots of its 28 mm provide a good image with > 90 degrees, at very low postproduction.
 
Last edited:

Michael Fontana

pro member
follow-up; still single-row:

basically, stitching allows to create "virtual lenses" - that's what I really like about it: its not within the limits of 2/3 or 4/5 or whatever, but the photographer makes the choice of the image proportions, following the intention, the requirement of the scene.

I can setup 7 different lenses; this allows me to chose any desired angle; in height and width with single-rows, only! If you need a bit more sky; okay, take the 28 mm instead of the 35 mm; easy....

If I need ultraflat-panos, in a not extensive size; the homebrew adaper is mounted in a minute....

Just for comparison; I add a single shot, just taken about 100 meters away from the first stitch; same lens, distagon 28; I agree, that one lacks contrast:


haupt_07_m_2.jpg


For ending; computers are not good for showing pano's; to much loss of details:
a vaporised, 24-quality, screenie-webjpg, out of the 2nd pano, showing a little barn - at the right, high up, under the peak:

panodetail.jpg
 

Asher Kelman

OPF Owner/Editor-in-Chief
Michael and Ray,

There's nothing wrong with the panrama. It just needs to be printed large, very large and properly!

As you can see there is tons of dimensionality in your panorama.

Picture_orig 3.jpg


This is at 100% and one can see that the lighting has created good texture and building of the reality of the ground. That's pretty damn good IMHO!

Picture 7 orig.jpg
Picture 5 orig.jpg


© 2007 Michael Fontana portions of image


As you can see there's nothing wrong with the photography or the final picture! I hope someone agrees!

Asher
 

Asher Kelman

OPF Owner/Editor-in-Chief
Is it linked to the fact that you are using a zoom lens, which tends to foreshorten distance) to create a wide angle view? I can't see that it may be much different for your scene, which could be sort of perpendicular to your line of sight, but I think stitching may also flatten more horizontal scenes, compared to a wide angle lens view (which increases distances, so to speak)

Maybe someone with a more techie background can translate what I am trying to say. Of course I could be quite wrong, just linked in my mind to how video guys typically show predators and prey.

Ray,

The perspective has nothing to do with the lens focal length but only the positiion of the camera relative to what is being photographed. That means distance! People who get a flat image just have to go closer! All a lens does is put more or less of the image on the recording surface be it film or silicon!

Michael,

To be prepared for printing I have made some quick processed versions of several cutouts. Change in contrast, saturation, distribution of tonalities and density of image and sharpness.

Picture_orig 3.jpg
Picture3_50percent sat 50 percent fulleditAK.jpg


© 2007 Michael Fontana portions of image, original then quick edits


Picture 7 orig.jpg
Picture 7 AK.jpg


© 2007 Michael Fontana portions of image, original then quick edits


I think that in making panoramas there is a great excitement at getting to see the image. However, hat is only the very first step. When one samples such a huge area the camera is not seeing what is in our brains. We see a powerful and wonderful scene stretching across miles of stark dry, worn, almost desert-like landscape with worn out wooden homes huddled in the hiilsides some how surving the stark lonely, forgotten and harsh area....and there are good fields, so they work hard to live!

Printing is a huge and underestimated task. My edits are not exactly what you might ever consider and you are the only person who counts! However, this is not a flat photograph and will print well.

Thanks so much for sharing to hard work.

Asher

BTW, at risk of having my head bitten off, this will be also fantastic in B&W. Sorry, but it's the truth!
 

John_Nevill

New member
Asher, I like what you've done, it adds great emphasis, as one would say "it may not be everyone's cup of tea" but it definitely adds dimension.

Would a B&W conversion work?, i'm not sure, there's a dominance of mid tone, the skies would need something to break up the solid colour. It would be quite a challenge and adding content may move away from what the author was trying to say. Although close up there's so much detail it may well work.

Great thread!
 

Michael Fontana

pro member
I was a bit frightened, when I saw the samples, Asher took from zoomify, and the differences to his edits. So I went back to the masterfiles and had a look:

zoom_camparison.jpg


It's true that I didn't oversharped/overcontrasted the tiff, before sending it to zoomify, which makes the tiling. I have this behauviour to sharpen rather conservative; not playing a lot with zoomify.

On the color/saturation level, however, zoomify takes a lot of color away, so one has to push it, before sending to zoomify.

The °prior to zoomify° is in sRGB already. At the left, the histogram of the it.
 

Asher Kelman

OPF Owner/Editor-in-Chief
I was a bit frightened, when I saw the samples, Asher took from zoomify, and the differences to his edits. So I went back to the masterfiles and had a look:

It's true that I didn't oversharped/overcontrasted the tiff, before sending it to zoomify, which makes the tiling. I have this behauviour to sharpen rather conservative; not playing a lot with zoomify.

The °prior to zoomify° is in sRGB already. At the left, the histogram of the it.

zoom_camparison.jpg


What Michael Fontana's posted in Adobe RGB 1998 color Space

You can see that the images look anemic since the web cannot display the large gamut of colors in Adobe RGB 1988! What is need is for Photoshop to reassign or remap, by mathematical and psychological algorithms optimized for our impression and color sense, so that the colors appear as intended perceptually. So I converted Michael's combination image of all three variants to the sRGB color space that now allows us to see the intended colors here in the forum! Without going to a web friendly conversion, one is doing a Sunday Mass in a Hindu Temple, sort of thing! Well at least one gets incense with the wine, but it is not good for anyone who wants a true to faith experience.

zoom_camparison.jpg


Michael Fontana's post above, converted sRGB IEC6 1996_2.1 color space

So you can see a part, (color saturation) but not all the issues of "wallpaper flatness" i.e. not the distribution of tones and the detail) is explained by using a color space which is too large for the web. Images must be in sRGB :) So this adds another major point to showing and sharing one's pictures on the web. Not only does one have to alter the file in order to get to convey the psychodynamic exeperience what one could breath in and enjoy by turning one's head slowly to feast on the mountain scene, but there's more!

One also needs to package that precious artistic work in sRGB or the message one arduously encodes, oder get the artist's intent and passion delivered! Only that way is the artist's Arc of Intent completed in a Arc of Communication between the photographer and the viewer!

Ultimately we have to look into the picture and see something of what the photographer him/herself saw, exploited and bargained with in making the photograph satisfy his or her passion.

I still would love to know more about these people sitting at the table in the shadow of the porch, what were they doing and what are they like.


Thanks for taking us to this fascianting Swiss location! Who's have thought!

Asher
 

Michael Fontana

pro member
Wait, Asher

I'm pretty sure I converted to sRGB before sending it to °save for web° - as usual....

But as the fresh set-up of the mac produces png - might this influence the story?

I hadn' had time to tell the terminal to produce jpgs and not as screenshots.

slightly confused
 

Asher Kelman

OPF Owner/Editor-in-Chief
Wait, Asher

I'm pretty sure I converted to sRGB before sending it to °save for web° - as usual....

But as the fresh set-up of the mac produces png - might this influence the story?

I hadn' had time to tell the terminal to produce jpgs and not as screenshots.

slightly confused
Hi Michael,

The pictures that you get from the screen as screenshots are saved as .png and the color space is LCD color space!

So one can simply use Edit-Convert Color Space to sRGB!

Asher
 

Michael Fontana

pro member
I still would love to know more about these people sitting at the table in the shadow of the porch, what were they doing and what are they like.

Asher

Hey Asher, this is not blow-up ;-)

Ok so, you gonna listen a story:
They were doing holidays, at their chalets; but they' re not the friend I wrote before.

I know these two people since about 30 years, but haven't seen them for a long while; about 25 years. Beeing 5 years ago in my friends chalet in winter, for doing powder snow skiing, like you guys do in Alaska, but here, it's without chopper...

winter.jpg


it was rather cold outside; about - 17 degs Celsius, so everbody protected the face with long caps - dunno the name of it in english - as we saw some other people arriving at the "village" on that cold day. As we were on skis as well, everbody was masked. We talked to these two people, not knowing who they are, as the woman asked me, after a few seconfds, if I am MF. She had recocognized my voice after 25 years!!

That's bloody amazing!
 

Asher Kelman

OPF Owner/Editor-in-Chief
Hey Asher, this is not blow-up ;-)

Ok so, you gonna listen a story:
They were doing holidays, at their chalets; but they' re not the friend I wrote before.

I know these two people since about 30 years, but haven't seen them for a long while; about 25 years. Beeing 5 years ago in my friends chalet in winter, for doing powder snow skiing, like you guys do in Alaska, but here, it's without chopper...

winter.jpg


it was rather cold outside; about - 17 degs Celsius, so everbody protected the face with long caps - dunno the name of it in english - as we saw some other people arriving at the "village" on that cold day. As we were on skis as well, everbody was masked. We talked to these two people, not knowing who they are, as the woman asked me, after a few seconfds, if I am MF. She had recocognized my voice after 25 years!!

That's bloody amazing!

But there you are, Michael, it is "Blow Up"!

Asher
 

Michael Fontana

pro member
Hi Michael,

The pictures that you get from the screen as screenshots are saved as .png and the color space is LCD color space!

So one can simply use Edit-Convert Color Space to sRGB!

Asher

Asher, I know that stuff....the main screen here is a LaCie blue IV, with a profile; so I converted - from that profile - to sRG...

But still confused...
if I download the pict from OPF, its native a Adobe 98...

But, if I reopen the saved screenshot in PS - not the webjpg - I save them all the time (for easier seeing its content) after the save for web - procedure, it says, its a sRGB.

The colorsettings in PS are ok, I verified it....
 

Asher Kelman

OPF Owner/Editor-in-Chief
Asher, I know that stuff....the main screen here is a LaCie blue IV, with a profile; so I converted - from that profile - to sRG...

But still confused...
if I download the pict from OPF, its native a Adobe 98...

But, if I reopen the saved screenshot in PS - not the webjpg - I save them all the time (for easier seeing its content) after the save for web - procedure, it says, its a sRGB.

The colorsettings in PS are ok, I verified it....


Hi Michael,

Thought you knew it, just explained it any way for anyone else. So we have a puzzle! I've just dragged the images of yours that I posted orig and modifed and they are as, I posted then sRGB. So OPF is not converting them to Adobe RGB! You said you checked your setting in PS. Could it be that on import the files are converted to your "Working RGB" and that is Adobe RGB?

A fascinating puzzle. Sure is important to know the answer as a lot of work can get poorly shown. It's not only on the web! I've seen an artist an near apoplexy because the lighting in a gallery changed the color of his pictures!

Could you perhaps drag several of the small single files that I reposted, the small jpgs and see if they are RGB or sRGB. Look at then in iview media pro or something else which won't touch the color space.

Asher
 

Michael Fontana

pro member
Asher good morning

still puzzled! I hate to have colormanagement-issues, therefore I want to clear it, even its not the most important parth of that thread:

My °save for web-option° throughs the profile away, but before °save for web°, the files are in sRGB!

So this is what I did: I open

1) the image after °save for web° - from my desktop - and assign sRGB.
2) the image downloaded from my server, and assign sRGB.
3) the image, you told to be a Adobe 98, and assign sRGB.

They all look the same! Obviuosly, they look the same too, if I convert them to Adobe 98, which is the workspace. If opening them in preview, same result.

Now, if I open the one you converted to sRGB with PS, it tells me beeing a sRGB, as you saved it as jpg - without °save for web° or told °save for web° to keep the profile.

The correct way - in theorie - is to tell PS: "Use embedded profil" - but its getting reddish then.

What the heck is going wrong here?
 

Michael Fontana

pro member
Tracking it down, by looking at the source:

Where did you took the °portions of image°?
from zoomify?

ok, so the bug must be somewhere in between:

zoom_delta.jpg


Maybe someone from the colormanagement-board might have a look at it.
Thanks.
 

Michael Fontana

pro member
We talk about contrast/local contrast within panorama, here some difficulties of wide angled panorama's:

As there is much more FoV, in almost all the cases, one has to deal with bigger contrast, than you would have in a singleshot.

haupt_g.jpg


That's the entire image, with 130 x 28 deg. Difficult to get a good local contrast in the shadows - at the left, and the lights at the right. That was corrected with manual tweakings on layermasks, but no HDR in that one.
 

Ray West

New member
Hi Michael,

I gave up in trying to jump through the adobe hoops in 'save for web'. I think I did sort it at one stage. I found it better to save it in whatever format I wanted, open it in Irfan view, then resize/save it from there, if I wanted it for web use (bearing in mind other folk's monitor settings, I wasn't very fussy about it). IV is not colour managed, and it seemed to make its own method good enough. More recently, I have set cs2 to srgb colour space, etc., since I rarely print things, these days. I used to get the red tinge if I worked in argb, and tried to save for web by any means within cs2. now I just convert to 8 bit, re sample/size, export as jpeg.

If your browser is not colour managed, then it will look different than if in a colour managed viewer, e.g. cs2.

Probably easier to check it out with a colour test chart.

Best wishes,

Ray
 

Michael Fontana

pro member
okay, at the browser level, it seems, that:

- Safari is CM-savy/aware, and therefore makes a difference between a wegjpg, still tagged in sRGB, and a webjpg, beeing in sRGB before °save to web° but with the tag beeing thrown away, during websaving.

This could clear up the clouds ;-)

2nd: beeing on PS-CS-2, I have the choice of embedding the profile in the webjpg, or to through it away:

PS_CS_2_prof.jpg


It seems now, that PS-Cs-3 doesn't have that option! Thanks Nicolas!

Is this correct?
 

Michael Fontana

pro member
okay, gents and ladies

still trying to get most out of the shots - and after thinking about the "pump-up-methode" from that thread, I gave Photoacute a new try:

Pacute_1.jpg


Pacute_2.jpg


Pacute_3.jpg


Following the discussion in the linked thread, I imported the RAWs in Photoacute, made a dynamic range expansion and chosed 2 x output - with super resolution, and exported to DNG; converting in LR to tiffs, down to native size, and stitched it again. So these screenshots (in sRGB) are from the stitches, in PS at 100%.

To be fair: the Photomatix-tiff-stitch hadn't been sharpend, plus now, I choosed another light temperature; but you might find very noticable's differencies.


Most obvious are the improvements in the 3/4-tones, but a other test, a backlit-scene that I send to Photoacute came out much better! So I went for it.

I' m not saying that Photoacute will resolve all problems, but in some situations, its a big help.
 
Following the discussion in the linked thread, I imported the RAWs in Photoacute, made a dynamic range expansion and chosed 2 x output - with super resolution, and exported to DNG;

Were those shots from a 1Ds2? I cannot save to DNG after SuperResolution has been applied, because the long side becomes 10010 pixels (if I recall correctly), which is (only just) above the 9999 pixel Adobe limit.

Bart
 

Michael Fontana

pro member
Hi Bart

glad you jump in. For downrez to native size, I used your Gausschenblur-methode.

yes, they' re from the 1 Ds-2; with 9952 x 6624 (in LR, ACR, and RAW Developer)
iVMP looks at them at 10004 x 6656!

which Photoacute-version do you use? It's 2.7.2, here.

Edit: It was done with HDR-methode (at the top), with 2x Superes + HDR at the center....
3 brackete RAWs, + 1.5, 0, - 1.5...
 

Michael Fontana

pro member
... the backlightshot; even this a 50 macrolens, it displays some CA in Photomatix+tiffs; meanwhile Photoacute - having a calibration of that lens brings it well:

Pacute-backlite.jpg


This is obvious in the 200%-crop:

200Percent.jpg


and for further info, the entire scene:


Pacute-light.jpg


On both of these fruits shots, (-1.5, 0 + 1.5) RAW Developer was used.

My guess you can print about 50% bigger, whithout artefacts. Ant tonality is nice!

Point of view workflow: yes the DNG is bigger; 377 MB, but only one RAWconversion is required, Photoacute takes here about 5 minutes...
 

Michael Fontana

pro member
Bart

did you get it now?
Did you see the immatest-examples on the dev-site?

I made several test, and here' re just some hints:


- Using RAWs/DNGs provides the best results; as the internal computing of the files is done in 32 bit. IMO, that's the big point about PA.

- obviously, you best use a high quality lens and a lensprofile.

- Avoid any sharpening/ resolution related tweaks, when converting in LR.

- I dunno why, but LR had sometimes problems to export these big 99xx-files.
A workarround: to downrez in LR, when exporting...
 
Bart

did you get it now?
Did you see the immatest-examples on the dev-site?

Michael,

I've been attempting to get the PA 2.73 trial version to save SuperResolution results from my 1Ds2, but it keeps failing to save the result. Even allowing to crop the final result, which brings the larger dimension below 9999 pixels won't help. It's strange, the result is shown on my screen with watermarks, but I cannot save the image. Maybe it has indirectly something to do with the limited RAM on my computers, or maybe this 2.73 version has an issue that your 2.72 doesn't have, I don't know. I guess I'll spend more time on it once I've upgraded my computer (probably Q1 2008) and my camera (when the price in Euros becomes more reasonable).

The Imatest evaluations on their site show that a real resolution enhancement is possible, but the number of lens profiles is very limited (and they are really needed for good results). I've offered my assistance to help them create some more, but to date I didn't get an answer.

I made several test, and here' re just some hints:

- Using RAWs/DNGs provides the best results; as the internal computing of the files is done in 32 bit. IMO, that's the big point about PA.

That's what I wanted to test, but cannot.

- obviously, you best use a high quality lens and a lensprofile.

Yes, good lenses always help, and I assume a good profile helps to reduce the halo artifacts I'm seeing. Too bad there are too few profiles.

- Avoid any sharpening/ resolution related tweaks, when converting in LR.

Yes, for the best results the data should be as Raw as possible. For resolution enhancement, sharpening is not going to help, on the contrary.

- I dunno why, but LR had sometimes problems to export these big 99xx-files.
A workarround: to downrez in LR, when exporting...

Interesting. Maybe there is something wrong?

Bart
 
Top