• Please use real names.

    Greetings to all who have registered to OPF and those guests taking a look around. Please use real names. Registrations with fictitious names will not be processed. REAL NAMES ONLY will be processed

    Firstname Lastname

    Register

    We are a courteous and supportive community. No need to hide behind an alia. If you have a genuine need for privacy/secrecy then let me know!
  • Welcome to the new site. Here's a thread about the update where you can post your feedback, ask questions or spot those nasty bugs!

Precision camera positioning

Is the camera body lens mounting surface the only surface on a modern DSLR that is precisely positioned in relationship to the sensor?

I wish to do some high precision macro photography that requires that the sensor be exactly parallel to the object being photographed. The object is ~2" X 3" and will fill the 1.6 crop sensor frame, so I think my magnification ratio will be on the order of 1:10 or so.

The keystone distortion caused by trying to position by eye, or with the aid of lines on the focusing screen, or lines on the computer monitor in live view, is unacceptable.

I'm shooting with a 60mm macro lens at ~f/8 for maximum sharpness so there isn't any depth of field to speak of.

Does anyone have any suggestions besides spending gobs of money on a custom built focusing gauge?

The ultimate goal is to be able to make a sequence of such shots and stitch them together for multi-megapixel macros. But stitching requires a degree of precision I haven't been able to achieve yet.

Thanks,
 

Asher Kelman

OPF Owner/Editor-in-Chief
Is the camera body lens mounting surface the only surface on a modern DSLR that is precisely positioned in relationship to the sensor?

I wish to do some high precision macro photography that requires that the sensor be exactly parallel to the object being photographed. The object is ~2" X 3" and will fill the 1.6 crop sensor frame, so I think my magnification ratio will be on the order of 1:10 or so.

The keystone distortion caused by trying to position by eye, or with the aid of lines on the focusing screen, or lines on the computer monitor in live view, is unacceptable.

I'm shooting with a 60mm macro lens at ~f/8 for maximum sharpness so there isn't any depth of field to speak of.

Does anyone have any suggestions besides spending gobs of money on a custom built focusing gauge?

The ultimate goal is to be able to make a sequence of such shots and stitch them together for multi-megapixel macros. But stitching requires a degree of precision I haven't been able to achieve yet.

Thanks,

Charles,

An interesting challenge. I hope I have grasped you intent.

There are two issues.

1. Making the camera sensor plane parallel with the object. One needs an industrial worm screw driven mounting block, best choice, look for something that might work used on ebay, that just moves only vertically or else the heaviest mother camera pole stand, too expensive at $3500 less $ 0.01 change, LOL! They do come up used too!


b97b39cc3b5644dca44fdbd18be58d0c.jpg


Calumet here


You can get your camera, by one of these tools, rigidly fixed perpendicular to a solid flat plane, namely a very substantial table or I'd use the floor. Add a heavy flat polished marble 2x2ft square tile on 2 1" thick a piece of plywood 2ft x 2ft, level it and glue down. Get an accurately etched piece of class and photograph it checking your stand's adjustments until until the squares are perfectly parallel.

2. Moving the object exactly within that XY plane is, IMHO, likely to prove far easier than doing the same with the camera. Here one can find many precision macro stages that you can progress in cm, mm or sub mm if you wish. You can get them with various pitch threads and with handle driven or electrical driven movements. Some you can program so that one click of you mouse and the stage will move to the next position. They are also available used from the most simple, which is what you need to the most sophisticated.

This is my start,

Asher
 

Doug Kerr

Well-known member
Hi, Charles,

Is the camera body lens mounting surface the only surface on a modern DSLR that is precisely positioned in relationship to the sensor?
I believe so.

I wish to do some high precision macro photography that requires that the sensor be exactly parallel to the object being photographed. The object is ~2" X 3" and will fill the 1.6 crop sensor frame, so I think my magnification ratio will be on the order of 1:10 or so.
To fill a Canon "1.6X" sensor with an object 3.00" x 2.00" requires a magnification of about 0.3 (1:3.3).

The keystone distortion caused by trying to position by eye, or with the aid of lines on the focusing screen, or lines on the computer monitor in live view, is unacceptable.
I'm not sure I know why (but see some of my discussions below).

I'm shooting with a 60mm macro lens at ~f/8 for maximum sharpness so there isn't any depth of field to speak of.[/quote]
Is depth of field the/an issue here, or is our concern "geometric precision" as such?

For the numbers you mention, the DoF would be about 0.9mm front and back.

In any case, before we try and concoct some alignment procedure, what do we have that indicates the plane of the subject? Just the subject itself? Or is it perhaps on a large flat metal plate?

Is the subject itself something that could bear touching by something like the plunger of a dial gauge? (Not that I have any idea yet how to use that - I am merely trying to understand the "creature".)

Can we temporarily replace the object with an alignment target having a carefully-constructed grid? Then the alignment could be done optically (via the Live View mode, with the video output to a large monitor if needed).

Here is another approach. It requires that the object be mounted to a flat plate of some sort (the "platen"). Assume the body is on a good x-y-z slide unit. With no lens, use a metal cylinder whose ends have been carefully ground parallel as a spacer between the front of the lens mount and the subject "platen". Adjust the orientation of the body (or the platen) until the cylinder is just snug between the lens flange and the platen. Then rack the camera back on the z-slide, mount the lens, and proceed.

I assume there is also the issue of the exact location of the optical axis vs. some reference point on the subject. I would expect that would need to be done optically.

Maybe these thoughts will lead you in a useful direction.

Best regards,

Doug
 
Is the camera body lens mounting surface the only surface on a modern DSLR that is precisely positioned in relationship to the sensor?

Hi Chas,

Unfortunately no. The lens will have some degree of decentering (turning it into a tilt lens), the lens mount will, and also the sensor itself will have some tolerance. There is only one test and that's live feedback from the sensor itself.

I wish to do some high precision macro photography that requires that the sensor be exactly parallel to the object being photographed. The object is ~2" X 3" and will fill the 1.6 crop sensor frame, so I think my magnification ratio will be on the order of 1:10 or so.

That should allow for some tolerances. Depending on the sensel pitch (used as a super critical COC), you'll have some 10-16 millimetres of DOF at f/8 at a magnification of 1:10.

The keystone distortion caused by trying to position by eye, or with the aid of lines on the focusing screen, or lines on the computer monitor in live view, is unacceptable.

I undestand the desire to square things as much as possible but, since you are going to stitch, correction of some keystoning can also be done in the software, automatically.

I'm shooting with a 60mm macro lens at ~f/8 for maximum sharpness so there isn't any depth of field to speak of.

I don't think it's too bad, unless you start shooting at larger magnification factors and cover the field by stitching.

Does anyone have any suggestions besides spending gobs of money on a custom built focusing gauge?

When shooting from a bit of distance, nothing beats a mirror. Put the mirror where the object is going to be, and try and center the reflection of the lens in the center of the sensor, and everything will be close to perfectly perpendicular.
Alternatively you might use an improvised suspended plumb line when shooting vertically, but then the subject plane should also be perfectly level. You could tape some pices of string to the lenshood, and suspend a small object from another string in the optical axis as positioned in the middle of the sensor.

The ultimate goal is to be able to make a sequence of such shots and stitch them together for multi-megapixel macros. But stitching requires a degree of precision I haven't been able to achieve yet.

It also depends on your stitcher, and it's interpolation quality. PTAssembler (the Beta 5.1 version) offers a camera position optimizer which assists in stitching flat planes, even when tiles are shot at an angle. It also offers a number of Sinc interpolation qualities, including Sinc 1024 which delivers very high resolution stitches, there is very little loss due to keystoning correction or rotation.

Cheers,
Bart
 
Last edited:

Doug Kerr

Well-known member
Hi, Bart,

When shooting from a bit of distance, nothing beats a mirror. Put the mirror where the object is goin to be, and try and center the reflection of the lens in the center of the sensor, and everything will be close to perfectly perpendicular.
Ooh! Nice.

I note that the "basic" version of Michael Tapes' LensAlign focus test rig uses just that principle to align the rig and the camera. But I didn't think about it in this situation.

Best regards,

Doug
 
Some good suggestions.
In response to some of the points raised:

Asher's suggestions are exactly the direction I was seeing, but the expense is prohibitive for a series shot "on spec"

I can't allow the stitching software do "de-keystone" the image because it distorts and blurs the fine details as it interpolates new pixels or discards old ones to make the edges match.

Doug's magnifcation factor is correct, mine was a WAG. And indeed at that mag factor, there is less than 1mm DoF.

Bart - yes I am working at larger magnifications and yes I'm trying to stitch as I said in my last para. The old mirror trick occurred to me, but I can't mount the mirror with enough precision without damaging the object. Thanks for the software suggestion, I've been using PS, which doesn't offer much stiching support.

Thanks for the answers so far, I'm interested in any others, especially lower-budget approaches ;-)
 

John Angulat

pro member
Hi Charles,
Definitely some good suggestions so far.
A lower budget approach can be had from Asher's sugestion.
You certainly don't need a $3000 copy stand (would anyone???).
Do a search at B&H for copy stands.
A decent one can be had for $300 - $400.
I do a huge amount of product imaging for my company.
Although no longer available, I use a Manfrotto 1700 and it has served me quite well.
The types of images I'm shooting are of objects usually no larger than 1/2".
Here's a link to one that's similar: http://www.bhphotovideo.com/c/product/4188-REG/Bencher_90020.html

Hope this helps,
 

Asher Kelman

OPF Owner/Editor-in-Chief
Some good suggestions.
In response to some of the points raised:

Asher's suggestions are exactly the direction I was seeing, but the expense is prohibitive for a series shot "on spec"

Charles,

To hold the camera, get ideas from a local machine shop. The guy can modify some unused junk piece you get for nothing on eBay; cost maybe $40-$80. These guys are often delighted to do something out of the ordinary and will often come up with great solutions. I'd use him principally for the camera mount. One can, BTW, buy an odd precut lump of aluminum, brass or steel for a modest price and a discount metal store. That's what I do and then go to my friendly machinist. I always worry, will he still be in business next time.

The stage for the item to be photographed is the easiest as manual stages are plentiful as MF bodies on the used market. Again, the house that resells these things will be able to suggest the best choices for your needs. An item like this you wont want to part with!

To align them, either the floor marble plate on wood, let's call it a "Table" or the camera holder need to be adjustable. The marble "Table" is likely to be easiest. 4 screw in adjustable legs can allow you to do that accurately and for almost no cost at all. The camera mount just has to move in the Vertical direction and then not move at all.

Asher
 
To align them, either the floor marble plate on wood, let's call it a "Table" or the camera holder need to be adjustable. The marble "Table" is likely to be easiest. 4 screw in adjustable legs can allow you to do that accurately and for almost no cost at all.

Yes, I agree. In my experience it is often easier to move/tilt the subject plane than the camera/sensor plane when dealing with small objects. Once you have both planes parallel, shifting the object can be done when the bottom plate is put on rollers/bars/pipe with 2 wedges to stop travel. That will allow a good linear travel of the object stage, and is cheap to make.

Of course when this would be something that needs to be done on a regular basis, then a very high quality X/Y table will pay off pretty soon, especially with small sizes.

Cheers,
Bart
 

Asher Kelman

OPF Owner/Editor-in-Chief
Of course when this would be something that needs to be done on a regular basis, then a very high quality X/Y table will pay off pretty soon, especially with small sizes.

Really Bart,

A device like this will be a basis for a whole new addiction. Forget the gear photographers use. This will give so much pleasure. Imagine having a motorized version and putting the camera on it to photograph a bug or butterfly with the device advancing every 0.5mm and then stacking the images or else also moving from side to side or rotating and getting 3D models and then sending it for 3D lithography or machining from a block of brass any size you want.

Watch it! Think about snapping pics. One can start with the simplest camera, everyone does, just like getting a digital rebel and one kit lens and within 2 years folk are spending real money on all sort of fancy gear that's absolutely, without question, "needed"!

Me? love things like this. Just got to find why I must have one!


Charles,

First get the advice from this company Bart has discovered and find the simplest device to satisfy your immediate needs. Armed thus, you can now talk to the guys who have thousands of these in stock for resale from companies that have upgraded 10 benches with fancier stages. There's a huge recycling of XYX and rotating stages. These are often made like a jeweled marvelous hand crafted swiss Watch. I love these devices which gives us the feeling that we can actually control things.

When you have the input from the MFR/ primary outlet and the used equipment store, then you can also see what's available privately on the web and from eBay. It just requires the homework in getting your needs right.

  • Size of stage,

  • accuracy of movement,

  • side scale or precision rotatory scale,

  • X and Y controlled or just one axis.

  • Rotation, yes or no.

I'd pick one that allows for adding a rotation stage in the future.

With a motor, BTW, one can do sub-pixel movements to get say 4 overlapping shots (per shot you need) moved only 1/4 pixel with the goal of even better resolution and perhaps color if you can do the math. I'm sure existing software would work!

Asher
 

Erie Patsellis

pro member
"1. Making the camera sensor plane parallel with the object. One needs an industrial worm screw driven mounting block, best choice, look for something that might work used on ebay, that just moves only vertically or else the heaviest mother camera pole stand, too expensive at $3500 less $ 0.01 change, LOL! They do come up used too!"

Hey! I have one of those in the studio here at the house, indispensable for stability, especially with the Sinar and RB.

"You certainly don't need a $3000 copy stand (would anyone???)." Well, it depends, shoot 8x10 and larger, tabletop work on 4x5 with a Betterlight (or in my case, a Dicomed FieldPro), and get exposures into the 15 min range and you'll wonder how anybody does without one. In camera multi exposures are another thing I do a lot of (on film, no less) and a stable stand is a prerequisite. (along with a china marker for the ground glass, etc...) I've been looking for an inexpensive MP4 stand for repro work, every time I find one, I'm a day or two late.

For the project at hand, instead of trying to move the camera, it's far easier to linearly move the subject. I'd likely use my Beseler Dual Mode slide duplicator with it's bellows and something around 135mm or so enlarging lens , MH or Halogen microscope fiber optic lighting and a translation stage (bought or adapted) to move the subject laterally under the fixed camera. An decent translation stage on a minuscule budget can be made with some scrap plywood, 2 full extension drawer slides, some 3/8" all thread rod, a few hex nuts, a bushing or bearing and a knob or two. One turn of the 3/8-16 all thread is exactly 1/16" movement. If it doesn't make sense to you, I can give you some nudges in the right direction and some pictures of the focusing stage of my 20x24 camera (it will make it very clear and is one of those forehead slapping moments) As my uncle would tell me, while you can move the mountain to Mohamed, sometimes it makes more sense to move Mohamed to the mountain.

Of course a better solution would be using the Sinar/Dicomed with a semi silvered mirror to get some frontal lighting, and rear shift to stitch, but you likely don't have those handy.

Rotary translation (for future reference) can be easily done with nothing more than a lazy susan bearing, two pieces of plywood and a few holes drilled and a pin to keep the stage from moving.
 

Erie Patsellis

pro member
Really Bart,

A device like this will be a basis for a whole new addiction. Forget the gear photographers use. This will give so much pleasure. Imagine having a motorized version and putting the camera on it to photograph a bug or butterfly with the device advancing every 0.5mm and then stacking the images or else also moving from side to side or rotating and getting 3D models and then sending it for 3D lithography or machining from a block of brass any size you want.

Watch it! Think about snapping pics. One can start with the simplest camera, everyone does, just like getting a digital rebel and one kit lens and within 2 years folk are spending real money on all sort of fancy gear that's absolutely, without question, "needed"!

Me? love things like this. Just got to find why I must have one!


Charles,

First get the advice from this company Bart has discovered and find the simplest device to satisfy your immediate needs. Armed thus, you can now talk to the guys who have thousands of these in stock for resale from companies that have upgraded 10 benches with fancier stages. There's a huge recycling of XYX and rotating stages. These are often made like a jeweled marvelous hand crafted swiss Watch. I love these devices which gives us the feeling that we can actually control things.

When you have the input from the MFR/ primary outlet and the used equipment store, then you can also see what's available privately on the web and from eBay. It just requires the homework in getting your needs right.

  • Size of stage,

  • accuracy of movement,

  • side scale or precision rotatory scale,

  • X and Y controlled or just one axis.

  • Rotation, yes or no.

I'd pick one that allows for adding a rotation stage in the future.

With a motor, BTW, one can do sub-pixel movements to get say 4 overlapping shots (per shot you need) moved only 1/4 pixel with the goal of even better resolution and perhaps color if you can do the math. I'm sure existing software would work!

Asher

Having designed and built custom CNC routers and machines, it can make photography seem downright inexpensive.
 

Asher Kelman

OPF Owner/Editor-in-Chief
Having designed and built custom CNC routers and machines, it can make photography seem downright inexpensive.

True,

But, like photography, a lot of precision stage equipment gets to be on the resale bench as folk upgrade or go out of business! So it's really like deciding to work with a fine Mamiya C330. It's a perfectly made little monster, a gem of a camera, almost perfect lenses and more sellers than buyers!

So with care, one is likely to be able to get a high level of movement accuracy in a perfect plane with only a modest outlay.

Asher
 

Erie Patsellis

pro member
It's too bad Charles doesn't live closer, I have several linear stages from about 4" of travel to about 18" just sitting here waiting for me to decide what to do with them. (I'm thinking a small format, benchtop CNC router for all my "projects")
 

Erie Patsellis

pro member
True,

But, like photography, a lot of precision stage equipment gets to be on the resale bench as folk upgrade or go out of business! So it's really like deciding to work with a fine Mamiya C330. It's a perfectly made little monster, a gem of a camera, almost perfect lenses and more sellers than buyers!

So with care, one is likely to be able to get a high level of movement accuracy in a perfect plane with only a modest outlay.

Asher

True, to a point, but like film photography (and Nikon MF lenses), the recent surge in hobbyist interest has driven prices to where I can build a stage less expensively than buying a used on on Ebay.

Given that this is a spec job, I'd consider the approach I outlined above, for less than $30 or so, you can build a stage accurate enough for your present needs.
 

Asher Kelman

OPF Owner/Editor-in-Chief
I missed this post!!

"1. Making the camera sensor plane parallel with the object. One needs an industrial worm screw driven mounting block, best choice, look for something that might work used on ebay, that just moves only vertically or else the heaviest mother camera pole stand, too expensive at $3500 less $ 0.01 change, LOL! They do come up used too!"

Hey! I have one of those in the studio here at the house, indispensable for stability, especially with the Sinar and RB.

What does it look like? Bought or made at home?

"You certainly don't need a $3000 copy stand (would anyone???)." Well, it depends, shoot 8x10 and larger, tabletop work on 4x5 with a Betterlight (or in my case, a Dicomed FieldPro), and get exposures into the 15 min range and you'll wonder how anybody does without one. In camera multi exposures are another thing I do a lot of (on film, no less) and a stable stand is a prerequisite. (along with a china marker for the ground glass, etc...) I've been looking for an inexpensive MP4 stand for repro work, every time I find one, I'm a day or two late.

For the project at hand, instead of trying to move the camera, it's far easier to linearly move the subject. I'd likely use my Beseler Dual Mode slide duplicator with it's bellows and something around 135mm or so enlarging lens , MH or Halogen microscope fiber optic lighting and a translation stage (bought or adapted) to move the subject laterally under the fixed camera.

Any pics?

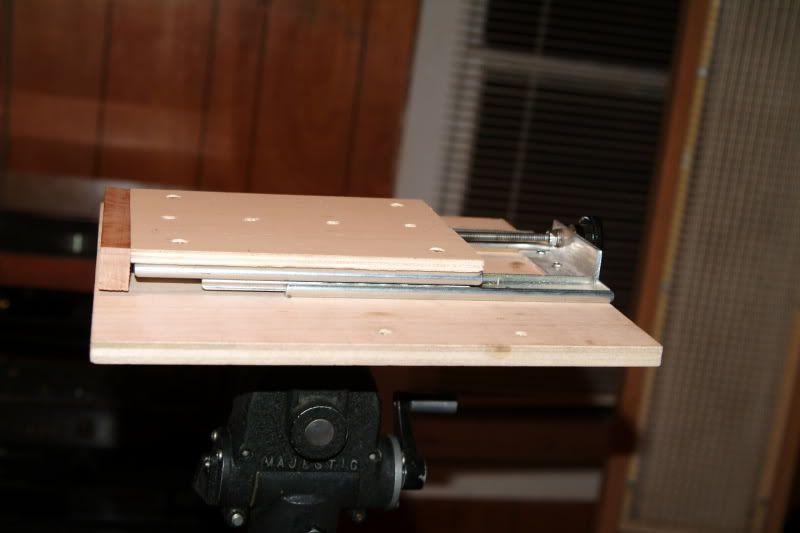
An decent translation stage on a minuscule budget can be made with some scrap plywood, 2 full extension drawer slides, some 3/8" all thread rod, a few hex nuts, a bushing or bearing and a knob or two. One turn of the 3/8-16 all thread is exactly 1/16" movement. If it doesn't make sense to you, I can give you some nudges in the right direction and some pictures of the focusing stage of my 20x24 camera (it will make it very clear and is one of those forehead slapping moments) As my uncle would tell me, while you can move the mountain to Mohamed, sometimes it makes more sense to move Mohamed to the mountain.

Love to see this!

(I have a 1920's 8x10 camera with a split wood base so the worm screw doesn't work!!!)

Of course a better solution would be using the Sinar/Dicomed with a semi silvered mirror to get some frontal lighting, and rear shift to stitch, but you likely don't have those handy.

You have no end of interesting "stuff" handy. I think Charles should move in with you for a while, LOL!

Rotary translation (for future reference) can be easily done with nothing more than a lazy susan bearing, two pieces of plywood and a few holes drilled and a pin to keep the stage from moving.

But what about wobble?

Great ideas here. essentially you agree with me that moving the subject with a fixed camera is thr way to go. I'm interested in the drawer slide solutions and the slap on the head moment!

Asher
 

Erie Patsellis

pro member
I missed this post!!


What does it look like? Bought or made at home?
I bought it used, when there were dozens of them practically given away, I paid $400 for a 12' Cambo UST (same as pictured above) with arm extension, drop arm, Cambo geared head, trays and other accessories. I had to cut the column to 9'6" to fit in the room.

"You certainly don't need a $3000 copy stand (would anyone???)." Well, it depends, shoot 8x10 and larger, tabletop work on 4x5 with a Betterlight (or in my case, a Dicomed FieldPro), and get exposures into the 15 min range and you'll wonder how anybody does without one. In camera multi exposures are another thing I do a lot of (on film, no less) and a stable stand is a prerequisite. (along with a china marker for the ground glass, etc...) I've been looking for an inexpensive MP4 stand for repro work, every time I find one, I'm a day or two late.


Any pics?
I'll have to take some next time I'm shooting here at home. I use the duplicator mostly for quick "scanning" of negatives and slides for several of our studio clients. Amazing what you can do with a 14mp full frame capture, and the throughput is far faster than using a scanner. A few actions is lightroom and you can take an entire directory of files and process them while you get a cup of coffee.
I borrow the light source from a friend when I can, it helps greatly with macro work, I wish I could find one inexpensively used.

Love to see this!

(I have a 1920's 8x10 camera with a split wood base so the worm screw doesn't work!!!)
Here's a quck snap of my 8x10 camera in the process of being built, the drawer slides and screw is clearly visible (I later upgraded to teflon coated lead screw with an acetal nut that I had in my "CNC stuff" scrap box)
DSCF7060.jpg


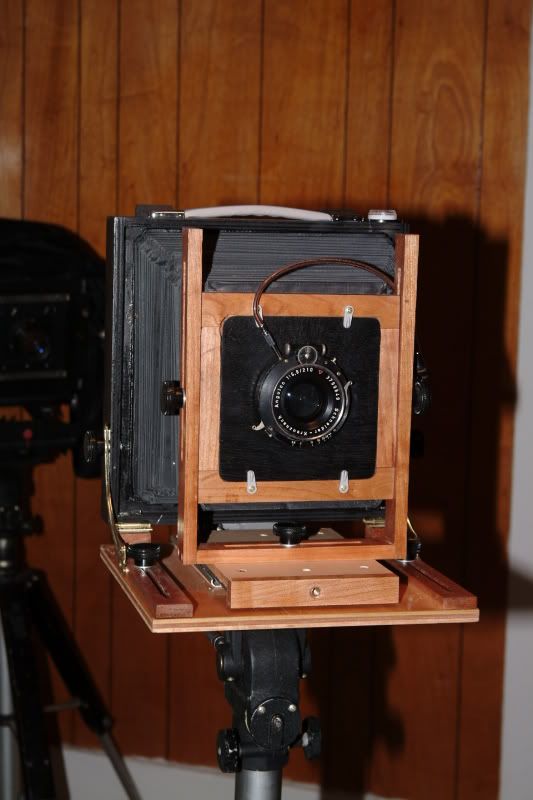
and the finished camera:
DSCF7066.jpg

(Total cost was under $50 sans lens)

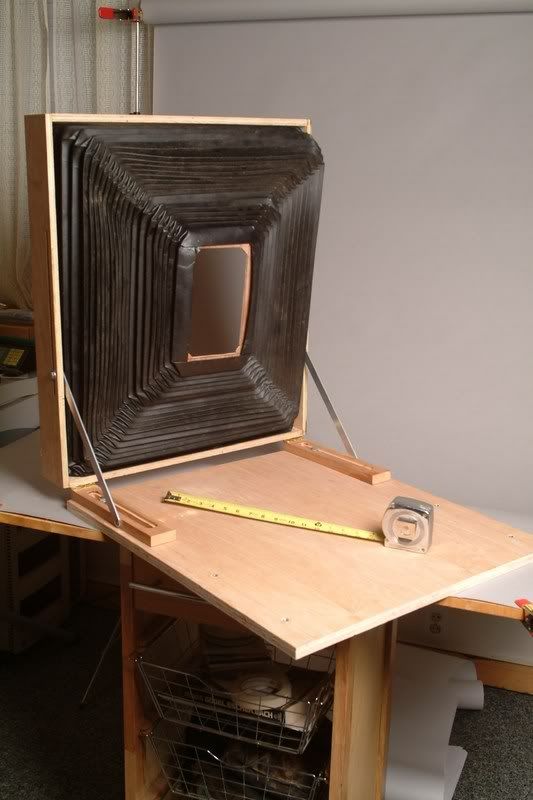
Scaled up a bit for the 20x24 (for scale, note the tape measure):
mini-DSCF7103.jpg


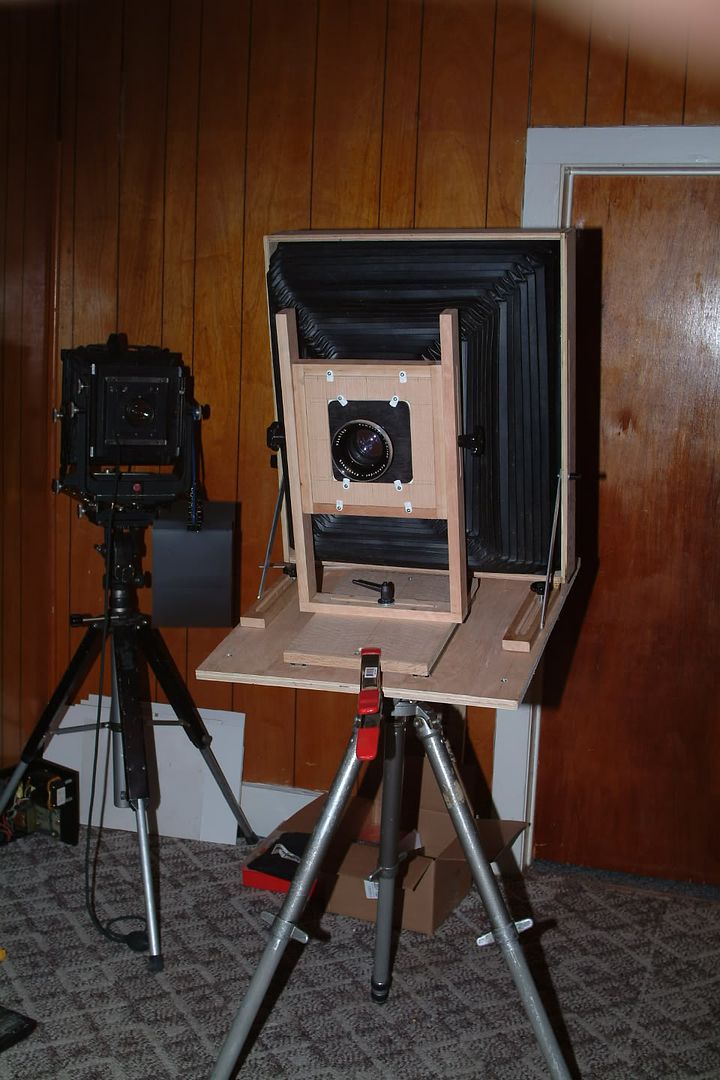
Farther along in the build process, before mounting the lead screw. The lens is a 360 Componon (120mm filter thread)
DSCF7108-1.jpg


You have no end of interesting "stuff" handy. I think Charles should move in with you for a while, LOL!

But what about wobble?
If the force is predominantly downward, the slides are reasonably parallel and the screw isn't bent, there is only smooth linear motion. It is a method used by low buck CNC hobbyists before they figured out that inexpensive (then) linear bearings and stages were available.

Great ideas here. essentially you agree with me that moving the subject with a fixed camera is thr way to go. I'm interested in the drawer slide solutions and the slap on the head moment!

Asher

From a stability standpoint, of course I'd suggest using well sealed MDF instead of plywood and eliminating backlash through careful selection and fitting of parts. But it's eminently doable on even the smallest of budgets if you're willing to be creative and actually get your hands dirty.
 
Some great suggestions and discussion here, thanks for the ideas.
1. The object is too large to move (guitar).
2. I see some promising suggestions for moving the camera with the required degree of precision, but not many for getting the sensor parallel to the object.
The precision stages are exactly what I need, but I don't see a way that they can be affordable.

I think I can "fake" the lateral movement, because repeatability isn't a high priority, and I can "make" a flat enough surface for a reference, but the only solution to the "parallelness" issue seems to be a custom machined plug to replace the lens. Or maybe just micrometer-precision manual measurement from the lens mounting flange?

Sorry if my replies are a bit tardy, but I'm travelling on vacation and don't always have high-speed access.
 

Doug Kerr

Well-known member
Hi, Charles,

I think I can "fake" the lateral movement, because repeatability isn't a high priority, and I can "make" a flat enough surface for a reference, but the only solution to the "parallelness" issue seems to be a custom machined plug to replace the lens. Or maybe just micrometer-precision manual measurement from the lens mounting flange?

Can you not use the mirror technique? You may need to have an assistant hold the mirror against the reference surface of the subject if it is not attractive to adhere it.

If you have the camera on a focusing slide, then you can check for parallelism not with a micrometer (it would have to be an "inside" one) but rather any rod of suitable length, testing in three places around the face of the lens mount flange. Once parallelism is attained, it will prevail when the camera is then racked along any axis.

You should in fact be able to use any old lens as the "plug" - I doubt if there is any substantial departure from parallelism of the front face of the filter ring.

The secret to all this is a nice x-y-z mount, or if that is not economical, an x-y mount atop a tripod with a nice column elevator. Something like the Adorama x-y mount would probably do (of course that is $180.00).

http://www.adorama.com/MCFRS.html

Best regards,

Doug
 
Hi, Charles,


-snip-

You should in fact be able to use any old lens as the "plug" - I doubt if there is any substantial departure from parallelism of the front face of the filter ring.

The secret to all this is a nice x-y-z mount, or if that is not economical, an x-y mount atop a tripod with a nice column elevator. Something like the Adorama x-y mount would probably do (of course that is $180.00).

http://www.adorama.com/MCFRS.html

Best regards,

Doug

The x-y-z mount looks good. I'll book mark that one for future reference. Thanks for the idea of using an old lens - sounds like a good use for the broken 50mm ;-)

<Chas>
 

Asher Kelman

OPF Owner/Editor-in-Chief
Some great suggestions and discussion here, thanks for the ideas.
1. The object is too large to move (guitar).
2. I see some promising suggestions for moving the camera with the required degree of precision, but not many for getting the sensor parallel to the object.
The precision stages are exactly what I need, but I don't see a way that they can be affordable.

I think I can "fake" the lateral movement, because repeatability isn't a high priority, and I can "make" a flat enough surface for a reference, but the only solution to the "parallelness" issue seems to be a custom machined plug to replace the lens. Or maybe just micrometer-precision manual measurement from the lens mounting flange?

Sorry if my replies are a bit tardy, but I'm travelling on vacation and don't always have high-speed access.


Charles, if it's as big as a guitar. you can place a board on 4 rollers and have the board limited from side to side with 2 vertical planks so the moving platform can only go in one direction. Below the platform add a rotating worm, screw drive made from a super long threaded bolt so that as you turn the bolt, it will precisely move your guitar forward with mm precision. So that's just one direction. to get 2 axis movement, requires you to have a sliding draw on the platform so it slides 90 degrees to the lower axis. Again, the distance moved can be set by rotating a long bolt X number of turns. This system could be built for under $200 and be very accurate.

Getting the sensor plane accurately parallel is a separate matter.

Asher
 
Top