• Please use real names.

    Greetings to all who have registered to OPF and those guests taking a look around. Please use real names. Registrations with fictitious names will not be processed. REAL NAMES ONLY will be processed

    Firstname Lastname

    Register

    We are a courteous and supportive community. No need to hide behind an alia. If you have a genuine need for privacy/secrecy then let me know!
  • Welcome to the new site. Here's a thread about the update where you can post your feedback, ask questions or spot those nasty bugs!

Grayscale images appear brighter in Photoshop than after exporting...

Nick Masson

New member
Hey all,
So another techie question i'm hoping someone might be able to help with...

I've been going over a few test BW negs that I have had scanned, and I am a little puzzled by what happens after editing in photoshop. I got my images looking the way I liked them, but after exporting the image and opening it in a generic image viewer, all of the images seemed darker than in photoshop. When I open the image (after export) in photoshop, however, it appears to not have changed. This leads me to believe that a generic photoviewer is lacking in some way relative to how photoshop views the image.

In as far as specs, I edited the images as either 8bit or 16bit images, scanned as TIFF. I exported the images as jpeg and TIFF. Both appear darker when viewed in an application outside of photoshop.

Really my main concern is being able to correlate the digital image to what it will be after printing (screen calibration aside -- to trust photoshop or not?)...

Thanks for any insight.
-Nick
 

Asher Kelman

OPF Owner/Editor-in-Chief
Hello Nick!

Tell us what color space you are in? The export function is something I never use. The generic viewer must be assigning it a new color space. Go to Edit menu and go down the list drop-down menu and see what color space you are in. The order I use is to save my PSD file as .psd, .psb or .tif and then also make a smaller version and choosing the sRGB color space but converting to that color space, never assigning it. Now SAVE AS and choose jpg. It likely will appear correct in your viewer!

Asher
 

Mike Shimwell

New member
Also, are you scanning in grayscale or in rgb. Photoshop treats each slightly differnetly for editing purposes and I would be surprised if the applied output profile on export is not waht the external viewer expects.

It's basically a colour management problem.

MIke
 

Nick Masson

New member
Hello Mike and Asher -- thanks for the reply!

Mike: I was scanning images with TIFF as the output format...

Asher: I was actually not using the 'export' function; sorry for the slip of tongue. (I use 'export' in lightroom...). Here I was using 'save as' and saving as .jpeg from the .psd file that I work in. It seems that the tones are preserved if I convert the image to sRGB before saving, whereas if I keep it in grayscale the generic viewer displays it darker. So the generic viewer read the .jpeg expecting sRGB then? So I should always convert to sRBG before saving .jpeg files from grayscale?

If you wouldn't mind elaborating on the difference between 'forcing' and 'converting' color spaces that would be great. I think what I am doing is forcing... When I force (?) I just change from grayscale to sRGB in 'Image > Mode' from the Photoshop toolbar. To convert, it seems I would use 'Edit > convert to profile' and chose sRGB? My intuition is that doing the previous action has photoshop map an assumed grayscale space on to sRBG. Using 'convert to profile' will have photosphop go from your current workspace, whatever it should be, to your desired destination workspace... So it is best to to this?
As far as workflow goes, is it usually best to have a document automatically converted to a specific workspace, or is it generally okay to work in whatever workspace is embedded. I assume that, as long as photoshop recognized the embeded workspace, it doesn't matter since it will be correctly converted later on...

I've always just worked with .raw and then used lightroom to export in .jpeg. Now that i'm working with BW I find that I really need to know how to work/deal with color-spaces so I can get the outcome I anticipate...

Thanks for all the insight; I really appreciate all the knowledge...
-NICK
 

Doug Kerr

Well-known member
Hi, Nick,

When you scanned those negs, was the working space in PS a grayscale space (and if so which one - there are a couple), or was it just a grayscale-only image in, for example, the sRGB space?

Best regards,

Doug
 

Asher Kelman

OPF Owner/Editor-in-Chief
Hi, Nick,

When you scanned those negs, was the working space in PS a grayscale space (and if so which one - there are a couple), or was it just a grayscale-only image in, for example, the sRGB space?

Doug,

Of course, we don't know which it is. I'd assume it was in and RGB color space! Whatever it was, he corrected it to look right on his screen, which is another color space.

Asher
 

Mike Shimwell

New member
Hi, Nick,

When you scanned those negs, was the working space in PS a grayscale space (and if so which one - there are a couple), or was it just a grayscale-only image in, for example, the sRGB space?

Best regards,

Doug


I understand from Nick's comment that he has scanned into a grayscale space - likely with a different Gamma from the sRGB space.

Nick grayscale only has one channel (i.e. gray) and a Gamma (effectively a tone curve) associated. MOving to RGB has the three colour channels (each will have the same value at any point for a grayscale image) and a Gamma function. If the Gamma functions are different then the eternal viewer is unlikely to recognise this as it may not be colour space aware. Hence the need to convert to sRGB before export. (There may be other issues if you have a wide gamut monitor...)

Practically, using mode to move to the RGB space instead of grayscale will embed your normal working space in the image. It sounds like this is set up as sRGB, which is fine for mono output and most external viewers will default or simply imply htis in their behaviour.

Mike
 
It seems that the tones are preserved if I convert the image to sRGB before saving, whereas if I keep it in grayscale the generic viewer displays it darker. So the generic viewer read the .jpeg expecting sRGB then? So I should always convert to sRBG before saving .jpeg files from grayscale?

Hi Nick,

I suspect, like Mike does, that it has it do with your Photoshop "Edit|Color settings", in particular the Workingspace profile choices for RGB and Grayscale. For mode changes that preserve the tonalities you want to select profiles with a similar gamma. If your RGB working space is Pro Photo RGB which is a gamma 1.8 colorspace, you should also select a Gray gamma 1.8 profile. For Adobe RGB color space that would become a Gray gamma 2.2 color space.

That will allow to switch mode between a 3 channel RGB and a single channel grayscale mode without changing the overall brightness.

You would then typically "convert to" sRGB colorspace for web output as a final step.

Cheers,
Bart
 

Nick Masson

New member
Thanks guys! To answer a few questions, and from what best I understand:
I used 'viewscan' to scan the negative under 'bw negative' setting, exporting as a tiff. When I opened the tiff in photoshop, the mode was preset at grayscale. Now, as for what working space exactly...

Under my 'color settings' I have 'use embedded workspace' selected for grayscale, CMYK and RGB, and I didn't change that when I worked on the photo to get it to where I wanted it. When I did 'convert to profile' and sellected 'sRGB', the dialog box that popped up indicated that I was going from "source: grayscale dot gain 20%" to "destination: RGB sRGB...", so I assume that means that the embedded workspace that photoshop was using is grayscale dot gain 20% (would someone mind explain what the different 'dot gains' mean; I have a handle on gamma, but I don't know what dot gain is...).

Furthermore, when I experimented and converted the image in its current workspace to 'grayscale dot gain 20%' there was no chance, so this reinforces my assumption that the embedded workspace, and the one in which I did my editing, was grayscale 20%.

At the end of the day, it doesn't matter what workspace I do my editing in, right? As long as I make sure that Photoshop maps from this workspace to my desired output workspace. Even if I work in a workspace of gamma 1.8 and convert to adobe RGB which is 2.2, if I tell photoshop to 'convert' rather than 'force' it, then it should do the math and preserve the tonalities. Is that correct?

I suppose my monitor's color setup matters somewhere here...? My mac OSX partition is set up with a gamma around 2.2, so perhaps that is why the grayscale image saved as dot gain 20% seemed much darker? I believe my printing lab uses sRGB as their color space for printing images. I should probably look into having my monitor's color profile also match this space so images saved as sRGB print the way they look. Right now my mac partition and my windows partition both have, I think, their own factory calibrations, but I suspect there are some changes I can make without investing in an expensive monitor calibration tool that would also help... But for BW images I guess workspace image gamma > monitor gamma is all that really matters for tonal accuracy, hun?

Cheers,
-NICK
 

Doug Kerr

Well-known member
Hi, Nick,

Thanks guys! To answer a few questions, and from what best I understand:
I used 'viewscan' to scan the negative under 'bw negative' setting, exporting as a tiff. When I opened the tiff in photoshop, the mode was preset at grayscale. Now, as for what working space exactly...

Under my 'color settings' I have 'use embedded workspace' selected for grayscale, CMYK and RGB, and I didn't change that when I worked on the photo to get it to where I wanted it. When I did 'convert to profile' and sellected 'sRGB', the dialog box that popped up indicated that I was going from "source: grayscale dot gain 20%" to "destination: RGB sRGB...", so I assume that means that the embedded workspace that photoshop was using is grayscale dot gain 20%
Yes, that is what that would seem to mean.

(would someone mind explain what the different 'dot gains' mean; I have a handle on gamma, but I don't know what dot gain is...).

Basically, this means that the color space tries to outfox the fact that in halftone printing, the dots "swell" a little and so the average luminance is not what we might expect from the "geometry". But there is a lot about that I don't understand well.

Furthermore, when I experimented and converted the image in its current workspace to 'grayscale dot gain 20%' there was no chance, so this reinforces my assumption that the embedded workspace, and the one in which I did my editing, was grayscale 20%.

Makes sense to me.

At the end of the day, it doesn't matter what workspace I do my editing in, right? As long as I make sure that Photoshop maps from this workspace to my desired output workspace. Even if I work in a workspace of gamma 1.8 and convert to adobe RGB which is 2.2, if I tell photoshop to 'convert' rather than 'force' it, then it should do the math and preserve the tonalities. Is that correct?
I would think so (but I'm not too expert in that aspect of things).

Best regards,

Doug
 

Doug Kerr

Well-known member
Some random additional thoughts. Maybe these will pile onto the info in hand to help the answer come to the surface.

By the way, I am not a heavy Photoshop user, and I don't have Photoshop on the laptop I have with me on this trip.

1. If the working space was set to "use embedded profile", and it in fact means that, note that there is a difference between a color space profile for which an image is tagged and a color space profile actually embedded in the image. The former just declares the color space under which the image should be interpreted, while the latter (also) makes the definition of the color space available to a "profile aware" receiving application that might not have the profile for the declared color space in its "library".

If none is embedded, Photoshop might use some default.

2. The different grayscale color spaces indeed have different values of "gamma" but in the case of the "dot gain" grayscale color spaces there is more to it than that.

3. Indeed a "generic" viewer will probably assume that the color space of the file presented to it is sRGB.

Best regards,

Doug
 

Jerome Marot

Well-known member
In Photoshop, click "edit", then "convert to profile" and tell us what is written under "source space". Presumably, to fix your problem, choose "sRGB IEC61966-2.1" as your destination space, click "convert" and save.
 

Nick Masson

New member
Yes, the 'source space' is in dot gain 20%; I assume that is the default grayscale color-space of the scanner.
In a nutshell, everything appears to be alright if I do a proper mapping of grayscale to sRGB. The generic viewer just doesn't know how to properly read the grayscale TIFF/JPEG file... but in properly mapped sRGB it is fine.

Thanks for all the feedback!
 

Doug Kerr

Well-known member
Hi, Nick,

Yes, the 'source space' is in dot gain 20%; I assume that is the default grayscale color-space of the scanner.
In a nutshell, everything appears to be alright if I do a proper mapping of grayscale to sRGB. The generic viewer just doesn't know how to properly read the grayscale TIFF/JPEG file... but in properly mapped sRGB it is fine.
Glad it worked out.

Now that I'm back home and have my own Photoshop to play with, I am trying to figure out all the pieces of this.

What was your working grayscale color space set to? You mentioned "preserve embedded profiles", but that is not a working color space choice - it is a color management policy option. But it might mean essentially the same thing if there was an embedded profile.

But if there was none, then presumably the working color space choice itself would come into effect.

I believe that you said the scanner was operated under VueScan. In that case, it is VueScan which generates the TIFF file, not the scanner per se (it never generates a file), and the output color space is presumably "worked" by VueScan (and if a profile for that space is embedded, presumably VueScan does that).

But I don't remember much about how VueScan works (I have not ever really used it). Is there a setting in it for the color space to be used for the output file? A setting as to whether or not to embed the profile for that color space?

Thanks.

Best regards,

Doug
 

Doug Kerr

Well-known member
Hi, Nick,

Yes it seems (from the VueScan 9 manual) that in VueScan 9 we can:

• Choose the color space to be used for an output file (e.g., TIFF or JPEG) (but only in the Professional Edition - I don't know what happens otherwise)
• Choose whether to not to embed the applicable color profile in a TIFF (or JPEG) output file.

Best regards,

Doug
 

Asher Kelman

OPF Owner/Editor-in-Chief
Happy ending. Now I hope you'll share the scans and tell us about your scanner and how good it is for the shadows and highlights. You might be able to scan for one then the other and combine then subsequently.

Asher
 

Nick Masson

New member
Hi Doug: The working space when I did the grayscale editing was dot gain 20. I didn't set that when I originally opened the file, so I assume that it was embedded in the TIFF and photoshop recognized it (as I have the 'preserve embedded files' selected in the 'color management'). Alternatively photoshop could have assigned it a default grayscale color space. I'll be certain to check what is selected as the output type next time I scan with VueScan.

Asher: I would certainly be happy to post a few photos. I am actually waiting for a used scanner in the mail so I can do some work here at home. The photos which prompted this thread I made at my University, but the scanner is technically for academic work only, so I won't have the privilege of prolonged use (CoolScan 5000 w/VueScan). I will shortly have a Canon FS4000US and plan to use VueScan. I don't expect the scans to be as good, but the price was right, and this should suffice for the time-being (for web applications at least) while I hunt down an old Minolta Dimage Scan Elite 5400.

Cheers!
-NICK
 

Asher Kelman

OPF Owner/Editor-in-Chief
I will shortly have a Canon FS4000US and plan to use VueScan. I don't expect the scans to be as good, but the price was right, and this should suffice for the time-being (for web applications at least) while I hunt down an old Minolta Dimage Scan Elite 5400.

Hi Nick,

You will be happy with the Canon FS4000US, at least for a good while, Vuescan. My view is that for a picture you are going to sell, get a high level scan done professionally and save the big bucks!

Good luck!

Asher
 

Jerome Marot

Well-known member
Dot gain 20% is more or less the most used profile for B&W images. Apparently your generic viewer does not recognize it or not properly.
 

Doug Kerr

Well-known member
Hi, Nich,

Hi Doug: The working space when I did the grayscale editing was dot gain 20. I didn't set that when I originally opened the file, so I assume that it was embedded in the TIFF and photoshop recognized it (as I have the 'preserve embedded files' selected in the 'color management'). Alternatively photoshop could have assigned it a default grayscale color space.
I suspect it is the latter.

I don't think that when PS honors an embedded color space it changes the color space setting seen in Color Settings. But I'm not sure.

Thanks.

Best regards,

Doug
 

Doug Kerr

Well-known member
Hi, Jerome,

Dot gain 20% is more or less the most used profile for B&W images.
I didn't know that. That's good to know.

Is it likely that this is the Photoshop "factory default" grayscale working space setting? (I had changed that once for some special purpose and don't remember what I changed it from.)

Best regards,

Doug
 

Leonardo Boher

pro member
That's because you're using different color spaces among applications. Set Photoshop to the same color space than used in the other applications and problem solved.

Make sure you're not previewing other colors spaces/profiles as well.

Leo :)

PS: regarding this: "This leads me to believe that a generic photoviewer is lacking in some way relative to how photoshop views the image" try another viewer that allows color management, such as ACDSee if you're in Microsoft Windows.

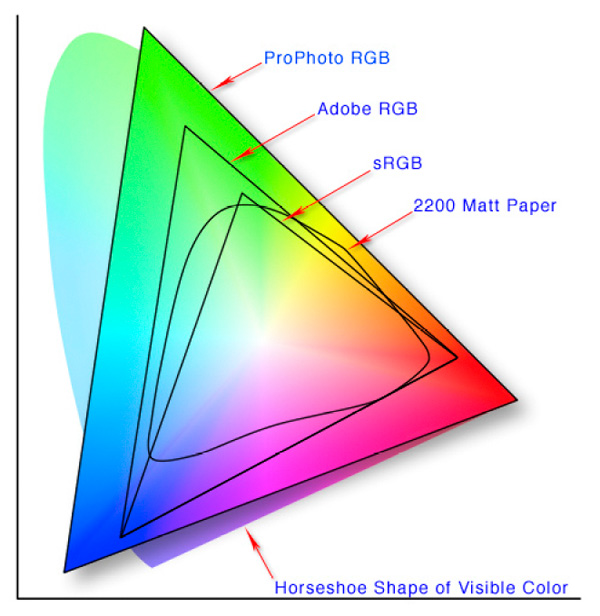
PS 2: regarding "forcing" the image, it doesn't happens when converting from grayscale to sRGB because grayscale has less tones than the sRGB profile. Forcing occurs when converting from a wider color profile/space to a lower one, like converting from ProPhoto RGB to sRGB but not when doing it from sRGB to ProPhoto (see this chart):

-2.jpg


For converting, just make sure you're not assigning, just converting among profiles by going to Edit/Covert Profile and selecting Relative Colorimetric as shown in the image below:

ConvertToProfile28x6.jpg


This will convert from a profile to another by matching colors and changing color IDs respectively. Assigning colors does the opposite: changes colors but it keeps the colors IDs.
 

Leonardo Boher

pro member
Hi, Jerome,


I didn't know that. That's good to know.

Is it likely that this is the Photoshop "factory default" grayscale working space setting? (I had changed that once for some special purpose and don't remember what I changed it from.)

Best regards,

Doug

That's the default PS setting, Doug. Command+Shift+K will take you to the PS Color Settings if you need to change something there.

My personal experience showed me that's better to convert the color profile of an image to the color profile used in the printing shop in order to get accurate results, whichever is a gray scale image or not. I have printed some gray scale images in Adobe RGB 1998 (16 bit files) on a Epson 9900 with Ultrachrome inks on Epson Glossy Photopaper and it looks amazing, in colors is just breathless. Any picture looks like 10 times better than on screen, which of course, screen already kills lot of tones. HDR Inks are the lead, actually. The vividness of colors are also much, much beyond screen limits. A must!

Leo :)
 
Top