David A. Goldfarb
New member
I'm experimenting with some food photography, which I've never done much of before, so I thought I'd start a diary that I'll confine to a single thread, just adding new images as I make them, along with some notes about the process and a self-critique. I'd be interested in more feedback on the images.
15 December 2007--Pureed pears
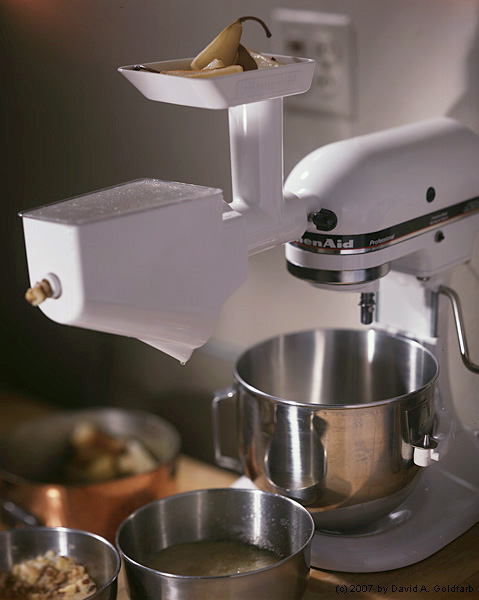
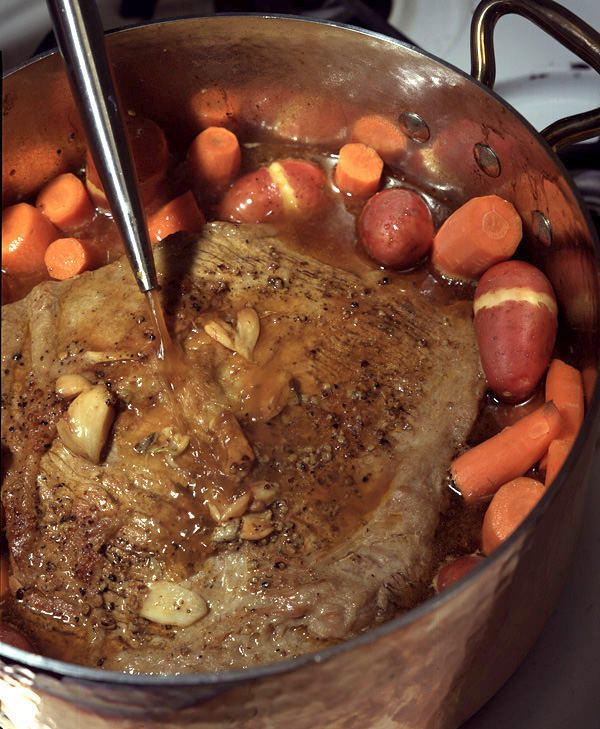
I thought I’d start this with something simple to prepare, so that I could concentrate on photography. Pears, quartered and steamed for about 20 minutes, then run through the KitchenAid fruit and vegetable strainer attachment. Our one-year-old son loves them for breakfast. I wanted to show the steamed fruit in the pot, piled in the food tray, in the bowl after pressing, and I wanted to show how the KitchenAid separates the flesh from the stems, seeds, and peels.
The project proved not to be so simple visually. The pears in the feed tray were one still life, the mixer was a product shot, the bowls and the pot formed another composition, and it all had to work as a unified composition. To keep the waste peels coming out, I had to embed a toothpick in the tube of pomace as it emerged. I knew there would be some reflections to control, so I tried to position the camera so the bowls would reflect the other bowls and the wooden countertop.
My first observations--Food photography is hard work. It’s difficult for most people to imagine what goes into what seems to be the dumbest rendering of a burger, fries, and a drink. Controlling lighting, styling of the food, composition of the image, the shape of objects in the frame, is all a lot to think about, and usually involves a team of several people, but for now, I’m a team of one. And yes, after a four-hour still life shoot, a backache is to be expected.
I’m shooting in 8x10” using an old Sinar P that I bought for a fraction of its original price from a busy New York food studio. They kept it in good working order with new parts and it has a custom long bellows suited for still life work. It would be easier to shoot digital or a smaller format, but there’s nothing quite like a big slide on the light table, so I want to work in this medium, and to produce a portfolio of 8x10” transparencies. I like to cook, so I’m emphasizing food preparation. If I decide to try doing this professionally, there’s probably more money in the burger and fries, but I’d rather illustrate cookbooks.
I wanted to keep the lighting uncomplicated, but not soft, so I used a Norman 10” fresnel spot strobe head as the main light and a regular head in a plain 5” reflector with barndoors bounced off a 36” white reflector disk as the fill. I wanted the hard spot to provide some translucency in the pears on top and to show the texture of the puree. The lens--a classic Voigtländer 36cm/f:4.5 Heliar would balance the hardness of the light with some “Heliar glow.” With selective focus, the Heliar also gives a good sense of three-dimensionality. My goal here is food as a subject, large color transparencies as the medium, in the lighting style of classic Hollywood portraiture.
At first I was worried about shooting too many Polaroids, but after two-and-a-half hours of setup and composition on the groundglass before making the first exposure, $14 for a test shot seemed trivial. I made four of them for this shot.
In the first Polaroid I found too many distracting elements. I want the photographs to look natural like they are happening in a real working kitchen, as they are, but in practice, even a neat kitchen looks cluttered in a still photograph where the viewer has time to dwell on the scene, so the ice cream maker and extra wires in the background had to go. I also needed more controlled fill, so I adjusted the barndoors on the fill, so that some of the fill would be reflected from the reflector disk, and some would be overspill directly from the light. The first shot was also a bit overexposed.
The second shot was too dark, but now I had a big empty space where the irrelevant ice cream freezer was, so I moved the copper pot of steamed pears to the other side. By the third things were falling into place, but I still had an unattractive electrical outlet panel in the background. This I couldn’t eliminate without setting up a new background, which I didn’t really have time for on this shoot, but I could shoot at a wider aperture to throw it more out of focus, which would also make the shot a little brighter, as it needed to be. With the wider aperture, I wasn’t able to keep everything in focus that I wanted to be, so I let the fruit waste fall a little out of focus, since it isn’t so attractive anyway. The drop of juice from the strainer was unplanned, but worked out nicely. I realized I should have had more pears to make a bigger pile in the pot and more puree in the bowl to create a better sense of abundance, but, I had what I had.
The fourth worked, but I would have liked to have kept the verticals slightly more parallel, which I couldn’t do while keeping everything I wanted in focus. The puree needs more light. I didn’t have time to work in another light, but if I did, I would have added another light with a narrow snoot just on the puree. In retrospect, I think I also should have just used a more diffuse fill, rather than letting some of the direct light from the fill spill over, which got some light where it was needed but also produced harder reflections on the steel bowls than I would have wanted. There is also a stray reflection visible over the electrical outlet in the background, which I misjudged as a Polaroid artifact in the test shots, but later realized that it was on all four Polaroids, so it was obviously a lighting problem.
I shot the final transparencies on some past-date, but frozen Fuji Astia. I’ve tested this batch and I rate it at EI 80--same as Polaroid Type 809--and use an 81A filter, since it tends naturally toward the cool side. I made two exposures at f:11and f:9 since transparency film can have a range of “correct” exposures that have different tonalities. I probably should have run two more sheets at f:16 and 22 just to see how they really looked on film. Judging from the transparency, a little more DOF might have been a good thing.
15 December 2007--Pureed pears
I thought I’d start this with something simple to prepare, so that I could concentrate on photography. Pears, quartered and steamed for about 20 minutes, then run through the KitchenAid fruit and vegetable strainer attachment. Our one-year-old son loves them for breakfast. I wanted to show the steamed fruit in the pot, piled in the food tray, in the bowl after pressing, and I wanted to show how the KitchenAid separates the flesh from the stems, seeds, and peels.
The project proved not to be so simple visually. The pears in the feed tray were one still life, the mixer was a product shot, the bowls and the pot formed another composition, and it all had to work as a unified composition. To keep the waste peels coming out, I had to embed a toothpick in the tube of pomace as it emerged. I knew there would be some reflections to control, so I tried to position the camera so the bowls would reflect the other bowls and the wooden countertop.
My first observations--Food photography is hard work. It’s difficult for most people to imagine what goes into what seems to be the dumbest rendering of a burger, fries, and a drink. Controlling lighting, styling of the food, composition of the image, the shape of objects in the frame, is all a lot to think about, and usually involves a team of several people, but for now, I’m a team of one. And yes, after a four-hour still life shoot, a backache is to be expected.
I’m shooting in 8x10” using an old Sinar P that I bought for a fraction of its original price from a busy New York food studio. They kept it in good working order with new parts and it has a custom long bellows suited for still life work. It would be easier to shoot digital or a smaller format, but there’s nothing quite like a big slide on the light table, so I want to work in this medium, and to produce a portfolio of 8x10” transparencies. I like to cook, so I’m emphasizing food preparation. If I decide to try doing this professionally, there’s probably more money in the burger and fries, but I’d rather illustrate cookbooks.
I wanted to keep the lighting uncomplicated, but not soft, so I used a Norman 10” fresnel spot strobe head as the main light and a regular head in a plain 5” reflector with barndoors bounced off a 36” white reflector disk as the fill. I wanted the hard spot to provide some translucency in the pears on top and to show the texture of the puree. The lens--a classic Voigtländer 36cm/f:4.5 Heliar would balance the hardness of the light with some “Heliar glow.” With selective focus, the Heliar also gives a good sense of three-dimensionality. My goal here is food as a subject, large color transparencies as the medium, in the lighting style of classic Hollywood portraiture.
At first I was worried about shooting too many Polaroids, but after two-and-a-half hours of setup and composition on the groundglass before making the first exposure, $14 for a test shot seemed trivial. I made four of them for this shot.
In the first Polaroid I found too many distracting elements. I want the photographs to look natural like they are happening in a real working kitchen, as they are, but in practice, even a neat kitchen looks cluttered in a still photograph where the viewer has time to dwell on the scene, so the ice cream maker and extra wires in the background had to go. I also needed more controlled fill, so I adjusted the barndoors on the fill, so that some of the fill would be reflected from the reflector disk, and some would be overspill directly from the light. The first shot was also a bit overexposed.
The second shot was too dark, but now I had a big empty space where the irrelevant ice cream freezer was, so I moved the copper pot of steamed pears to the other side. By the third things were falling into place, but I still had an unattractive electrical outlet panel in the background. This I couldn’t eliminate without setting up a new background, which I didn’t really have time for on this shoot, but I could shoot at a wider aperture to throw it more out of focus, which would also make the shot a little brighter, as it needed to be. With the wider aperture, I wasn’t able to keep everything in focus that I wanted to be, so I let the fruit waste fall a little out of focus, since it isn’t so attractive anyway. The drop of juice from the strainer was unplanned, but worked out nicely. I realized I should have had more pears to make a bigger pile in the pot and more puree in the bowl to create a better sense of abundance, but, I had what I had.
The fourth worked, but I would have liked to have kept the verticals slightly more parallel, which I couldn’t do while keeping everything I wanted in focus. The puree needs more light. I didn’t have time to work in another light, but if I did, I would have added another light with a narrow snoot just on the puree. In retrospect, I think I also should have just used a more diffuse fill, rather than letting some of the direct light from the fill spill over, which got some light where it was needed but also produced harder reflections on the steel bowls than I would have wanted. There is also a stray reflection visible over the electrical outlet in the background, which I misjudged as a Polaroid artifact in the test shots, but later realized that it was on all four Polaroids, so it was obviously a lighting problem.
I shot the final transparencies on some past-date, but frozen Fuji Astia. I’ve tested this batch and I rate it at EI 80--same as Polaroid Type 809--and use an 81A filter, since it tends naturally toward the cool side. I made two exposures at f:11and f:9 since transparency film can have a range of “correct” exposures that have different tonalities. I probably should have run two more sheets at f:16 and 22 just to see how they really looked on film. Judging from the transparency, a little more DOF might have been a good thing.