• Please use real names.

    Greetings to all who have registered to OPF and those guests taking a look around. Please use real names. Registrations with fictitious names will not be processed. REAL NAMES ONLY will be processed

    Firstname Lastname

    Register

    We are a courteous and supportive community. No need to hide behind an alia. If you have a genuine need for privacy/secrecy then let me know!
  • Welcome to the new site. Here's a thread about the update where you can post your feedback, ask questions or spot those nasty bugs!

Bracketing to Grasp Wide Dynamic Range Scenes: What's Your Approach?

Klaus Esser

pro member
asiaroom_preview.jpg


Photo © Karsten Schneeberger​

The first 2 posts are copied from Karsten's original thread in Panorama, here, to kick off a further discussion of bracketing. Asher


....................
This was my workflow:

1. Processing all the raw Olympus files with Olympus Studio
2. Photomatix made one picture out of the three ISO bracketed exposures
3. PTgui Pro made on pano out of 36 pictures
4. USM in Photoshop, converting to sRGB
5. Pano2VR finally processed the flash file

Because of this pano I upgraded to a 8-core Mac Pro. All the errors have been driving me almost insane, when I first used xp64, vista64 and ubuntu64 with APP.

My current APP version is still 1.4.2... should I try the beta version?

Karsten

Hi Karsten!

Use bracketing at -2/0/+2 and make HDR and tonemap in Photomatix FIRST. After you have got tonemapped TIFFs or JPGs stitch them in APP.
You also can stitch 3 bracketed layers as TIFFs and make them HDR and tonemap them in Photomatix afterwards.

I can´t imagine why your pano should make problems in APP . .
3x12 pictures isn´t really much stuff. I had about 240 pictures in a pano - using a 4 years old Mac G5 with 8GB RAM and 2x2GHz processors.

The current Alpha2 of APPG uses the GPU additionally - that´s a real speedup on Intel-Macs or PCs.

best, Klaus

P.S.: in my pano "CanGabriel" i had extremely bright light outside. To get a smooth inside i used -2/0/+2 bracketing and made them HDR first, tonemapped them and stitched them in the end.

I´m not familiar with the 1.9APP vcersion - but i doubt the HDR- resp. tonemap-tools would be better than the adjustments in Photomatix!
 
Last edited by a moderator:

Daniel Buck

New member
Hi Karsten!

Use bracketing at -2/0/+2 and make HDR and tonemap in Photomatix FIRST. After you have got tonemapped TIFFs or JPGs stitch them in APP.
You also can stitch 3 bracketed layers as TIFFs and make them HDR and tonemap them in Photomatix afterwards.

I can´t imagine why your pano should make problems in APP . .
3x12 pictures isn´t really much stuff. I had about 240 pictures in a pano - using a 4 years old Mac G5 with 8GB RAM and 2x2GHz processors.

The current Alpha2 of APPG uses the GPU additionally - that´s a real speedup on Intel-Macs or PCs.

best, Klaus

P.S.: in my pano "CanGabriel" i had extremely bright light outside. To get a smooth inside i used -2/0/+2 bracketing and made them HDR first, tonemapped them and stitched them in the end.

I´m not familiar with the 1.9APP vcersion - but i doubt the HDR- resp. tonemap-tools would be better than the adjustments in Photomatix!

You don't need to do -2/0/+2 if you just have areas that are to bright. You'd be better off doing -4/-2/0 to get as much highlight detail as you can :)
 

Asher Kelman

OPF Owner/Editor-in-Chief
I'm interesting in other favorites strategies for bracketing and also for extending the range of bracketing further. How does one get around the limit of 3 exposures on most cameras?

Asher
 

Bill Miller

New member

Daniel Buck

New member
Agree with Bill, either do it manually, or hook up a laptop and there is software available that will do brackets larger than what the camera is nativity capable of doing.

As for the number of brackets, and how far apart, that really depends on how much extra detail you need. Mathematically, the ideal solution would be 1-stop increments for maximum retention of pixel data. We did some tests on this at work, showing virtually no difference between 1/3, 2/3, and 1/1 stop increments. 2/1 and 3/1 were quite acceptable, but viewing through various mathematical filters, 1/1 stop increments was slightly (or more) better. That said, 2 or 3 stops is no crime at all if you just care about being visually good, and will probably not be noticed over 1/1 stop increments. Our tests were for full lighting HDRs, not tonemapping, tonemapping results may be different, if that's what you are after. Our goal was maximum floating-point light data in an HDR/EXR file format, so that the light cast from the HDR file would match the actual light present as good as possible. Not crushed down 16 or 8 bit tone mapped hdrs where the visual result is all that is needed.

When I'm shooting HDR files for lighting and reflections in 3d, Ideally I want to capture all of the highlights (the sun, studio-lights, or any other sources of light) so that in my darkest exposure, the brightest point of light is less than a value of 255 on the 0-255 RGB scale. For the sun, this usually requires ND filters since most digital cameras are limited to an ISO of 100, shutterspeed of 1/8000th, and lenses often are limited to f22 or so. Getting mid-day sun to be less than 255 requires a few additional stops of ND.

That said, if you just need an additional few stops in your scene, one or two additional shots exposed 2 or 3 stops darker than your original shot, will usually do the trick. I personally don't like using tone-mapping to get my highlight detail, I prefer to blend by hand, it usually ends up looking much more natural. I have do to this quite often, because I like shooting black cars, and a well exposed black car can often render parts of the environment brighter than the camera can handle, particularly when shooting into a sunset (which also happens to be one of my favorite ways to shoot!) When shooting the black cars, I can usually get away with doing just one additional shot, 2 or 3 stops darker than my hero exposure, and blend by hand.
 

Asher Kelman

OPF Owner/Editor-in-Chief
Agree with Bill, either do it manually, or hook up a laptop and there is software available that will do brackets larger than what the camera is nativity capable of doing.
Daniel, I suspected as much! This is most helpful. Any you can suggest? For sure there even must be integration with various battery powered panoheads, but probably not the inexpensice Gigapan.

.........
When I'm shooting HDR files for lighting and reflections in 3d, Ideally I want to capture all of the highlights (the sun, studio-lights, or any other sources of light) so that in my darkest exposure, the brightest point of light is less than a value of 255 on the 0-255 RGB scale. For the sun, this usually requires ND filters since most digital cameras are limited to an ISO of 100, shutterspeed of 1/8000th, and lenses often are limited to f22 or so. Getting mid-day sun to be less than 255 requires a few additional stops of ND.
I need a new set!

That said, if you just need an additional few stops in your scene, one or two additional shots exposed 2 or 3 stops darker than your original shot, will usually do the trick. I personally don't like using tone-mapping to get my highlight detail, I prefer to blend by hand, it usually ends up looking much more natural. I have do to this quite often, because I like shooting black cars, and a well exposed black car can often render parts of the environment brighter than the camera can handle, particularly when shooting into a sunset (which also happens to be one of my favorite ways to shoot!) When shooting the black cars, I can usually get away with doing just one additional shot, 2 or 3 stops darker than my hero exposure, and blend by hand.
Daniel,

With your great technique of using a longer lens for the background anyway, you can expose that sunset differently. Still, for the car itself, that's got to be a great challenge to deal with the highlights well. Do you have pictures like that in which the sunset is reflected in a black car? That would be great.

Asher
 

Daniel Buck

New member
With your great technique of using a longer lens for the background anyway, you can expose that sunset differently. Still, for the car itself, that's got to be a great challenge to deal with the highlights well. Do you have pictures like that in which the sunset is reflected in a black car? That would be great.

For the long-lens stiching, I don't shoot the background seperatly, the car and background are all on one shot (well, one stitch).

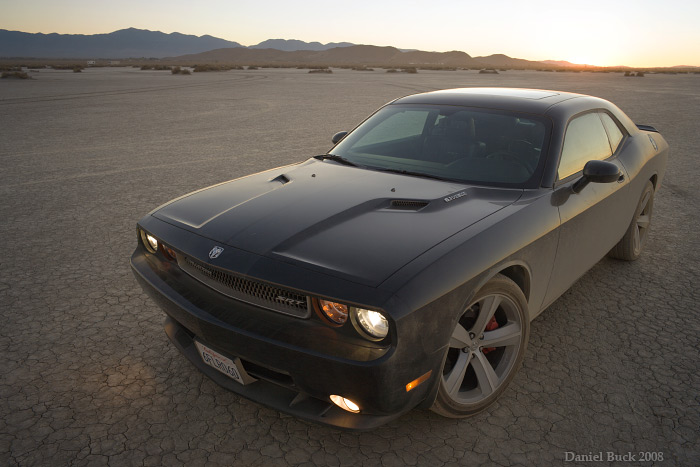
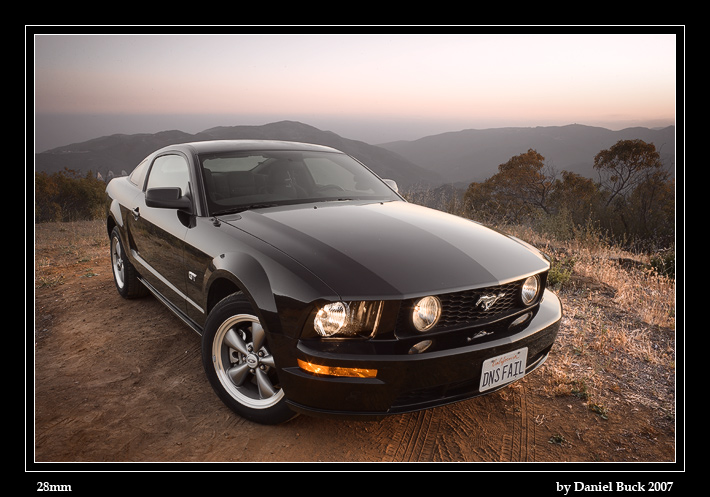
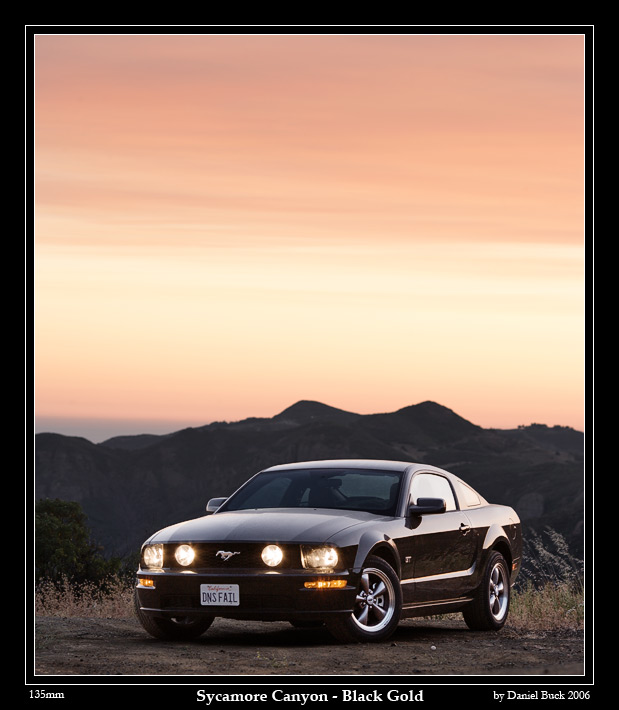
As for the hand blended highlights, here's a few examples. Sometimes I'll let a bit of the sky go white, sometimes it doesn't look natural if the car has white highlights, and the sky doesn't! Other times it doesn't seem to look bad to have the sky completely within range, but still having white highlights on the car. Even reducing the sky by a stop or two can usually still look pretty natural without messing with the highlights on the car. Sometimes the highlights on the car look to bright, so then some soft blending on the car is done. Usually not the case though, letting the car go a little bit brighter than the sky kind of makes the car pop out a bit, the trick is the balance, between standing out too much, and not enough

very natural looking, let the sky go white near the sun:
challenger_01.jpg


matching the highlights on the car body (intensity, saturation, and temperature) to the color of the darkened sky, for the most part. pretty naturally looking.
sycamore_mustang_01.jpg


letting the car go 'hotter' than the sky, and a tad bit more neutral and not as saturated:
sycamore_canyon_01.jpg


a little more stylized, the car's highlights are more seperated than the darkness of the sky, and more neutral in color (not as warm), but still shows the technique:
12.jpg
 

Klaus Esser

pro member
I have do to this quite often, because I like shooting black cars, and a well exposed black car can often render parts of the environment brighter than the camera can handle, particularly when shooting into a sunset (which also happens to be one of my favorite ways to shoot!) When shooting the black cars, I can usually get away with doing just one additional shot, 2 or 3 stops darker than my hero exposure, and blend by hand.


Well, Daniel: to be honest - judged from a professional car-photography viewpoint the car-pictures you show in this thread are a bit questionable in terms of toneranges. Details are missing in the "noses" and the reflexions in the side of the last picture are too confused.
In the first picture the car looks completely covered with dust.

A wider exposure-range would have shown more details in the frontal parts (don´t know it in english) and would have produced more overall "smoothness".
ArtDirectors over here wouldn´t accept the shots.

please see my words as a constructive and well minded critique.

best, Klaus
 

Klaus Esser

pro member
I'm interesting in other favorites strategies for bracketing and also for extending the range of bracketing further. How does one get around the limit of 3 exposures on most cameras?

Asher

Hi Asher!

Again: a 3-step -2/0/+2 set is an "all-rounder" - works always and gives kind of safety. Off course a set of 9 or more steps using a spacing of ONE gives a finer graduated range. That´s what the Spheron does (continuosuly - not stitched, it´s a scan-camera). I worked wit the Spheron and it´s a great device . . but extremely expensive (complete set and capable of measurement is around 50000.-€).
Coming close to this oustanding quality you have to shoot bracketed with very much steps to get the "smoothness" of a Spheron HDR.

Of course the main-point is GlobalLighting in 3D applications like Maya and so on - but it´s very useful with stillifes or architecture also when shot as rectangulars.

For shooting with long lenses - i often use 85mm/105mm and 300mm - a motorized head is very preferable. And a controller which writes a script to make detection faster by "telling" the app which picture has to be at which point.
That´s integrated in the upcoming APP version and rudimentarily in the actual Alpha.
The script is generated by several heads - so by the Orion/Merlin controlled via a Nokia N770/800/810.

Great stuff!

best, Klaus

P.S.: more steps using a Canon DSLR you can make using the "Breeze" software. Maybe they support other brands actually.
Rund on PC-laptops and works fine! I did sets of 9 bracketed steps per image - gives a VERY smooth tonerange when processed as HDR and mapped afterwards. Or used as HDR in Maya, Cinema and so on.
 

Asher Kelman

OPF Owner/Editor-in-Chief
Combining Breeze with an electronic panohead like the Gigapan would be impressive!

Asher

Question I have now is how to avoid the drawing look to HDR?

Asher
 

Klaus Esser

pro member
Question I have now is how to avoid the drawing look to HDR?

Asher

Hi Asher!

Like nearly all tools you can handle it clever or dumb. Handling tonemapping in a dumb way produces dumb results . .
Handling it in a clever way you can completely avoid ANY "effekt" and take nearly invisible influence AND/OR use a heavy visible tonemapping-"effekt" as a stylish item.

HDR produces an extraordinary wide tonerange and hence colordepth - which in fact is not displayble on conventional displays or print. It´s meant for 3D programs as light-sources.
So for displaying it it has to be "compressed" to a displayable range.
There are two strategies of making it displayable:
1) Tone-Compressing
2) Tone-Mapping

In simple words "tonecompressing" changing 32bit fp files to 16bit or 8bit TIFFs resp. JPGs and some others.
Tonemapping - in also simple words - does basically the same, but let YOU decide HOW that is done.
You can take influence on tonerange, colorrange, lights and shadows, color- and toneintensity, saturation, halos and a lot more adjustments. And here some skills are needed to handle it in way which doesn´t end in lollypop-coloured Barby coaches . . :)

Don´t blame it to the technique . .

best, Klaus
 

Daniel Buck

New member
Don´t blame it to the technique . .
I know tonemapping can be done effectivly with little or no evidence, but most of what I see, looks obvious and very un-natural to me. so I'm a little biased (and It also kind of urks me that everyone calls them "HDR", when it's not)
 

Asher Kelman

OPF Owner/Editor-in-Chief
I know tonemapping can be done effectivly with little or no evidence, but most of what I see, looks obvious and very un-natural to me. so I'm a little biased (and It also kind of urks me that everyone calls them "HDR", when it's not)

So far, what we are mostly seeing, (in online fora, at least), is quite cartoonish and while interesting to see occasionally, now becomes the "fashion". I'd like to see accounts of where it is best used as opposed to being just gimmicky.

Asher
 
I know tonemapping can be done effectivly with little or no evidence, but most of what I see, looks obvious and very un-natural to me. so I'm a little biased (and It also kind of urks me that everyone calls them "HDR", when it's not)

Hi Daniel,

I agree. It also gives HDR a bad reputation, which it doesn't deserve. It's the tonemapping of that huge dynamic range into the 'dynamic' range of display, or even worse paper, that deserves more careful attention. People also need to understand that a little clipping (or a roll off) of specular highlights in the tonemapped image is not forbidden (and they can also be dealt with separately in postprocessing if necessary).

Bart
 

Klaus Esser

pro member
I know tonemapping can be done effectivly with little or no evidence, but most of what I see, looks obvious and very un-natural to me. so I'm a little biased (and It also kind of urks me that everyone calls them "HDR", when it's not)

Yes - i know what you mean . . ;-)

But that´s the same as in every technique also - as in photography in general too. Depends on how it´s used.

best, Klaus
 

Bill Miller

New member
So far, what we are mostly seeing, (in online fora, at least), is quite cartoonish and while interesting to see occasionally, now becomes the "fashion". I'd like to see accounts of where it is best used as opposed to being just gimmicky.

Asher

This is a quick 3 photo HDR tonemapped -

3A1W0050_48_49_tonemapped.jpg
 

Daniel Buck

New member
This is a quick 3 photo HDR tonemapped -

It looks better than most I see :) I think people get to slap happy with the settings, and go far most of the time.


Here is a tutorial in the current Professional Photographer Mag. http://www.ppmag.com/web-exclusives/2009/01/tutorial-high-dynamic-range-im-1.html

I think the only thing that can be said about those images, is that they are 'different' than a regular image, I don't see how they are any better, I guess I just don't see it, they look worse to me. It starts to look like an 'impressionist' painting.
 

Klaus Esser

pro member
I think the only thing that can be said about those images, is that they are 'different' than a regular image, I don't see how they are any better, I guess I just don't see it, they look worse to me. It starts to look like an 'impressionist' painting.

Yes - a careful use can help solving critical situations. Often it´s simply too much - too coloured, too lollypop-like. That causes a bad reputation for HDR.

Here i had a situation with extreme differing levels of light - without bracketing-->HDR-->tonemapping it wouldn´t work well: (cutout from a VR movie)
kitch.jpg


best, Klaus
 

Daniel Buck

New member
Yes - a careful use can help solving critical situations. Often it´s simply too much - too coloured, too lollypop-like. That causes a bad reputation for HDR.

Yes, and unfortunatly, even (like that website above?) some 'professional photographers' are pushing the look, trying to get everyone to like it, saying BS like "you are behind the times" if you don't use it.

I think what's going to happen, is that alot of people (not all, there's always exceptions!) are going to forget how to meter, or forget everything about exposure, and just bracket like hell and hope for the best when they cram it through some tonemapping software. I know several very good photographers who do this (minus the tone mapping), they will bracket every single shot, even when the range of the scene can fit within one exposure. Oh well, I guess it really shouldn't matter to me what other people do, I guess I get worked up about it over nothing :)


oh, "Reason: expletive removed" What was removed? I don't think I wrote anything inappropriate, did I? if I did, forgive me :)
 
Last edited by a moderator:

Cem_Usakligil

Well-known member
Yes, and unfortunatly, even (like that website above?) some 'professional photographers' are pushing the look, trying to get everyone to like it, saying BS like "you are behind the times" if you don't use it.

oh, "Reason: expletive removed" What was removed? I don't think I wrote anything inappropriate, did I? if I did, forgive me :)
Hi Daniel,

Since you've edited your text adding the last paragraph, my own edit has been nullified again. What I did was to reword the text "...saying BS like..." into "...saying that...". I don't want to be a politically correct language police over here but I have reprimanded another user for rudeness earlier today and I want to avoid that the tone of language goes the wrong way in OPF.

So, you did not do anything wrong per se. But in this particular case, I think your personal opinion regarding the invalidity of a statement such as "you're behind times if you don't use HDR" is equally powerful without retorting to any expletives :).

Cheers,
 

Klaus Esser

pro member
Hi Daniel!

I saw your shots; "trees and old lenses" on your blog - very fine! I like them. Sensible B&W. Good pictures.

best, Klaus
 

Daniel Buck

New member
Hi Daniel,

Since you've edited your text adding the last paragraph, my own edit has been nullified again. What I did was to reword the text "...saying BS like..." into "...saying that...". I don't want to be a politically correct language police over here but I have reprimanded another user for rudeness earlier today and I want to avoid that the tone of language goes the wrong way in OPF.

So, you did not do anything wrong per se. But in this particular case, I think your personal opinion regarding the invalidity of a statement such as "you're behind times if you don't use HDR" is equally powerful without retorting to any expletives :).

Cheers,

Ah, ok :) No worries!
 
Top