• Please use real names.

    Greetings to all who have registered to OPF and those guests taking a look around. Please use real names. Registrations with fictitious names will not be processed. REAL NAMES ONLY will be processed

    Firstname Lastname

    Register

    We are a courteous and supportive community. No need to hide behind an alia. If you have a genuine need for privacy/secrecy then let me know!
  • Welcome to the new site. Here's a thread about the update where you can post your feedback, ask questions or spot those nasty bugs!

Calibrating a Macbook pro screen.

Here is the process with which I was able to calibrate my 17" macbook pro (late 2009 - antiglare screen) with respect to my perfectly calibrated Eizo CG241W monitor with more than 97% accuracy:

1. I used "x-rite's i-one" calibrator and x-rite's i1Pro software version 2.3.3.18… still the process is a "manual" one, (warning: do not disconnect x-rite from the laptop when you enter the "manual" part of the process as it is described)

2. On "display settings" choose XY illuminator, 120cd/m2 luminance and 180:1 contrast ratio

3. Choose a point for WB reference MANUALLY as near as possible to the "white line" where the magenta/red/greed sections meet and save it in the "profile settings"…

4. Complete the automatic calibrating in the "measurement" section and save it, also save the final ICC profile…

5. Load a complicated image with lots of colour information on your reference monitor and the same image on your Macbook and open both in PS on both computers...

6. Adjust "colour balance" on the PS of your laptop until it matches as good as possible the image on your other screen… This will direct you on where to seek a new WB balance point (it should be towards the Green area of the graph), do not save the colour balance changes on your Macbook's PS… instead,

7. Return to I1Pro software and enter new values to the x&y settings according to your sense on where the correction will match the colour balance that you previously tried on PS and overwrite the new settings over the old ones in the "profile settings" DO NOT ALTER (do not recalibrate) the screen by repeating the "measurement" section… instead load the saved values on it and overwrite the new profile on the ICC…

8. Repeat the process by comparing the PS images on both screens only by altering x&y settings using careful (and small magnitude) moves until you find an XY point where you are sure that even one unit move in either direction X or Y makes things worst (it took me six and a half hours) but the result is that the screen on my macbook is now 97% as accurate as my Eizo…

I can now confidently do image processing on the laptop's screen when I have to work with painting reproduction away from studio and then come back to the Eizo and be confident of what I will print… Most important, I now know exactly the tiny readjustments that will be needed for the result to be as good as it would be if the original painting was in the studio and processing would be done on the Eizo by checking the original all the time

I hope this will be of benefit for many. Thanks for reading.
 

Asher Kelman

OPF Owner/Editor-in-Chief
Here is the process with which I was able to calibrate my 17" macbook pro (late 2009 - antiglare screen) with respect to my perfectly calibrated Eizo CG241W monitor with more than 97% accuracy:

1. I used "x-rite's i-one" calibrator and x-rite's i1Pro software version 2.3.3.18… still the process is a "manual" one, (warning: do not disconnect x-rite from the laptop when you enter the "manual" part of the process as it is described)

2. On "display settings" choose XY illuminator, 120cd/m2 luminance and 180:1 contrast ratio

3. Choose a point for WB reference MANUALLY as near as possible to the "white line" where the magenta/red/greed sections meet and save it in the "profile settings"…

4. Complete the automatic calibrating in the "measurement" section and save it, also save the final ICC profile…

5. Load a complicated image with lots of colour information on your reference monitor and the same image on your Macbook and open both in PS on both computers...

6. Adjust "colour balance" on the PS of your laptop until it matches as good as possible the image on your other screen… This will direct you on where to seek a new WB balance point (it should be towards the Green area of the graph), do not save the colour balance changes on your Macbook's PS… instead,

7. Return to I1Pro software and enter new values to the x&y settings according to your sense on where the correction will match the colour balance that you previously tried on PS and overwrite the new settings over the old ones in the "profile settings" DO NOT ALTER (do not recalibrate) the screen by repeating the "measurement" section… instead load the saved values on it and overwrite the new profile on the ICC…

8. Repeat the process by comparing the PS images on both screens only by altering x&y settings using careful (and small magnitude) moves until you find an XY point where you are sure that even one unit move in either direction X or Y makes things worst (it took me six and a half hours) but the result is that the screen on my macbook is now 97% as accurate as my Eizo…

I can now confidently do image processing on the laptop's screen when I have to work with painting reproduction away from studio and then come back to the Eizo and be confident of what I will print… Most important, I now know exactly the tiny readjustments that will be needed for the result to be as good as it would be if the original painting was in the studio and processing would be done on the Eizo by checking the original all the time

I hope this will be of benefit for many. Thanks for reading.


A lot of these steps require ad hoc personal judgements that you can be satisfied with, but seem to be a great challenge to everyone else.

Can you present a workflow with screen shots and predictive steps that can allow the rest of the planet to do the same!

Asher
 
A lot of these steps require ad hoc personal judgements that you can be satisfied with, but seem to be a great challenge to everyone else.

Can you present a workflow with screen shots and predictive steps that can allow the rest of the planet to do the same!

Asher
Hi Asher, Actually I used paintings to do the process, most of which I don't have the licence to publish on web and hence I don't publish them on my site either, among others, I did use these three which I do have the licence:

picture_019siteb.jpg


picture_027sitebb.jpg


picture_002_siteb.jpg


I used paintings because colour accuracy is ultra demanding on them, fortunately, I came out with a result that the same tiny corrections was applicable to all images I used when the image was transferred from one screen (computer) to the other…

If I may, I have a few more recommendations on the method for those that are willing to follow it…

1. Each time you'll manually change the position of the WB mark using X&Y axes values and you move to the "measurement" section and load the stored values in it, you'll get a message that "this is not recommended" …ignore it and proceed to load the saved values and proceed to the next step to save a new ICC profile.

2. It is highly recommended, that when you use "colour correction" in PS to find out which way to move your XY new "target point", to: A. If you move all three sliders, to redo the process and eliminate one of them into the other two… so that at least one is at zero. B. When you have two sliders moved, choose only one direction for the XY new "target point", the one with the higher value and ignore the other for the next step where you'll repeat the process… C. When you do the "automatic calibration" to start with… use a "Soft cube" and put your laptop in there…

3. I insist that you use another screen that you are sure that it is perfectly calibrated, don't shoot a colour chart and try to calibrate your screen with it, because it is not guaranteed that your camera is accurately calibrated, either if you had it "automatically" calibrated or not, remember that accurate calibration of a screen is the most important (the hurt) of a fully calibrated process "from capture to print"… Always remember that a "perfectly calibrated monitor" is the one that will give us an equally "perfect print" not the one that will present what we consider "faithful reproduction of a shot".

4. I calibrated my laptop screen for Adobe RGB (1998) colour profile which is what I shoot, either in single shot or multishot with all my cameras and is what I use for printing on my Epson 9900… I don't know if the method is reliable for other profiles, I can guaranty it will work for Adobe 1998 if you follow the above instructions.
 
Thanks!

Now could you explain how we actually do step 7 in your O. P.?

Asher
I am sorry if my English make it sound more complicated than it is Asher… What one should do, is while having the image opened in his laptop's PS, to compare it with the "reference image" on the "reference monitor", then, I recommend to use the colour balance sliders of his laptop's PS and try to modify the looks of the image in the laptop as to match to the best possible, the same image on the "reference screen". This is not anything meant to achieve something that will influence the process… its aim is to help the sense of the user on where he should look for a new WB point on the graph…
For example, lets say that the sliders record -12cyan/red and +5magenta/green, ….one should look for the new WB point towards the Cyan to greenish area… but my recommendation is that it is best if the user will ignore the green reading (for the moment) and deal only with the higher value (i.e. the cyan), this way the user will have some correction at the time and he will sense better how far he is from final target as he will be approaching it step by step…
Now, coming back to the PS colour balance sliders, one should remember to only use two of the sliders (compensate the third into the other two so that it shows "zero") and before he returns to the I1 program to make the XY altering, don't forget to press the "cancel" button, so that the PS image will always be the same as the one on the "reference monitor"….

EDIT: I now thought that one may not realise how you can "move" the WB point by using new X and/or Y values… you simply press "load", choose the saved profile, then alter the X and or Y values towards the desired direction and then save the new position overwriting it over the old one…. at the end of each "cycle" you also save the final ICC profile over the previous one.

One more hint….
You'll be surprised how "far out" the final WB point will be, depending on where exactly you choose manually the "original" WB point to be, the results from the "measurement" process can be anywhere on the graph… it can even fall outside the graph, in which case you should repeat the process from scratch… That is why I recommend to do the "measurement" process with a WB point chosen manually to be on where the magenta/red/green areas meet… it will secure that the final WB point is in the graph and in shorter distances than if a different "original" WB point is chosen… Still, mine is well into the Green area.
For some reason with MacBooks and X-rite's I1, different WB points chosen, give HUGE variations on the colours that will later be "measured"… There is no way that my Macbook can be reliably calibrated using X-rite and an automatic process… the result is no where near to be even considered as "worthwhile".

But this manual process works… Oh yes it does! I'll be glad if another one tries it and comment on his findings.
 

Doug Kerr

Well-known member
Hi, Theodoros,

Thank for this very thorough discussion of what seems to be a well-thought out and refined process.

One small issue. You said (please excuse the long context, but you know what can happen otherwise) (red emphasis added for reference later):

Here is the process with which I was able to calibrate my 17" macbook pro (late 2009 - antiglare screen) with respect to my perfectly calibrated Eizo CG241W monitor with more than 97% accuracy:

1. I used "x-rite's i-one" calibrator and x-rite's i1Pro software version 2.3.3.18… still the process is a "manual" one, (warning: do not disconnect x-rite from the laptop when you enter the "manual" part of the process as it is described)

2. On "display settings" choose XY illuminator, 120cd/m2 luminance and 180:1 contrast ratio

3. Choose a point for WB reference MANUALLY as near as possible to the "white line" where the magenta/red/greed sections meet and save it in the "profile settings"…

4. Complete the automatic calibrating in the "measurement" section and save it, also save the final ICC profile…

5. Load a complicated image with lots of colour information on your reference monitor and the same image on your Macbook and open both in PS on both computers...

6. Adjust "colour balance" on the PS of your laptop until it matches as good as possible the image on your other screen… This will direct you on where to seek a new WB balance point (it should be towards the Green area of the graph), do not save the colour balance changes on your Macbook's PS… instead,

7. Return to I1Pro software and enter new values to the x&y settings according to your sense on where the correction will match the colour balance that you previously tried on PS and overwrite the new settings over the old ones in the "profile settings" DO NOT ALTER (do not recalibrate) the screen by repeating the "measurement" section… instead load the saved values on it and overwrite the new profile on the ICC…

8. Repeat the process by comparing the PS images on both screens only by altering x&y settings using careful (and small magnitude) moves until you find an XY point where you are sure that even one unit move in either direction X or Y makes things worst (it took me six and a half hours) but the result is that the screen on my macbook is now 97% as accurate as my Eizo…

I can now confidently do image processing on the laptop's screen when I have to work with painting reproduction away from studio and then come back to the Eizo and be confident of what I will print… Most important, I now know exactly the tiny readjustments that will be needed for the result to be as good as it would be if the original painting was in the studio and processing would be done on the Eizo by checking the original all the time …

I hope this will be of benefit for many. Thanks for reading.​

Regarding the red passage, is that per some actual objective metric of relative accuracy, or just your metaphorical way of saying "really close"?

Best regards,

Doug
 
[/QUOTE]
Doug KerHi said:
red[/COLOR] emphasis added for reference later):

Here is the process with which I was able to calibrate my 17" macbook pro (late 2009 - antiglare screen) with respect to my perfectly calibrated Eizo CG241W monitor with more than 97% accuracy:

1. I used "x-rite's i-one" calibrator and x-rite's i1Pro software version 2.3.3.18… still the process is a "manual" one, (warning: do not disconnect x-rite from the laptop when you enter the "manual" part of the process as it is described)

2. On "display settings" choose XY illuminator, 120cd/m2 luminance and 180:1 contrast ratio

3. Choose a point for WB reference MANUALLY as near as possible to the "white line" where the magenta/red/greed sections meet and save it in the "profile settings"…

4. Complete the automatic calibrating in the "measurement" section and save it, also save the final ICC profile…

5. Load a complicated image with lots of colour information on your reference monitor and the same image on your Macbook and open both in PS on both computers...

6. Adjust "colour balance" on the PS of your laptop until it matches as good as possible the image on your other screen… This will direct you on where to seek a new WB balance point (it should be towards the Green area of the graph), do not save the colour balance changes on your Macbook's PS… instead,

7. Return to I1Pro software and enter new values to the x&y settings according to your sense on where the correction will match the colour balance that you previously tried on PS and overwrite the new settings over the old ones in the "profile settings" DO NOT ALTER (do not recalibrate) the screen by repeating the "measurement" section… instead load the saved values on it and overwrite the new profile on the ICC…

8. Repeat the process by comparing the PS images on both screens only by altering x&y settings using careful (and small magnitude) moves until you find an XY point where you are sure that even one unit move in either direction X or Y makes things worst (it took me six and a half hours) but the result is that the screen on my macbook is now 97% as accurate as my Eizo…

I can now confidently do image processing on the laptop's screen when I have to work with painting reproduction away from studio and then come back to the Eizo and be confident of what I will print… Most important, I now know exactly the tiny readjustments that will be needed for the result to be as good as it would be if the original painting was in the studio and processing would be done on the Eizo by checking the original all the time …

I hope this will be of benefit for many. Thanks for reading.​

Regarding the red passage, is that per some actual objective metric of relative accuracy, or just your metaphorical way of saying "really close"?

Best regards,

Doug

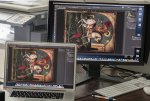
Intresting quote Doug… let me show you the result first (as far as you can judge from web):

First, it is important to mention that the photo posted doesn't make all the justice that it should, because of the wrong viewing angle of the lens towards both the monitors…
I have to agree with you that it is a metaphorical way of saying "really close", but OTOH, I do have my own (personal) scale in which I refer to call this 97%… In this personal scale of mine, 97% means that there are 3 fine adjustments that I have to redo on the file so that the Eizo will present the capture that was made (and processed) on the laptop correctly… In this case of calibration, those are:

A. Choose reds in "selective colour" and adjust -8 for the amount of black in the reds...
B. Add 1 unit of magenta in "colour balance"…
C. Adjust "gamma" in exposure to "104"….

EDIT:I had 2 of the above values corrected, because they were "vice versa" i.e. two of them were for Eizo to "show" the laptop, while one was for the laptop to "show" Eizo… sorry for the mistake, the above corrections are for Eizo to present "the same" as an image that has to be processed in the laptop which is of most importance in my case, where I sometimes have to do a capture of an art painting away from studio and then print in the studio…

Those adjustments do work for all captures that have been processed on the laptop. I guess there are many that would call this calibration as being "perfect" or 99%… but for my personal scale, this is 97%.

I hope this helps further. I now have something in mind, that may (in fact I'm sure it will) improve things further… maybe to more than 98% on my same personal scale… I'll keep you informed when I'll have the time to check it out.
 

Attachments

  • _DSC4879internet.jpg
    _DSC4879internet.jpg
    121.1 KB · Views: 188
Last edited:

Doug Kerr

Well-known member
Hi, Theodoros,

Intresting quote Doug… let me show you the result first (as far as you can judge from web):

. . .

I have to agree with you that it is a metaphorical way of saying "really close", but OTOH, I do have my own (personal) scale in which I refer to call this 97%… In this personal scale of mine, 97% means that there are 3 fine adjustments that I have to redo on the file so that the Eizo will present the capture that was made correctly
I understand.

Thanks.

Best regards,

Doug
 
Top