• Please use real names.

    Greetings to all who have registered to OPF and those guests taking a look around. Please use real names. Registrations with fictitious names will not be processed. REAL NAMES ONLY will be processed

    Firstname Lastname

    Register

    We are a courteous and supportive community. No need to hide behind an alia. If you have a genuine need for privacy/secrecy then let me know!
  • Welcome to the new site. Here's a thread about the update where you can post your feedback, ask questions or spot those nasty bugs!

EXPOSURE X6 —- Lightroom Replacement

Robert Watcher

Well-known member
I have to be honest about the anxiety I have had trying to decide if I should and can effectively replace Lightroom for my image organizing and primary image editor —- or than compositing and complex jobs handled best in a full blown image editor. After all I have been using Lightroom for those purposes since 2007 and am very comfortable working with it, having used it on almost a daily basis for my travel photography.

The jump to Exposure x6 a few days ago, was a bit of a gamble, but one I felt I needed to take before my Adobe subscription becomes due for another year, in a couple of weeks. According to everything that I have read over the last couple of years about Lightroom replacements, there is really nothing that handles the Organizing in the same way that Lightroom does. So I was sceptical. With the extra power of my newer MacMini with Apple Silicone chip, I can more capably explore some of the updated but resource hungry options - that I wasn’t able to with my 2012 MacBook (that my wife now usesSo what for designing quilts). I looked into Luminar 4 and AI, On1, DXO with Nik, Raw Therapy, Capture One, Dark Table, and Exposure X6.

After using the 30 day Trial of X6 (I will call it that for short), I soon found that it was perfectly suited for my style of shooting, and handled the file organizing to my liking. I made the decision to pay for it, and drop my Adobe subscription. I already have Affinity Photo on both my desktop and iPad for any heavy duty work that I would handle in Photoshop.

So what I thought I would do in this thread, is add in some of the features of Exposure X6 that I am finding along the way, that I see as valuable:


———
 

Robert Watcher

Well-known member
Something that was important for my workstation setup, was to have the software be compatible with the Apple Silicone infrastructure on my computer. I know from experience that my audio DAW Reaper, is totally compatible with my MacMini M1, but many of the plugins will not work. There are many software applications that will work just fine, but they are handled through Rosetta 2. So it was nice to find that X6 runs Natively on my machine as is verified in the Preferences


0610D055-8DC7-4A8F-BF4A-6A7F0EBBF2E6.jpeg
 

Robert Watcher

Well-known member
Customizability - YES

Unlike Lightroom, X6 handles all processes on One Page. This does increase the number of editing and organizing tabs to open on the one interface. But I found out today, that all those can be moved into optimum position for my comfort level. As an example Navigation and Histogram were on the top left panel (1). I prefer that one to display only my Folder Bookmarks, so I rearranged them. Same with moving editing tabs so that ones I access most are high up (4).

I like have access to the Meta data of a file from time to time. With Lightroom that was easy to see on the first panel with the thumbnails, but not so much when moving to the Develop tab. In X6, the Meta data is always there, but by default is placed at the bottom of the bottom right side panel (4). I moved it up to the top right panel just under Layers, and find it so easy to access (3).


DBE9FEEA-93B0-4FF7-B076-5D3D6EF17A76.jpeg


CA03439E-C520-4810-A9D3-592B4A522C47.jpeg
 
Last edited:

Robert Watcher

Well-known member
OK, I’m not a RAW user, but do use it on occasion. I can see how having the ability to convert RAW to DNG, might be very useful. Thcan be done with X6. It can even be done automatically when copying files from the memory card. Pretty cool. It does require the Adobe DNG converter to be installed.


B255DC6E-098F-4714-817C-F9E3D90450A2.jpeg


62102223-BB64-4DEB-A65F-E90F0C029B2E.jpeg
 

Robert Watcher

Well-known member
Oh my goodness. This ability is awesome. While the memory card is being copied to my hard drive, all previews show up almost instantly —— and THOSE FILES CAN BE EDITED DURING DOWNLOAD. Talk about time saving. No such ability with Lightroom.


C2D8F917-CD78-4F12-B89D-AFD0AE5F143F.jpeg
 

Asher Kelman

OPF Owner/Editor-in-Chief
When files are converted to .DNG are all the settings transferred as well. Some cameras like Leica and Hasselblad have lens correction algorithms built in. I wonder whether the lens correction data, for example, might be lost or is it already baked in?

Asher
 

Asher Kelman

OPF Owner/Editor-in-Chief
Also, Robert, what are the unique features of Lightroom Catalog that are missing from such a solid program as Media Pro?

I own the permanent and CC versions of LR but never got to using them as PS is so easy!

Asher
 

Robert Watcher

Well-known member
Also, Robert, what are the unique features of Lightroom Catalog that are missing from such a solid program as Media Pro?

I own the permanent and CC versions of LR but never got to using them as PS is so easy!

Asher

Photoshop does not Manage photos. That is the reason for using Lightroom and it’s catalogue structure
 
Last edited:

Robert Watcher

Well-known member
When files are converted to .DNG are all the settings transferred as well. Some cameras like Leica and Hasselblad have lens correction algorithms built in. I wonder whether the lens correction data, for example, might be lost or is it already baked in?

Asher

I imagine it is totally dependant on what the Adobe DNG Convertor provides, as that is what X6 is using

BTW. X6 allows Profile corrections to be used. There is an edit tab for that. All of my Olympus camera models show up.
 

Robert Watcher

Well-known member
I AM SATISFIED - I HAVE THE PERFECT TRIFECTA FOR ME

After finding that Exposure x6 is handling all of the requirements I needed and made use of with Lightroom...

It was time to dig into Affinity Photo (which I already owned) to replace my Photoshop needs for composites, complex selections, image layers, text overlays, and content aware fill. I am finally getting my head around Photo...

One last piece of the puzzle had to do with finding an effective Noise Reduction software. Lightroom never really satisfied me in that area, and Exposure x6 handles noise reduction fine, but not on difficult images. That is where Topaz Denoise comes in. I downloaded the Trial version (which only allows you to see if it works but can’t save without a watermark) and could not believe my eyes, when I opened up a couple of very difficult animal images taken in dark jungle environment. It was a no-brainer. Nothing else I have seen or tried matches it and does it so effortlessly.

——
 

Robert Watcher

Well-known member
Once I set up Exposure x6 Preferences to allow Editing in both Photo or Denoise, from a right click on the image —- I was eager to take a found photo in the x6 Browser, that could benefit from both adjustments in that program, as well as Affinity Photo with both Inpainting (Content Aware Fill) and the amazing Selection tool with a Refine feature that exposes every light hole in tree limbs or other complex edges in the layer mask. I just had to find and open a sky shot and drag it onto the mask layer then move it around. Any little hazies on the mask around the edges of tree limbs, were handled by changing the Blend Mode so they didn’t show. Once I was done with the processing in Photo, I just clicked Save and the Tiff file with processing was sitting there beside the original in X6.

Thought I’d include some shots of the steps along the way:


4E9F1FBE-56E8-4755-9691-56DCC821C589.jpeg

The Original from camera


309D9D75-9F69-4BDF-92AA-822D6728AA4C.jpeg

Some basic Adjustments and cropping in Exposure x6


D01759F8-C326-42D0-A405-8D9534E0E80A.jpeg

Some basic Adjustments and cropping in Exposure x6 - sending out to Affinity Photo with “Edit Copy In“ to maintain the current adjustments


Last edited:

Robert Watcher

Well-known member
So the two reasons that I required Affinity Photo (or would need Photoshop), is because I wanted to fill in the foreground road, with grass using Inpainting Tool. As well, I felt the sky could benefit from a little texture by dropping on a sky from one of my pics.

BAB5EC36-0388-4FC5-AD60-857DC43AD747.jpeg

Content Aware and Replacement Sky completed in Affinity Photo


3C9ECDAC-43D1-4647-87B0-A6DDFB349784.jpeg

The Ontario sky that I decided to drop in


D8B8FABE-2C9F-43F2-9869-B592A453DD17.jpeg

The processed TIFF was available in Exposure x6 where I continued to make adjustments including adding a Fuji Velvia film emulation


4633AF77-6E01-4523-B25D-20FE03DCBC88.jpeg

I didn’t use Denoise on this image, because I was just running the Trial version - but Denise opened quickly on my machine after opening the TIFF file from within X6
 

Asher Kelman

OPF Owner/Editor-in-Chief
Very bucolic!

If you make a painting expand the sky! Then it will be a British or New Zealand scene!

Asher
 

Robert Watcher

Well-known member
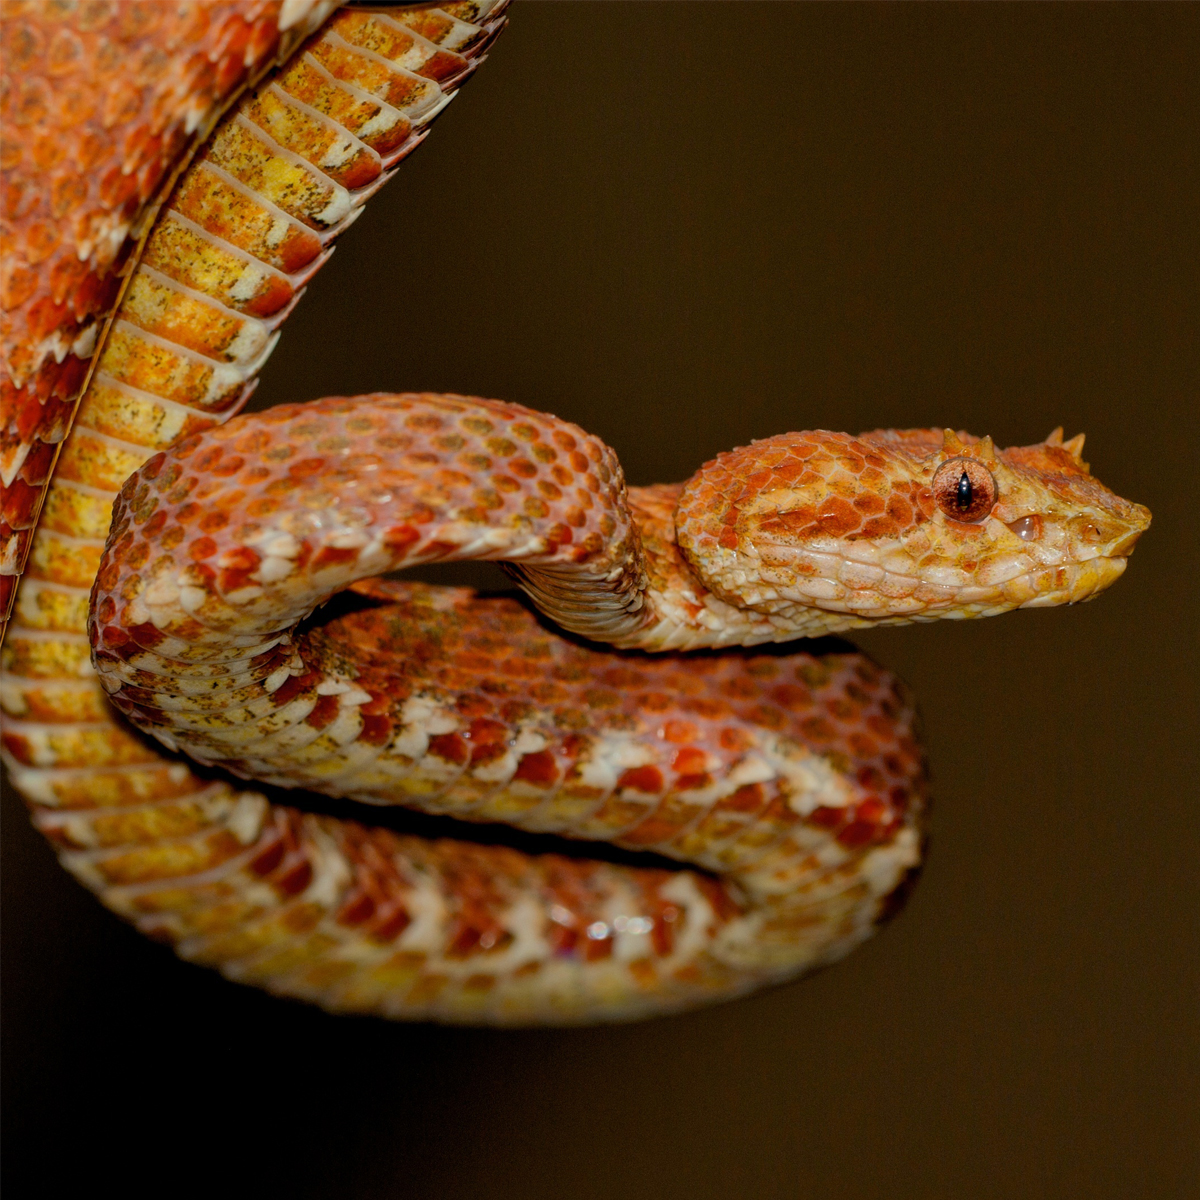
These animal shots taken in dark jungles in Costa Rica, have been tough ones for any noise reduction software to do justice to. Especially when trying to enhance the sharpness (I often shoot with Sharpening setting as low as possible on my cameras), which intensifies the noise even more.

This afternoon, these started off in X6 with basic crop and cleanup, then after a bit of touch up in Affinity Photo, went to Topaz Denois, then after a bit of post processing in X6, were exported for final use.


6412F587-2EC5-4BB5-8921-0C5F7139A96D.jpeg

Original image with cropping and basic clean up

0F48C04A-BA8B-4EF3-85F5-53C746831B12.jpeg


E433D173-D00B-4138-B66A-D27CE4111CF8.jpeg

Final Image

 
Last edited:

Asher Kelman

OPF Owner/Editor-in-Chief
Is it some kind of Cobra or perhaps a yellow Viper?

It’s so good, I thought this was straight out of 3D printed design for Walt Disney Studios!

it’s beyond imagination startlingly beautiful and frightening!

Asher
 

Robert Watcher

Well-known member
Is it some kind of Cobra or a yellow Viper?

It’s so good, I thought this was straight out of 3D printed design for Walt Disney Studios!

it’s beyond imagination startlingly beautiful and frightening!

Asher

it is the deadly yellow eyelash viper. It was so stunning that I was mesmerized- and didn’t even consider the danger I was in, standing only 5 or 6 feet from it shooting pics, with not a soul around if it bit me.


———-
 
Last edited:

Robert Watcher

Well-known member
It is a Capuchin. This guy/gal was hanging out on an isolated beach on the east side of Costa Rica (Caribbean Sea). But we did spend time with lots of Howler, Squirrel, and Spider monkeys in different parts of the country.
 

Robert Watcher

Well-known member
I used all three tools for this image I shot out the window of our jet when flying from Guatemala City to Mexico City. In all the flights we taken across this flight path, I only seen this volcano off in the distance. This particular time we flew right over top of it. It’s height is close to 18,000 feet.

Now I see it online, the finished shot looks a little over sharpened, but that is easy to correct. I was just having fun, seeing how much detail I could bring into it, being it was hazy and distorted from shooting through the airplane window.


87143FF6-BB5A-4DE4-8267-1EEAA7E478B6.jpeg

Original straight from camera


B625A22F-467E-4A77-BCE4-861431348FD7.jpeg

Creative processing in Exposure x6, Inpainting (Content Aware Fill) in Affinity Photo, Topaz Denoise to clean up crazy amounts of noise and artifacts in the background green areas
 

Asher Kelman

OPF Owner/Editor-in-Chief
Really enjoyable work, Robert!

it’s thrilling to see that smokin’ volcano!

Keep data mining your store of vintage files!

Asher
 

Robert Watcher

Well-known member
I was curious as to whether Topaz Denoise had been updated to run natively on the new Apple Silicone platform in my MacMini M1, and it has.

I hadn’t checked anything in the preferences panel, but on a YouTube video a fellow suggested big improvements in speed by going there and change setting to run on the GPU. I knew my machine just has built in graphics, but noticed that the time it took to update the preview or process out a file in Denoise, appeared to take much longer on his machine with the external graphics card.

That’s why I thought I’d see what was in my Preferences panel. There was no GPU listed under Performance, but had a drop down that was set to CPU, and when I opened it the option was there for Apple M1. I dont imagine though that having it set to CPU or Apple M1 will make a difference as there is only one running option. But nice to know that this app as well as Exposure X6 have been updated to run on the latest Mac platform - which before long will be in most Apple products.
 

Robert Watcher

Well-known member
I looked at files from one of my favourite wedding coverages. I always liked this pic of the BridalParty, and gave it some pizazz using ExposureX6 along with Topaz Denoise to help control some of terrible grain/noise that my Nikon D200 had shooting at 1600ISO because of the poor light quality in the forest.


6B0DC831-37B3-4135-82B0-0D7A9A770B9A.jpeg


———-
 

Robert Watcher

Well-known member
Well I ended up adding one more app to my arsenal. Topaz Sharpen AI. Yes I have been getting wonderful sharpening results with Denoise or X6.

Because I shoot everything handheld and often with a long lens in poorer light conditions —- I have many images that I like, that I haven’t used because of motion blur or camera shake. With Nicolas mentioning that he regularly uses both Denoise and Sharpen, I thought I would see if there would be a benefit to try Sharpen AI and see if it could really benefit me on those images. Turns out that I was quite impressed. Being that Topaz has a deal for $59.95 for the next few days, I made the purchase.


This is one photo that I have loved and have used, but the results were suitable only because of the content. It was a little soft from slight movement in the face. The deliberate movement of the Howler monkey’s hand resulting from his eating, didn’t really bother me.


The original jpg straight from camera (Olympus E3)
0B157448-5A26-47AA-A0D4-585B9706201F.jpeg


41870C99-F242-4BEA-ABE8-E459CB189E07.jpeg


5A58692D-633E-4B4E-AD96-98ABB59E5A8F.jpeg


14C8808B-CEB1-4048-B41A-549CAB76F8C6.jpeg


Here is the final images with full processing after sharpen and noise reduction
84530932-9D42-4E99-8C79-9698A557DD5B.jpeg


This was another shot of a Howler that benefited from Sharpen AI
It was amazing how it created well defined hair on the belly and edges of the monkey (left side is after running through Sharpen AI), where it looked like mostly blurred hair
I don’t know how they do it!

125EA1BE-9792-4741-89B7-E1255193E18E.jpeg


Last edited:

Robert Watcher

Well-known member
At 12:01AM tomorrow morning, Ontario, Canada goes back into lockdown for at least the next 4 weeks. A record number of cases each day for the last week, along with the highest capacity in ICU of any time during the pandemic. Many of those are young people. So Anne & I took a couple of hours to drive through the countryside this evening. I took this pic of an old train station in a town not too far from us.

For the final pic I edited a copy in Affinity Photo, where I removed the light pole and all the electric lines - as well as masked out the foreground to drop in a sky from one of my pics taken around the same time of day. ExposureX6 handled my processing.


EFF90333-484A-4D4B-881B-111ED2411DDB.jpeg


the original camera file

FE27C3BA-F01B-49A9-839E-9E8230D7760D.jpeg

 
Last edited:
Top