
-
Please use real names.
Greetings to all who have registered to OPF and those guests taking a look around. Please use real names. Registrations with fictitious names will not be processed. REAL NAMES ONLY will be processed
Firstname Lastname
Register
We are a courteous and supportive community. No need to hide behind an alia. If you have a genuine need for privacy/secrecy then let me know! -
Welcome to the new site. Here's a thread about the update where you can post your feedback, ask questions or spot those nasty bugs!
You are using an out of date browser. It may not display this or other websites correctly.
You should upgrade or use an alternative browser.
You should upgrade or use an alternative browser.
I tried Nicolas's sharpening action
- Thread starter Ron Morse
- Start date


Asher Kelman
OPF Owner/Editor-in-Chief
I see two problems with Nicolas' sharpening! First the fish rotated in the process, second it lost part of the right fin, LOL!
Otherwise it's beautiful. Looks like she's got lip glosss!
A before would be helpful!
Thanks,
Asher
Otherwise it's beautiful. Looks like she's got lip glosss!
A before would be helpful!
Thanks,
Asher
nicolas claris
OPF Co-founder/Administrator
Thanks for the thank Ron, but as Asher says we need before/after comparison!
Thanks for the thank Ron, but as Asher says we need before/after comparison!
The unfortunate thing is that I deleted the other. I suppose I could do it all over again.
Asher Kelman
OPF Owner/Editor-in-Chief
Well, this time it should be faster, LOL!!!!!!
Otherwise we have no sense of whether Nicolas and you have some sort of conspiracy going on here!
Asher
Otherwise we have no sense of whether Nicolas and you have some sort of conspiracy going on here!
Asher
Different subject
I went out to one of the pastures this morning and was greeted by big Benson. I figured a shot around the eye with the 70-200 f/2.8 IS would be a good try for Nicolas's sharpening as a couple of certain people asked for.
Before sharpening.

With Nicolas's action.

I went out to one of the pastures this morning and was greeted by big Benson. I figured a shot around the eye with the 70-200 f/2.8 IS would be a good try for Nicolas's sharpening as a couple of certain people asked for.
Before sharpening.
With Nicolas's action.
Charles L Webster
pro member
Nice, without looking artificial or "over sharpened"
I'll have to try it. I have a picture that benefits greatly from careful sharpening, but shows the effects of oversharpening.
I'm on a shooting expedition for the next week, but if this thread is still alive when I return I'll try Nic's action and post before and after versions.
I'll have to try it. I have a picture that benefits greatly from careful sharpening, but shows the effects of oversharpening.
I'm on a shooting expedition for the next week, but if this thread is still alive when I return I'll try Nic's action and post before and after versions.
Richard McNeil
New member
I have searched and can't find how to get that action! How do I get it?
Richard
Richard
I have searched and can't find how to get that action! How do I get it?
Richard
Its in this thread.
http://www.openphotographyforums.com/forums/showthread.php?t=2437
Richard McNeil
New member
Thank you Ron and Nicolas.
Richard
Richard
Asher Kelman
OPF Owner/Editor-in-Chief
Well, Ron, that's a huge departure from fish! I love that image of the horse. At least as a teaser!
I'd love to see a larger image for several reasons. First the horse looks great as a subject. Next a large picture would ass more fine textures and the grass too. Each might respond a little differently to the sharpening.
As it is, I must take my hat off to Nicolas for the great process he has put together. Kudos and thanks to you both!
Asher
nicolas claris
OPF Co-founder/Administrator
Thanks all
I'm very happy that you find this action working well.
The only issue is that on large (very) files it make takes several minutes to perform (i.e. 300 dpi A1 size - 16 bits)... even on dual-Core Intel 2.66, but only 4 Gb of ram... so expensive!
I'm very happy that you find this action working well.
The only issue is that on large (very) files it make takes several minutes to perform (i.e. 300 dpi A1 size - 16 bits)... even on dual-Core Intel 2.66, but only 4 Gb of ram... so expensive!
Asher Kelman
OPF Owner/Editor-in-Chief
Why is is so calculation intensive?
Asher
Asher
nicolas claris
OPF Co-founder/Administrator
Lot of things to do... maybe also lack of RAM...
Asher Kelman
OPF Owner/Editor-in-Chief
Any one else have examples!
Asher
Asher


Michael Fontana
pro member
Lot of things to do... maybe also lack of RAM...
I gave it a quick try; about a minute for a 120 MB 1DS-2-tiff, in 16 bit, on a (PPC) Quad with 8 GB of RAM.
Is it darkening a bit the shadows - popping up contrast?
Here's a comparison: unsharpend at the left, Nicolas action at the center, and Uwe Steinmüller's Easy sharpening at the right. All in 300%, PS.
My quick conclusion: Nicolas's acction is slightly sharpening stronger than "Easy sharpening" does.
Nicolas, do you use it as final sharpening, before delivering the images to the clients? I see, you went the LAB-route ;-)
Thanks for sharing! Sorry, no pets, here ;-)

Last edited:
Michael Fontana
pro member
Yep, the 90%-black is definatly accentuated by your action, Nicolas, I had a look at the histogramm
nicolas claris
OPF Co-founder/Administrator
Bonsoir Michael
yes, I do agree, but:
- that's the way I like my pics, with contrasts and colorfull.
- the action produces a layer that is set by default at 70%, easy to tweak:
- sometimes I get it back to 30%
- sometimes I increase it to 100%
- I may also do a level with midtone around 1.1
- You may also use the eraser on some part...
I think such an action cannot be used the same way on all pictures, but it is - for me - a good start...
Thanks for trying it!
Asher Kelman
OPF Owner/Editor-in-Chief
Michael,
Great example. However, it's coming up as jagies especially the diagonals. Could you post a less compressed jpg?
This is too good a contribution not to see it at it's best!
Thanks,
Asher
Great example. However, it's coming up as jagies especially the diagonals. Could you post a less compressed jpg?
This is too good a contribution not to see it at it's best!
Thanks,
Asher
nicolas claris
OPF Co-founder/Administrator
Asher
Michael has written there were 300%...
I agree it would be interesting to see the samples at 100%
Michael has written there were 300%...
I agree it would be interesting to see the samples at 100%
nicolas claris
OPF Co-founder/Administrator
Different tries from different persons are of course very interesting and a good test for my sharpness action. However there are many other action around, I think it would be interesting too to test Benjamin Kanarek workflow.
I'll give it a try tomorrow.
I also think that this thread should be merged with Benjamin's thread (in "Layback cafe") and moved to "Image Processing and Workflow" forum.
Asher if you agree could you do this?
I'll give it a try tomorrow.
I also think that this thread should be merged with Benjamin's thread (in "Layback cafe") and moved to "Image Processing and Workflow" forum.
Asher if you agree could you do this?
Michael Fontana
pro member
Bonsoir Michael
yes, I do agree, but:
- that's the way I like my pics, with contrasts and colorfull.
- the action produces a layer that is set by default at 70%, easy to tweak:
- sometimes I get it back to 30%
- sometimes I increase it to 100%
- I may also do a level with midtone around 1.1
- You may also use the eraser on some part...
I think such an action cannot be used the same way on all pictures, but it is - for me - a good start...
Thanks for trying it!
Helas Nicolas
ç'était pas du mauvais ésprit; et je savais d' exagerér en agrandissant a troiscent...
Setting the layer's opacity is a very valuable option, that I tried, too. Nicolas statement "I think such an action cannot be used the same way on all pictures" is identical with my own experiences.
I like the enhancement of the black, as I usually tend to keep them "open", till the last step. This pops contrast and color. I used your action today, in a rather "creative sharpening" - following the terms of Bruce Fraser - with a mask, for "selective" sharpness.
Still the question: Do you use it as last step, before reducing to 8-bit?
Michael Fontana
pro member
Michael,
Great example. However, it's coming up as jagies especially the diagonals. Could you post a less compressed jpg?
This is too good a contribution not to see it at it's best!
Thanks,
Asher
Asher and Nicolas, I'll upload it tomorrow, as I'm at home, now.
nicolas claris
OPF Co-founder/Administrator
Fine!
Thanks Michael!
Make sweet dreams
Thanks Michael!
Make sweet dreams
nicolas claris
OPF Co-founder/Administrator
300% is a good way to check also, then it's also interesting to see at 100% (and even at 50%)ç'était pas du mauvais ésprit; et je savais d' exagerér en agrandissant a troiscent...
I didn't understand your comments as "mauvais esprit" at all!
Comments may be negative also, though I didn't take them as so...
It is generally the last step before I save the file as LAB 16 bits, then:Still the question: Do you use it as last step, before reducing to 8-bit?
- if the final output is RGB, I convert to the desired RGB color space prior to reduce to 16 bits
- if the final output is cmyk, I convert to appropriate cmyk color space prior to reduce to 16 bits
Sometimes it reveals some spots (not necessarly sensor's dust) so I'll have some cloning (but that can be done in 8 bits)
Michael Fontana
pro member
ok, so he' re the 100%views, taken from screenshots at 72 dpi, and converted to sRGB. Still its not a 100% view of a tiff in PS....
BTW: It's shot from Distagon 28 on a 1 DS-2.


Nicolas, thanks for clarifying the action's place in your workflow.
This reminds me, that I generally tend to sharpen rather conservative, as - when delivering the shots - I never know its final size, use, CMYK-profile, etc.
BTW: It's shot from Distagon 28 on a 1 DS-2.
Nicolas, thanks for clarifying the action's place in your workflow.
This reminds me, that I generally tend to sharpen rather conservative, as - when delivering the shots - I never know its final size, use, CMYK-profile, etc.
nicolas claris
OPF Co-founder/Administrator
Nicolas, thanks for clarifying the action's place in your workflow.
This reminds me, that I generally tend to sharpen rather conservative, as - when delivering the shots - I never know its final size, use, CMYK-profile, etc.
Hi Michael
thanks for posting the above, I honestly have to admit that I don't prefer th "esay sharpening" versions...
I generally deliver my pics to the clients as this:
Out of camera size at 300 dpi / sRGB
I convert to cmyk when I know where (USA/Europe) it will be printed and on what kind of printer.
Otherwise, we mainly use our pics for producing ads or brochure for our clients so we know size and color space needed!
Have a great day
Asher Kelman
OPF Owner/Editor-in-Chief
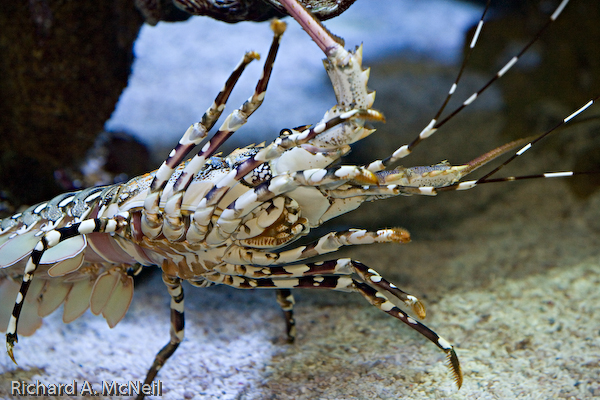
I'm posting this for Richard McNeil.
Asher
First the lobster, original, unsharpened:

and now sharpened with Nicolas Claris' actions:
Now the bird (what is it and where do you find them) original
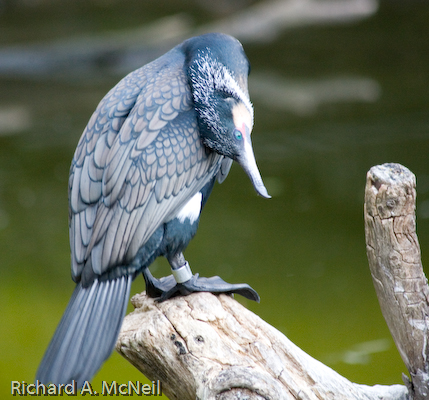
and sharpened
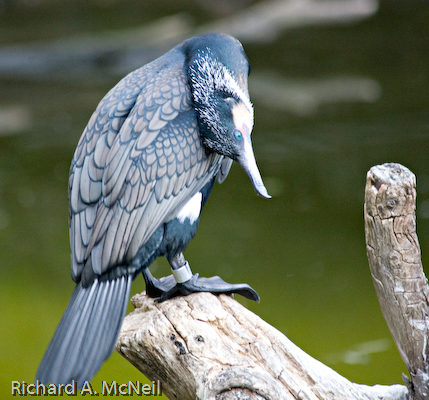
and now sharpened with Nicolas Claris' actions:
Now the bird (what is it and where do you find them) original
and sharpened
Asher