Doug Kerr
Well-known member
In a thread on the Clipping Mask concept in Photoshop, Joachim Bolte showed the use of that function to create a stunning composite. It was a monochrome image of a horse, overlaid on which were several "windows" each of which show the corresponding area of the image but in full color and surrounded by little white borders (with small beveled edges!).
I've repeated it here:
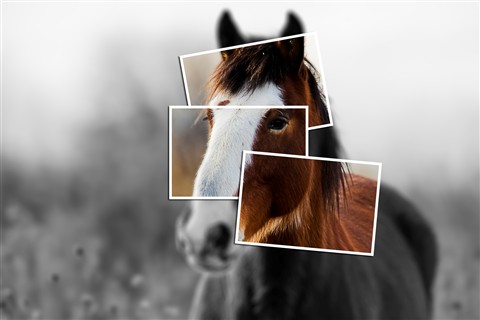
Joachim Bolte: Collage
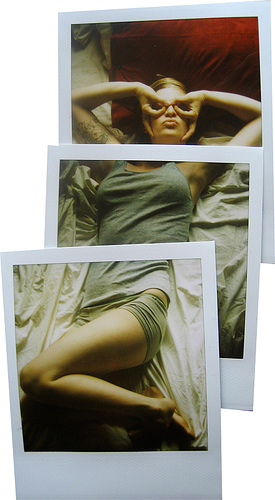
Asher praised the construction, and aptly said it was like a "collection of Polaroids" (he meant Polaroid prints, of course).
Joachim's description was "concise" - I'm sure that an experienced Photoshop walloper would have recognized exactly what he meant, but it took me (a Photoshop dilettante), a while to fill in what I think are the details.
Later, our new member Jonas Wendorf described a different technique to produce this same result, using the Knockout feature of Photoshop. His description was a little "concise", and again it took me a while to fill in the details.
Jonas' technique is perhaps a little simpler than what I believe Joachim's is.
I thought here I would describe what I believe to be Jonas' technique in (tedious) detail.
The project will be to construct a collage like that shown by Joachim: the main image is seen in grayscale, overlaid on which are three little "Polaroid prints" (exactly the same shape and size, although we could depart from that) exactly mimicking the corresponding area of the image but in full color, each with a white border. (I'll stop short of the beveled edge.)
Here we go.
• The base image must be on the Background layer. If it is not, demote its layer to Background status by using Layer>New>Background from Layer.
• Immediately above the Background layer, place an adjustment layer to render the image into the condition you want it as the background of the collage (I used Black and White). Set it to produce the desired effect.
• Above that establish a new ordinary layer - it will be empty. This will be our Knockout Layer 1.
• On Knockout Layer 1, construct a rectangle of any color you choose (I suggest not white) which will be the size and shape of your "Polaroid prints". I just make a selection that size and shape and then use Fill to make it the color I use. [I use an arbitrary orange - it makes it easier to see what happens further along.]
• Double click on the layer control bar for Knockout Layer 1 (not on any icon, its name, etc.) to bring up the Layer Style dialog.
• On the Layer Style dialog, choose Stroke. Make sure its check box is checked; if not, check it.
• Under Structure, set Size to the width of the white border you want on your "Polaroid prints". Set Position to Inside. Set Blend Mode to Normal. Set Opacity to 100%. Set Color to your border color (we assume white). [This will make the border on the "Polaroid prints".] (A beveled edge could be applied here as well.)
• Still on the Layer Style dialog, choose Blending Options. In the Advanced Blending panel, set Knockout to Deep. [This will make any part of this layer that is not opaque disable every layer below it down to, but not including, the Background layer. The point is to disable part of the "Black and White" layer that is taking the color from our image, letting the color show in our little "Polaroid print.]
• Set Fill Opacity to 0%. [This makes the colored rectangles on the Knockout layer not themselves appear in the composite image. Rather, we will see on those regions the original image, from the Background layer.]
• OK the Layer Style dialog.
• Suppose we want three "Polaroid prints" altogether. On the control bar for Knockout Layer 1, right click and hit Duplicate Layer. This will make Knockout Layer 2. Do that again to make Knockout Layer 3.
• One at a time, select the layer control bar for the Knockout layers. For each, move and/or rotate the layer content to position the "Polaroid print" it generates as desired. Note that the ones on the upper Knockout layers will (with regard to the white border) overlay the ones on lower layers.
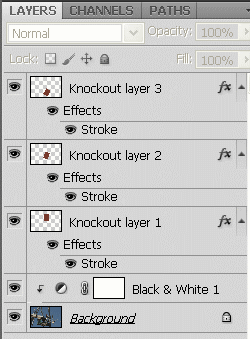
Here's a screen shot of the Layers panel for the setup I describe:
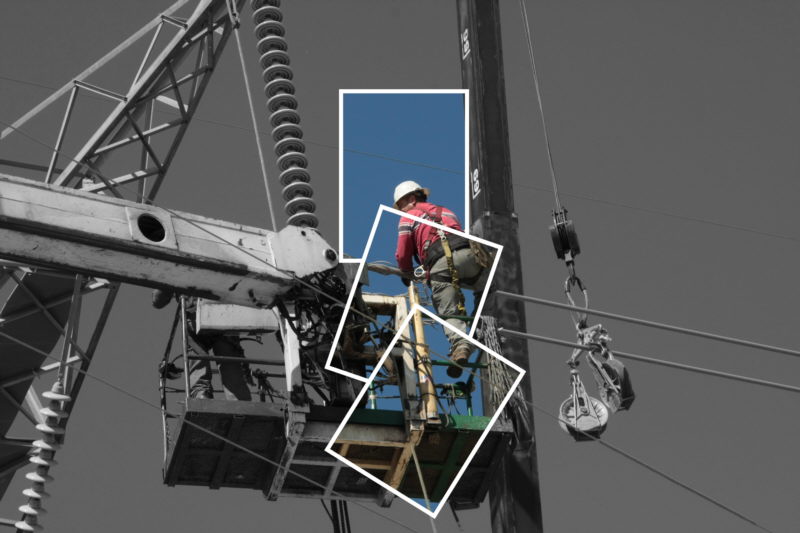
Here's the result (not nearly so pretty as Joachim's horse!):
Thanks so much to Joachim and Jonas for showing me how to do this.
Best regards,
Doug
I've repeated it here:
Joachim Bolte: Collage
Asher praised the construction, and aptly said it was like a "collection of Polaroids" (he meant Polaroid prints, of course).
Joachim's description was "concise" - I'm sure that an experienced Photoshop walloper would have recognized exactly what he meant, but it took me (a Photoshop dilettante), a while to fill in what I think are the details.
Later, our new member Jonas Wendorf described a different technique to produce this same result, using the Knockout feature of Photoshop. His description was a little "concise", and again it took me a while to fill in the details.
Jonas' technique is perhaps a little simpler than what I believe Joachim's is.
I thought here I would describe what I believe to be Jonas' technique in (tedious) detail.
The project will be to construct a collage like that shown by Joachim: the main image is seen in grayscale, overlaid on which are three little "Polaroid prints" (exactly the same shape and size, although we could depart from that) exactly mimicking the corresponding area of the image but in full color, each with a white border. (I'll stop short of the beveled edge.)
Here we go.
• The base image must be on the Background layer. If it is not, demote its layer to Background status by using Layer>New>Background from Layer.
• Immediately above the Background layer, place an adjustment layer to render the image into the condition you want it as the background of the collage (I used Black and White). Set it to produce the desired effect.
• Above that establish a new ordinary layer - it will be empty. This will be our Knockout Layer 1.
• On Knockout Layer 1, construct a rectangle of any color you choose (I suggest not white) which will be the size and shape of your "Polaroid prints". I just make a selection that size and shape and then use Fill to make it the color I use. [I use an arbitrary orange - it makes it easier to see what happens further along.]
• Double click on the layer control bar for Knockout Layer 1 (not on any icon, its name, etc.) to bring up the Layer Style dialog.
• On the Layer Style dialog, choose Stroke. Make sure its check box is checked; if not, check it.
• Under Structure, set Size to the width of the white border you want on your "Polaroid prints". Set Position to Inside. Set Blend Mode to Normal. Set Opacity to 100%. Set Color to your border color (we assume white). [This will make the border on the "Polaroid prints".] (A beveled edge could be applied here as well.)
• Still on the Layer Style dialog, choose Blending Options. In the Advanced Blending panel, set Knockout to Deep. [This will make any part of this layer that is not opaque disable every layer below it down to, but not including, the Background layer. The point is to disable part of the "Black and White" layer that is taking the color from our image, letting the color show in our little "Polaroid print.]
• Set Fill Opacity to 0%. [This makes the colored rectangles on the Knockout layer not themselves appear in the composite image. Rather, we will see on those regions the original image, from the Background layer.]
• OK the Layer Style dialog.
• Suppose we want three "Polaroid prints" altogether. On the control bar for Knockout Layer 1, right click and hit Duplicate Layer. This will make Knockout Layer 2. Do that again to make Knockout Layer 3.
• One at a time, select the layer control bar for the Knockout layers. For each, move and/or rotate the layer content to position the "Polaroid print" it generates as desired. Note that the ones on the upper Knockout layers will (with regard to the white border) overlay the ones on lower layers.
Here's a screen shot of the Layers panel for the setup I describe:
Here's the result (not nearly so pretty as Joachim's horse!):
Thanks so much to Joachim and Jonas for showing me how to do this.
Best regards,
Doug
")