• Please use real names.

    Greetings to all who have registered to OPF and those guests taking a look around. Please use real names. Registrations with fictitious names will not be processed. REAL NAMES ONLY will be processed

    Firstname Lastname

    Register

    We are a courteous and supportive community. No need to hide behind an alia. If you have a genuine need for privacy/secrecy then let me know!
  • Welcome to the new site. Here's a thread about the update where you can post your feedback, ask questions or spot those nasty bugs!

How I process my stacked photographs

Antonio Correia

Well-known member
A quick and modest description - perhaps a clumsy one - of my procedure when making stacked photographs. I do like the final result of most of the time. I always try to avoid a harsh HDR which I am not very found of.
Comments welcome. Thank you for your attention.

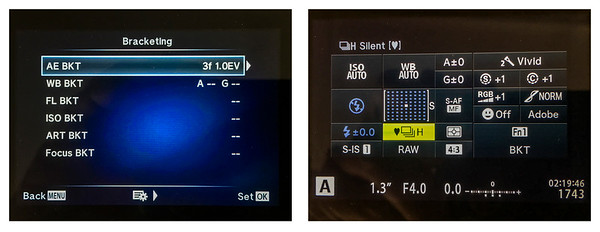
A - Settings in camera
My camera is so far, an Olympus 5 Mark II and I use this process mainly with the 7-14 (14-28mm FF) which for this purpose, I find a convenient choice.
The camera is set to Continuous Photo and the Exposure Bracketing set to 3, 5 or even 7 photographs depending on the scene.
I have tried once the ISO Bracketing along the Exposure Bracketing, but I have to try again. Hope to write about it later on.

i-7WR7QFQ-M.jpg

B - Hand held photographs
I photograph most of the time without tripod. I hold my breath and try not to move while making the stacking. I am not very worried about a small movement in the scene or of myself.
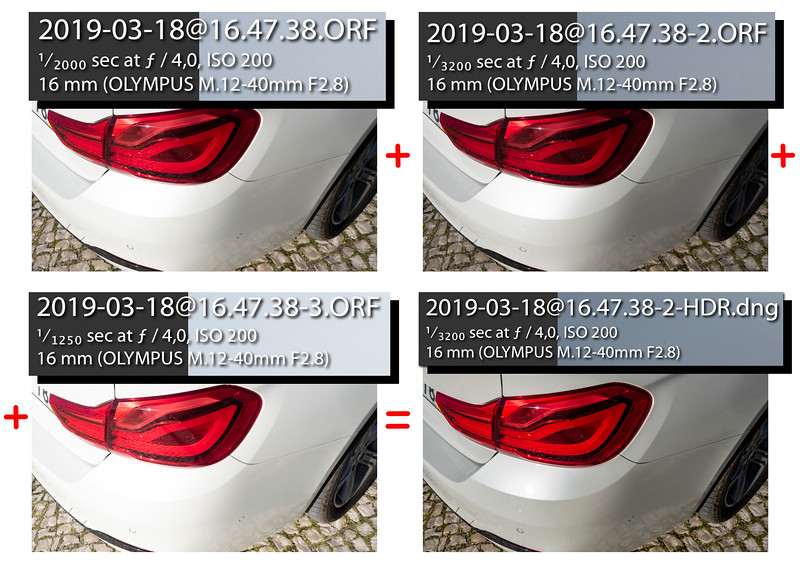
As an example here are 5 photographs taken in RAW and with only one adjustment in LR

i-R8XMHB2-M.jpg

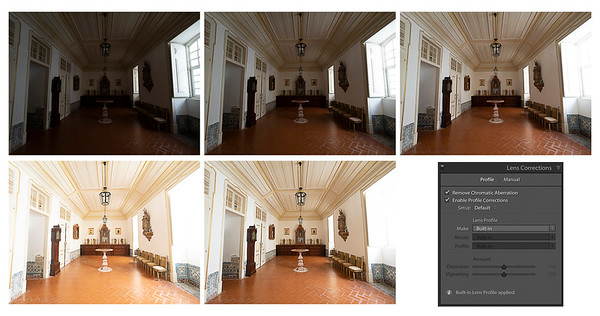
C - Exposure bracketing in Light Room
After importing the files in LR, I choose Control+H and let the program do it's job.
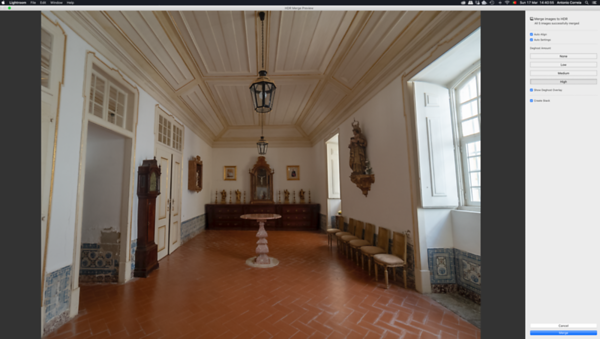
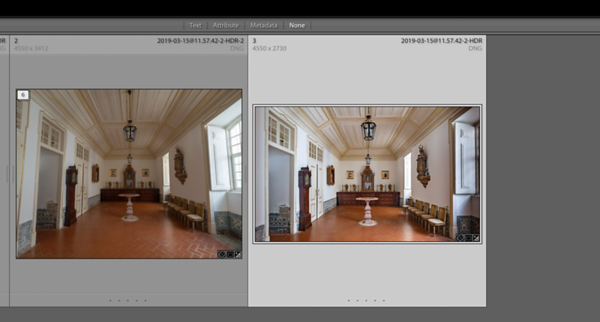
i-jpxgGzL-M.png

D - Final image
The 5 files are stacked. (on the right, the final one previously posted and at the left the new one)

i-B98JW2n-M.png

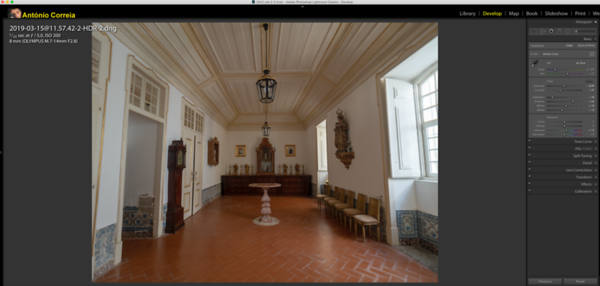
E - Developing photograph
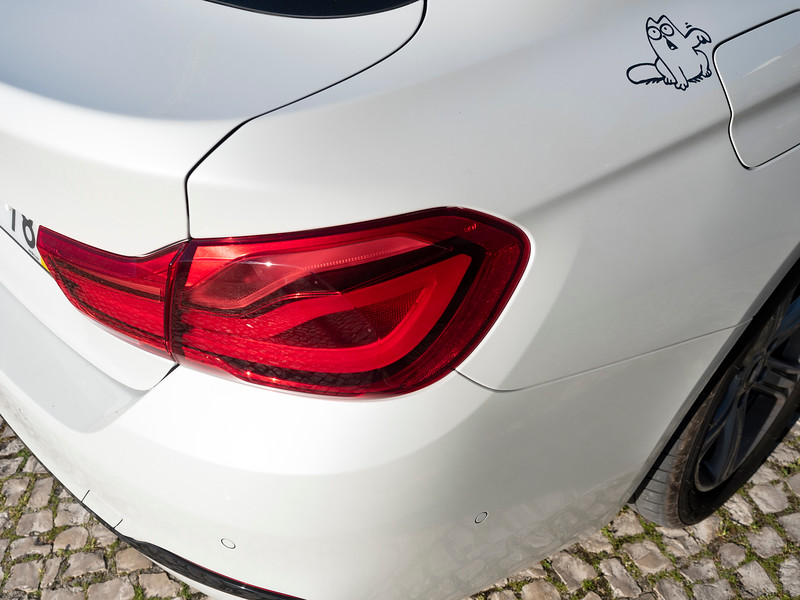
Now in the Develop mode, LR returns me a photographed automatically adjusted.
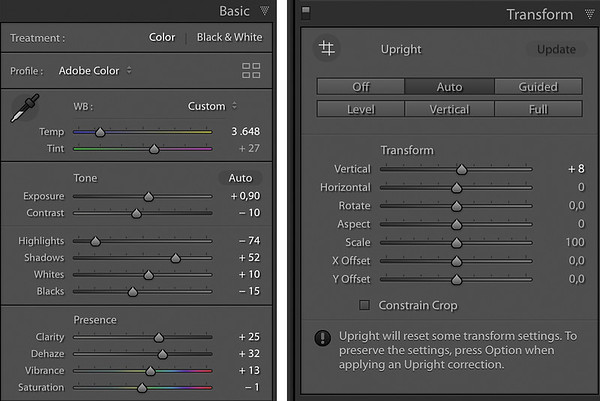
i-sptjw4Z-M.png

F - Time to play
Now it is time to play until I like the image.
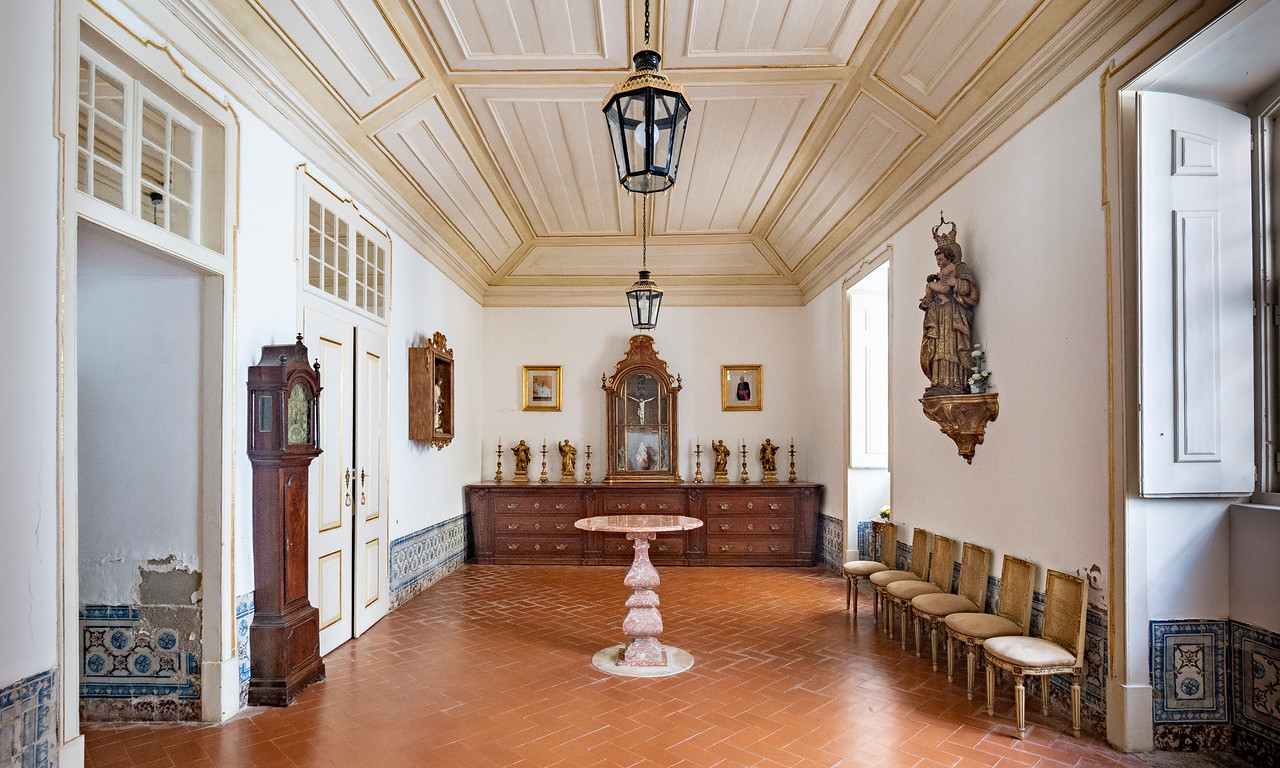
i-MxzxMmB-M.jpg

G - Done
i-q8kNrPG-X2.jpg

.

.
António Correia
+351 969 067 950 / +1 (415) 625 342 7
Images - Gente cá da terra - Projecto 33
"I've become very picky. Most of my outings these days do not yield satisfactory photographs because what used to be satisfactory to me in the past no longer is. I make much fewer images today than I have in previous times, and I expect this trend to continue. Progress in art is not about becoming more prolific; it's about becoming more demanding." - Guy Tal
 

Asher Kelman

OPF Owner/Editor-in-Chief
So that is how you did it, Antonio!

I had thought you had a Canon 24 mm tilt shift or something like it.

The result is wonderful.

But why don’t you call it “Develop” from the outset? Is this that you do it first in JPG and then LR works on the RAW?

Asher
 

Antonio Correia

Well-known member
I photograph only in RAW
All the process was done from them. LR processes the RAW files and returns a DGG one.
I like the results most of the time
Thank you for commenting Asher ! :)
Cheers ! :)
 

Doug Kerr

Well-known member
Hi, Asher,

But why don’t you call it “Develop” from the outset? Is this that you do it first in JPG and then LR works on the RAW?

I think that generally, in the digital regime, "develop" is a metaphor for deriving an image from a suite of raw data. What is done here is (at least) one step beyond that.

I realize that this is not directly equivalent to, in analog technology, developing four negatives and then in some way making a composite from them. Here, the developing and compositing are integrated. So I understand the possibility of considering this an "elaborated" form of development. Still, I think it is "beyond development".

Perhaps it is like the civilian who would take a roll of exposed negative film to the drug store and get back an envelope full of prints. He would say, "Yes, I got the pictures from the picnic developed."

But if we hold to that outlook, then anything we do between using the camera and having the final product (including dropping Elvis' likeness into the bridge club group photo and printing it on a poster) is "developing".

Best regards,

Doug
 

Asher Kelman

OPF Owner/Editor-in-Chief
Forgive me a moment, Antonio. I don’t use LR. So I don’t know what “Develop” might mean, except that it could refer to anything.
I guess in LR there is a “develop” module.

But you seemed to have processed the RAW files and then you did “develop”!

Sometime I will study it. I have yet to discover why on earth LR is so damned popular, LOL! Could be it’s beyond me, something like Rap “Music” which just doesn’t fit with my age and calcified sensibilities!

Asher
 

nicolas claris

OPF Co-founder/Administrator
Asher,
"Develop" is a module of LR, it is where one… develops raw images.
Within that module there's an HDR function that Antonio uses.
It is a very efficient feature, i do use it for all my boat interiors shoots.
---
LR uses the same engine than PS for developing raw files, but it is much more efficient as you can work on different shots applying the same settings, note them and then select the ones you wish to export, (eventually for more work with layers in PS).
Many folks do use LR also for it's capacity for Digital Asset Management, this is not my case, I do have my own way ;)
 

Asher Kelman

OPF Owner/Editor-in-Chief
Thanks Nicolas!

I have the software with my subscription.

Does it make a difference which version: Classic, etc?

Asher
 

nicolas claris

OPF Co-founder/Administrator
Asher, I don't know, I use Classic only.
As I do use it both on my Laptop when on location and on my working machine inn the office, I have migrated all the pref folder form the library/Application support/Adobe/Lightroom to Dropbox and created from Dropbox a symbolic link (much more trustable than aliases) into both library computers, therefore my settings remain the same on both Macs…
 

Asher Kelman

OPF Owner/Editor-in-Chief
Asher, I don't know, I use Classic only.
As I do use it both on my Laptop when on location and on my working machine inn the office, I have migrated all the pref folder form the library/Application support/Adobe/Lightroom to Dropbox and created from Dropbox a symbolic link (much more trustable than aliases) into both library computers, therefore my settings remain the same on both Macs…
Brilliant!

1. Is that symbolic link straightforward?

2. In Photoshop, in RAW one can select more files to have the same development, (but I haven’t found out how to apply the settings to “separated” files as in Capture One).

So is THAT the particular step in LR that is so advantageous compared to using PS?

Asher
 

Robert Watcher

Well-known member
I presume that you must know this stuff Asher (so if not for you, it may benefit others too) - but you are never resaving a raw file. Photoshop doesn’t have that ability. Data about any adjustments that are made in Adobe Raw Converter, are stored in a small sidecar database alongside the original untouched raw data. Changes are non-destructive but the raw files have no value, until they are converted into a proper image format.

So both Photoshop and Lightroom use the same Adobe Raw Converter (plugin) when you first open a raw file in them. It’s not really going to matter which program you use to open your raw files and make basic colour/exposure/density changes in. The conversion of raw sensor data, is necessary in order to see a usable bitmap image displayed on your monitor. (being that you can also open and adjust jpg or tiff files in ACR, helps to see the family resemblance to the LR Develop Module).

The advantage of using Lightroom is that it extends the non-destructive method of processing in the Develop Module (where all adjustments are made), so that many more things can be done than the essential colour and density adjustments of raw converter. Things such as gradients, dodging, burning, cropping and the list goes on to most of what would normally be required by a photographer (including other features mentioned in this thread).

All of this set of adjustment data is stored in the LR catalogue (instead of a sidecar or file included in a dng) so that when the file is opened again - one click can Reset the image to it’s original or any setting can be clicked on and adjusted or removed —- even if the original was a jpg from camera. In Photoshop, any processing is destructive, meaning you can’t revert unless you have saved psd, tiff or jpg versions along the way with every change.

One way around that, is to open the raw image as a Smart Object in PS and by creating Smart Object layers for adjustments and then saving the image to psd for future non-destructive editing. The psd is then just referencing the original file (does not include it) and storing the adjustments made.

That can be a lot of extra work compared to Lightroom’s way of doing things. If something can’t be done in Lightroom for some reason, the file can effortlessly be opened in PS (or any other processor like Affinity Photo) in the format you prefer and when Saved, the processed image is returned to the Lightroom Catalogue. 90% of what I need to process is done in LR and never hits PS. Photoshop does have a Lot of extensive layering, selection, masking, text and graphics features that simply are not available in LR, and so it has its place.

A huge advantage of LR for me is the data management end. No other image editing program out there has its functionality. There are different ways to manage files with many of the programs - but LR method is so practical and versatile. An example - some like to create separate catalogues for each assignment. Ones like me prefer to have one huge catalogue for all images taken. I store all of my travel and street photography since I began in 2008, in one catalogue stored with the image files on a 4 TB portable drive that I have with me. This catalogue is generally always open on my MacBook, and I can find just about any of the tens of thousands of images from the past eleven years, in no time. Either by my organization structure of different categories (much like your forum sections) - by colour flags or star rating, or by the amazing built in Search that can identify all files based on any property entered —- year, month, day, camera model, lens, aperture, iso, etc, etc. A convenient feature of the DMS - when Importing files, I can create Smart Previews that are small in file size, high enough quality and always available in the catalogue, to allow me to do editing without accessing the original (great for airplanes and travel) and those adjustments get transferred to the original file when accessed.

I’ve checked other programs and each has strengths and weaknesses. None match the DMS of Lightroom for my needs, or the ease of importing files from my cards onto my hard drives and cataloguing them - opening raw files or other image formats - processing most of what needs to be done to most images (including features mentioned in this thread) - creating develop presets that can be applied as starting points or as effects - to saving in a variety of formats or structures as well as a great printing engine. Also includes Soft Proofing and a section for designing books like Blurb - as well as FTP uploading and other custom plugins. I mean the list just goes on and on.

That is why Lightroom is so popular despite all the trash talk it gets and the desire for everyone to try and find alternatives. There are none, in one package. I have been using LR since 2007, and my current version I bought just before Adobe went to the subscription model. So there are no upgrades for it. But all versions of Lightroom operate the same way and have the same basic functionality. Newer cloud versions (CC) have improved data management and processing speeds and have more advanced features included than in my LR5 - and include raw converting of the latest cameras. But currently I am fine with what I have. I have it and PS 6 on my MacBook Air. Some day I will fork out for the subscription model I am sure.

WOW - there’s a big read - and oversimplification. LR is not necessary, but highly valued. ;)

——
 
Last edited:

Asher Kelman

OPF Owner/Editor-in-Chief
Thanks so much, Robert, for the generous time devoted to that explanation. It’s so needed.

Since I have both, which should I use? Does it matter after I have ingested the files that I move the original ones from my desk to a safe or off site?

Will I be able to get rid of dupes?

?

Asher
 

Robert Watcher

Well-known member
Thanks so much, Robert, for the generous time devoted to that explanation. It’s so needed.

Since I have both, which should I use? Does it matter after I have ingested the files that I move the original ones from my desk to a safe or off site?

Will I be able to get rid of dupes?

?

Asher

I use both LR & PS. But LR is the program always open on my MacBook and what I use on a daily basis. Unless I am designing graphics for companies, where I need PS and open a project in PS —— if I feel the need to edit in PS, I open the file from within LR. A common use for PS for me is with family portrait where I open 3 or 4 files as layers in PS (that option is automatic in LR) to replace eyes or heads to make a perfect shot.


I have never been in the practice of storing image files on my computer (I assume that’s what you mean by desktop). I store everything on external hard drives for a very practical reason. I want to be able to access my files on any type of device. Also I have had Windows and Mac computers go down for a variety of reasons. Thus my established practice has been to only store OS and working application on my computer hard drive. That is an easy and singular fix is something happens to the computers hard drive. My work files are never in danger from that happening.


I currently have 2 identical sets of external hard drives with me while away from home - and 1 identical copy of each main hard drive back home in Canada, that I update when I return a couple of times each year. I keep a (MAIN WORKING) portable HD for all my travel and street photography going back to 2008 (contains one LR catalogue for all files), one HD for my video files (non-Lightroom), and one HD for all of my professional photography going back to 2003 when I went digital (in its own LR catalogue). These are labeled and are the only ones I use on a day to day basis. I carry with me 3 identical drives that are exact copies of the Main 3 HD. I copy from the Main to BU periodically to keep the BU drives up to date as possible. —- with this set up, if any main drive goes down, I can use my BU and copy all files to a new drive when I get that.

So in all, I have a very small stack of 7 small portable hard drives with me all the time in a 4”x4” section of my camera bag - 3 work drives, 3 back up drives of the work drives and 1 drive to keep a regular back up of my MacBook (SuperDuper), iPads and iPhone in case any of them go down. These used to be each 2TB HD, last year I moved the complete set to 4TB drives and will probably migrate all to 8TB in a year or so. So far - so good.

As for dups —— there is a setting when Importing files from Memory card or other source into the catalogue, Don’t Include Duplicates (I believe it is based on timestamp so have found in times past, dups where created for some reason related to how I had saved files previously. But it works well. Dups just get greyed out in the thumbnails. In this way I always have full Rez copies of my Snapseed processed pics stored there and available if needed.


———


BTW - you may have noticed that I use the Snapseed App for processing most images that I post online. That does not preclude my use of LR for storing and organizing my images. It is just very quick and convenient to upload a few files straight from my camera wirelessly to my iPad or iPhone - do great processing quickly - and upload to Instagram or forums whether I am sitting around the house, in a coffee shop or on a street corner. But at the end of the day, my card with all the files from the day needs to go into a card reader and get imported into Lightroom for storage and future use. If I really like the Snapseed processing and want it as part of my permanent catalogue, I can import it into LR from my desktop or other location. The way I am set up though, all files on my iPad and iPhone that automatically get stored in the Photos folder of my device, are sync’d to save to my Google Photos account at full resolution - and then are automatically deleted from my Photos folder so I always have lots of free space.


——-
 
Last edited:

Asher Kelman

OPF Owner/Editor-in-Chief
So you don’t delete dups to save space, just take it as the cost of not risking removing valuable images?

Asher
 

Robert Watcher

Well-known member
I’ve never deleted a shot - either in camera or on HD storage. It takes more time than it’s worth for me to check and delete them. Plus as you mention, hit the wrong file to delete is not good. I have many useless images stored. They don’t get in the way.

I don’t generally end up with exact duplicates if that is what you are referring to - because with the setting I mentioned, they get recognized as that and don’t get imported into the catalogue.

Actually when working in LR, I do often end up with many duplicates of a particular file if I want to create various versions or effects. So easy to right click and create a duplicate. That sits beside each other. There are also options to stack same images or raw/jpg versions under each other for less clutter.

Same with garbage images. It is easier to mark them with a flag so they don’t show in the thumbnails, that to delete them from the catalogue and HD. But I have ended up sing blurry images or other images that I might have thrown away, for web backgrounds or other graphic purposes - or blown out images for overlays - so I was glad to have kept them.

———
 
Last edited:

Antonio Correia

Well-known member
Robert... what a complete explanation ! :)
I completely agree with you.
Indeed LR is a great program which I use all the time.
You did not mention the key-wording possibility which allows to make a search in no time, getting shots done years ago with those shot yesterday. Great, great... :)
You know Robert, that I photograph with Olympus.
I have thought - silly perhaps - that photographs stacked are better than non-stacked ones. Their size is obviously larger. Let me just give you an extreme example.
Today I was outside taking some photographs when I looked at a car and made 3 stacking shots. The light was terrible, strong on the bumper ! The car is white !
I made the 3 photographs handheld as usual. I take some care not to move too much...
her is the result. I like it. Do you ?
I just wonder if the systematic method of making 3 bracket exposures to get just one, doesn't return a better final result than just one ?
Yes, I know that it depends on what your aim is... (I contradict myself)

i-KwGvcd7-L.jpg


i-5stXL5s-L.jpg


i-5nbMnt5-L.jpg


i-NcjwHMf-L.jpg


i-SvtSkwM-L.jpg
 

Robert Watcher

Well-known member
Hey Antonio. I fully imagine that in such contrasts situations a bracketed could should be superior. I’m not quite sure what each of your images are as there are no labels for each. If one is the combined image. I see they are different expsosures? EDIT - I got it now. The last dng is the combined image.

I have shot bracketed exposure for testing in the past, and one I did find I got cleaner shots. It is not something I am likely to use unless perhaps I am hired for some Interior Photography where there would be areas of extreme brightness ranges like your interior shots.

Two features that don’t really cause me to use Bracketing in my day to day shooting - are that I don’t shoot in raw format where the best possible results would likely be - and my version of Lightroom 5 doesnt have compositing bracketed shots, built into it.

I have the capability in my PS6. I should give your handheld method a try in normal situation, and see the difference myself. (y)
 

Robert Watcher

Well-known member
Oh yeah - LR keywording is great too. I should do it, but I don’t take the time. For a while when I tried, I created some presets to drop in. Problem is after a while tons of files had the same set of keywords and it didn’t help a lot :ROFLMAO:
 
Last edited:

Asher Kelman

OPF Owner/Editor-in-Chief
The best bracketing I have seen is in the Ricoh GR. It does the brackets with one press of the shorter and so it’s easier to keep the camera still!

On the Olympus, do you have the same capability?

Asher
 

Antonio Correia

Well-known member
Robert, the 4 photographs together have the settings.
The others appear in that order being the last one the DNG.
I think Olympus has the capability of stacking in camera but the result is in jpg which I do not use.
Sony does that too ! ;)
Hhhhuuuummmm Sony ..... Hhhhuuuummmm ;)
:LOL:
 

Doug Kerr

Well-known member
For what its worth, my Panasonic Lumix DMC-FZ1000 has provision for exposure stacking in-camera (3 images). Of course the output is a JPEG file, The pixel dimensions of the output are slightly smaller than normal (owing to the need to perhaps shift the images into alignment.

I haven't tried it, but probably should.

Best regards,

Doug
 

Robert Watcher

Well-known member
Fortunately for us Olympus users, virtually every Olympus camera includes both manual exposure bracketing as well as auto combining in camera (HDR mode). My original E-M1 and a couple other models offer a dedicated button to set the HDR mode - and for all other models like my original E-M10, it’s available easy in the Menu. For Manual Bracketing, Olympus cameras go up to 7 exposures. The only camera I have used that provided more exposures at 9 - was when I was shooting with a Nikon D200 years ago.

Antonio mentions that auto combining of HDR creates JPG files only? Raw files are simply raw sensor data so there is no image to combine in camera. If versatility to change white balance or tweak settings to taste is required - it can only be done by manually Bracketing different exposures and combining those in post processing after the raw files have been adjusted and converted to a bitmap file that you are seeing on the monitor. That is my take on it.


Here are the steps for all Olympus m4/3 cameras from cheapest to most expensive:


——
 
Top