
-
Please use real names.
Greetings to all who have registered to OPF and those guests taking a look around. Please use real names. Registrations with fictitious names will not be processed. REAL NAMES ONLY will be processed
Firstname Lastname
Register
We are a courteous and supportive community. No need to hide behind an alia. If you have a genuine need for privacy/secrecy then let me know! -
Welcome to the new site. Here's a thread about the update where you can post your feedback, ask questions or spot those nasty bugs!
You are using an out of date browser. It may not display this or other websites correctly.
You should upgrade or use an alternative browser.
You should upgrade or use an alternative browser.
Interior of a sailing yacht
- Thread starter nicolas claris
- Start date
leonardobarreto.com
pro member
Nicolas
Thank you for shearing your experience with the Hy6, my life is so much less complicated since I only use C1 3.7.8 (C1 4 light is not good for me since I work tethered). I like C1 so much that when I have to do something in Photoshop I feel like going back in time (the feeling of having to manually open a car window, you know?). What happens with C1 is that you set the white point, hue and color temperature in a non destructive way, after that, the rest of the color is done with profiles. I have a few custom profiles that I use to bring difficult colors and other Phase One canned profiles for other situations. For example: when I do an installation shot at a gallery where the lighting is mixed available hot lamps I use something called "EASY GREY" profile from Phase. This profile was developed to help product photographers that use white seamless background and produces perfect white walls while maintaining the color of the artwork.
I can't wait to see the next version of C1 with lens correction filters specifically designed for Mamiya lenses, that and the release of C1 Pro 4 will be big days in my calendar. The other interesting development is the new Combo wide camera designed for digital backs that will be much smaller --and maybe even cheaper -- than the current one... probably a must-have companion to the Hy6 owner...
The problem I have some times with stitching is finding that the two images don't match because of lens distortion, but probably what happens is that I use my 35mm when doing so. Now that I see your work I want to try to see if with my 45mm the procedure will be easier since that lens is more "normal".
Thierry Hagenauer
pro member
hi Leonardo,
I don't want to parade, but this option (call it "profile") is available in Captureshop since more than 2 years: it is called the "Color Alchemist" and includes 2 plugins: the "adaptive color compensation" and the "Enhance Neutral Areas", which can both even be fine tuned with sliders. And those settings can be saved and used later on new files.
This was introduced at the time of the SB 54 with the Kodak sensor: this sensor is known for producing sometimes (under certain light conditions) some very "annoying" color shifts (mainly visible in the neutral tones), and the only possibility to correct it is with a specific correction. PO call it now a "Easy Grey" profile, we have given the possibility even to fine-tune it.
Best regards,
Thierry
Nicolas
... when I do an installation shot at a gallery where the lighting is mixed available hot lamps I use something called "EASY GREY" profile from Phase. This profile was developed to help product photographers that use white seamless background and produces perfect white walls while maintaining the color of the artwork.
Last edited:
leonardobarreto.com
pro member
Thierry, I am sure there are many ways to do what I do, I basically stay in my corner of the woods where things work for me. You have a much broader view of everything that there is. The entire ColorEditor, a separate program that comes with C1 is there for me to explore. The interesting thing is that I asked other photographers about it and some --that work every day with C1-- don't even know it is there.
hi Leonardo,
I don't want to parade, but this option (call it "profile") is available in Captureshop since more than 2 years: it is called the "Color Alchemist" and includes 2 plugins: the "adaptive color compensation" and the "Enhance Neutral Areas", which can both even be fine tuned with sliders. And those settings can be saved and used later on new files.
This was introduced at the time of the SB 54 with the Kodak sensor: this sensor is known for producing sometimes (under certain light conditions) some very "annoying" color shifts (mainly visible in the neutral tones), and the only possibility to correct it is with a specific correction. PO call it now a "Easy Grey" profile, we have given the possibility even to fine-tune it.
Best regards,
Thierry
nicolas claris
OPF Co-founder/Administrator
Hi Leonardo
So glad to hear from you! I'm sure we have a lot to compare and exchange as we do use different MFC …differently!
e.g. I never shoot tethered, just because I don't need.
And yes I agree C1 is a great software, I do prefer far more 3.7.8 (which I still use for my 1Ds3 files) than C1 4.
However when I do like C1 4 for DNGs files.
AFAIK, the Sinar software such as CaptureShop and the later eXposure works only for Sinarbacks.
I do like the new version of eXposure, very promising. With it, a few clicks and you just have to sharpen in PS and you're done.
Yes these files are really clean and easy to handle (just need some power to handle 190 Mb files !-)
I must add that Sinar's people are really helpfull and fast replying, that's another relief!
The pano has been made with the Schneider 40 mm and it is very difficult to see any distortion… You will certainly get better resutls with your 45 than the 35…
@Thierry anything similar to "Color Alchemist" in eXposure?
Last edited:
Asher Kelman
OPF Owner/Editor-in-Chief
Hi Leonardo,
Glad to have your experienced input. It's one thing for reviewers and "gurus" to give pages of reports/ Experience in a specific professional use of a camera, lens or software is vastly more valuable to us. So thanks!
For those who do not know Leonardo's work he is a fine artist, a painter, an experienced war photographer with compelling images taken at great live fire personal risk and hard wild terrain living. He is now in New York and specializes in museum quality fine artwork photography for leading galleries.
This requires being able to image efficiently a whole exhibition, deliver files on time that are color perfect for that work of art. The latter might be flat, hyper-reflective with specular highlights or have colors that challenge the gamut of photography. So Leonardo's ideas and hints are reliable.
Leonardo, I have split up your post by headings since it's rich and covers a lot:
Phase One RAW Conversion:
I understand color temp. But how do you measure it. Do you use a Minolta color meter for color temp? Or do you use a WhiBal™ in one step for for color temp, hue and setting the white point? Can you show examples of a typical image with a standard then an "Easy Grey" profile?
Custom Lens Profiles or else select lens from several lenses: I would suggest that getting a custom profile might be worthwhile or else carefully checking lenses against color charts and photographs of grids to see if aberrations are really corrected for that lens. You may ask why?
Unfortunately a lens, even a very expensive lens may not be assembled properly! It may be out of alignment so the corrections and assumptions will not match your particular lens. How bad could that be? Very bad! I cannot disclose which MFR, but paying for a costly lens does not mean a the optics match the specs.
New Combo wide camera:
Stitching is becoming increasingly practical and advantageous in architectural, vehicle and other photography requiring extreme wide angle. Sometimes we simply do not possess a wide enough lens. Here in the Yacht picture, how far back can one go? Not much for sure. 40mm may not be wide enough. The next lens may be too distorted or expensive or else not available to rent.
Matching images with lens distortion:
This is a common problem even with the very best lenses. For example the famous Contax Zeiss 21mm Distagon, MM, has "moustache" distortion, so it's a challenge to stitch. One way of dealing with this is to overlap much more and crop away the lateral 10% before stitching. That means needing more images. However, the extra work will pay off. If one has very good lens distortion testing software then maybe one could use the un-cropped images.
Thanks again Leonardo,
I remember I owe you a lot for sharing some of your secret locations in New york and your artwork.
Asher
Glad to have your experienced input. It's one thing for reviewers and "gurus" to give pages of reports/ Experience in a specific professional use of a camera, lens or software is vastly more valuable to us. So thanks!
For those who do not know Leonardo's work he is a fine artist, a painter, an experienced war photographer with compelling images taken at great live fire personal risk and hard wild terrain living. He is now in New York and specializes in museum quality fine artwork photography for leading galleries.
This requires being able to image efficiently a whole exhibition, deliver files on time that are color perfect for that work of art. The latter might be flat, hyper-reflective with specular highlights or have colors that challenge the gamut of photography. So Leonardo's ideas and hints are reliable.
Leonardo, I have split up your post by headings since it's rich and covers a lot:
Phase One RAW Conversion:
......... I only use C1 3.7.8 (C1 4 light is not good for me since I work tethered). I like C1 so much that when I have to do something in Photoshop I feel like going back in time (the feeling of having to manually open a car window, you know?). What happens with C1 is that you set the white point, hue and color temperature in a non destructive way, after that, the rest of the color is done with profiles. I have a few custom profiles that I use to bring difficult colors and other Phase One canned profiles for other situations. For example: when I do an installation shot at a gallery where the lighting is mixed available hot lamps I use something called "EASY GREY" profile from Phase. This profile was developed to help product photographers that use white seamless background and produces perfect white walls while maintaining the color of the artwork.
I understand color temp. But how do you measure it. Do you use a Minolta color meter for color temp? Or do you use a WhiBal™ in one step for for color temp, hue and setting the white point? Can you show examples of a typical image with a standard then an "Easy Grey" profile?
Custom Lens Profiles or else select lens from several lenses: I would suggest that getting a custom profile might be worthwhile or else carefully checking lenses against color charts and photographs of grids to see if aberrations are really corrected for that lens. You may ask why?
Unfortunately a lens, even a very expensive lens may not be assembled properly! It may be out of alignment so the corrections and assumptions will not match your particular lens. How bad could that be? Very bad! I cannot disclose which MFR, but paying for a costly lens does not mean a the optics match the specs.
New Combo wide camera:
..and other digital backs I expect? I'd like to hear more. When is it availalble and any price?The other interesting development is the new Combo wide camera designed for digital backs that will be much smaller --and maybe even cheaper -- than the current one... probably a must-have companion to the Hy6 owner...
Stitching is becoming increasingly practical and advantageous in architectural, vehicle and other photography requiring extreme wide angle. Sometimes we simply do not possess a wide enough lens. Here in the Yacht picture, how far back can one go? Not much for sure. 40mm may not be wide enough. The next lens may be too distorted or expensive or else not available to rent.
Matching images with lens distortion:
The problem I have sometimes with stitching is finding that the two images don't match because of lens distortion, but probably what happens is that I use my 35mm when doing so. Now that I see your work I want to try to see if with my 45mm the procedure will be easier since that lens is more "normal".
This is a common problem even with the very best lenses. For example the famous Contax Zeiss 21mm Distagon, MM, has "moustache" distortion, so it's a challenge to stitch. One way of dealing with this is to overlap much more and crop away the lateral 10% before stitching. That means needing more images. However, the extra work will pay off. If one has very good lens distortion testing software then maybe one could use the un-cropped images.
Thanks again Leonardo,
I remember I owe you a lot for sharing some of your secret locations in New york and your artwork.
Asher
Last edited:
Bart_van_der_Wolf
pro member
However, if one has very good lens distortion testing software then maybe one could use the un-cropped images.
Most lens distortions are rather easy to correct with capable Pano stitching software. It usualy requires only 2 images with 50% overlap, rotated around the entry pupil, to build a profile. The 'only' variable might be when the lens utilizes internal floating elements during focusing.
Bart
Asher Kelman
OPF Owner/Editor-in-Chief
For sure! They are also lens correction software too! You are right to point that out.
Thierry Hagenauer
pro member
As said, Leonardo, I did certainly not want to parade, rather put things in the right perspective and inform. As you say it yourself, very often "features" exist, some since a long time, and the users are not aware of it. It's sometimes disappointing to see such.
Best regards,
Thierry
Best regards,
Thierry
Thierry, I am sure there are many ways to do what I do, I basically stay in my corner of the woods where things work for me. You have a much broader view of everything that there is. The entire ColorEditor, a separate program that comes with C1 is there for me to explore. The interesting thing is that I asked other photographers about it and some --that work every day with C1-- don't even know it is there.
Georg R. Baumann
Inactive
<whispers> This is a very interesting thread <leans back and listens> ")
nicolas claris
OPF Co-founder/Administrator
<whispers> This is a very interesting thread <leans back and listens>
So my friend, write down this one, will be usefull one day and will be for Leonardo as soon as he reads it (unless he knows it already ;-)
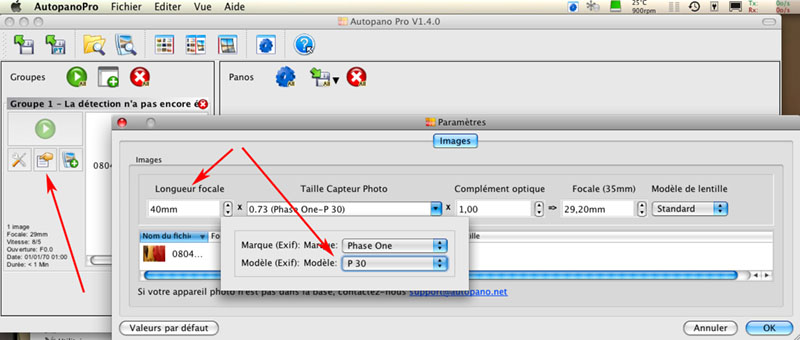
In Autopanopro, there is a data bas for lenses, this database recognizes the exifs unfos such as lens focal, ƒ stops, sensor (crop/uncrop/MF etc) do determine what correction to bring to the file prior to stich…
Many DB don't bring enough infos or the data base is not updated…
In my case it didn't recognize (weren't into the DB, and exif is quite poor (though better handeled now thru eXposure))
So when you click in the left tab (just after importing images) on the icon with a hand pointing to a sheet of paper, you can manually enter the infos…
In my case, I entered 40 mm AND applied the most close phaseone back as a reference (this let's the SW to calculate the real focal…)
No more back and forth, no more poorly stitched panos, right on at the first try!
Leonardo, if you haven't used this trick retry your 35 m shots, you'll be amazed…
Hope it helps… ;-)
Last edited:
leonardobarreto.com
pro member
I think that It is much better than my work flaw that is: develop in C1 and apply a CS3 FILTER>DISTORT>LENS CORRECTION and then make the stitch by hand. Before I used LensFix. normally the galleries want the files "as soon as possible" which means that I shoot, edit and raw-process at the same time. - Typically the images go to the web the same day-. So, thanks for the info (and I can tell that it comes in Apple flavor) I will google it.
The perfect solution for me would be to do the lens correction ON C1 -- or for someone working with Sinar system, on the Sinar raw processor -- so that the workflow can flow better and faster. That seams to be in the horizon with the coming of C1 4 PRO now that Mamiya lenses are in the same family of Phase One. I don't think that C1 will come with a stitch filter... and I don't have a problem with hand made stitching if the images are highly compatible.
In the ideal world you would tell the "mother program" to "auto correct" and give you a raw file that has the exact lens adjustments. This is probably what Hasselblad intended --or is using as alibi -- when going with a closed architecture system, so we can assume that other maker's responses will be "look, we do that too".
Thanks,
Leonardo
ps, than you Asher for your kind words, I had a terrific time when you visited ny city, I was impressed by your use of the 5D with the super fast normal lens, I am sure you got fantastic images...