• Please use real names.

    Greetings to all who have registered to OPF and those guests taking a look around. Please use real names. Registrations with fictitious names will not be processed. REAL NAMES ONLY will be processed

    Firstname Lastname

    Register

    We are a courteous and supportive community. No need to hide behind an alia. If you have a genuine need for privacy/secrecy then let me know!
  • Welcome to the new site. Here's a thread about the update where you can post your feedback, ask questions or spot those nasty bugs!

Night time Panorama of Rotterdam Skyline from the Euromast

Cem_Usakligil

Well-known member
Hi All,

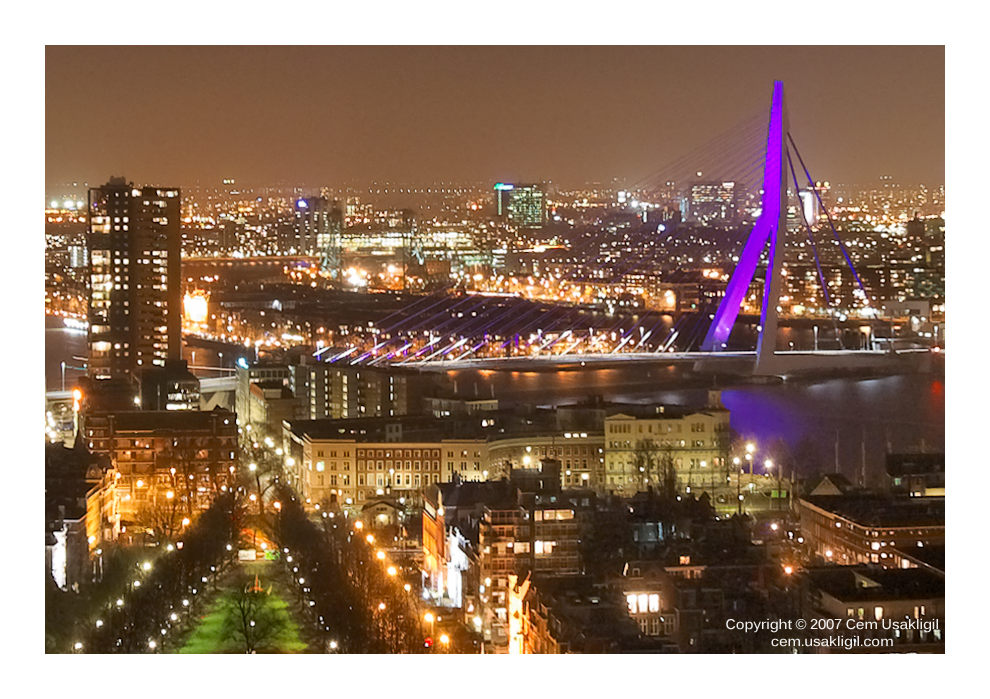
This is my first attempt at a couple of new (to me) aspects of photography. Firstly, I've never attempted to construct a panorama by stitching photo's before. Well, actually I did, but just as a small experiment using 2-3 takes at the most. Secondly, I have never done nighttime skyline photography before with a DSLR. My objective was to try and learn some skills in the end.

Here is the background info:
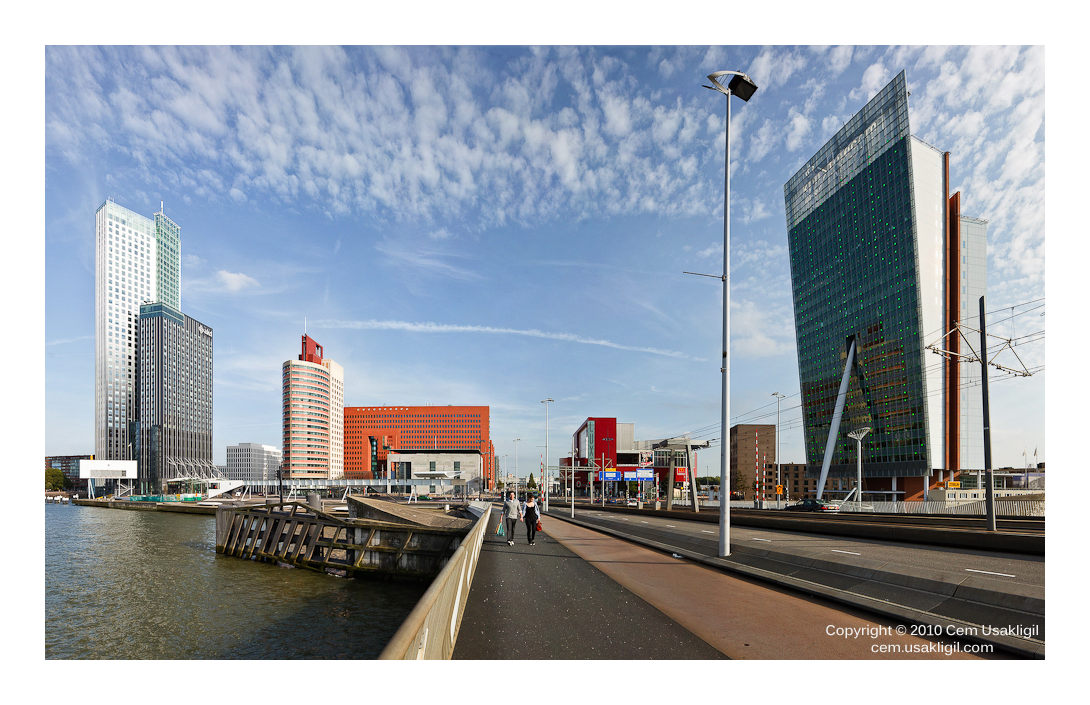
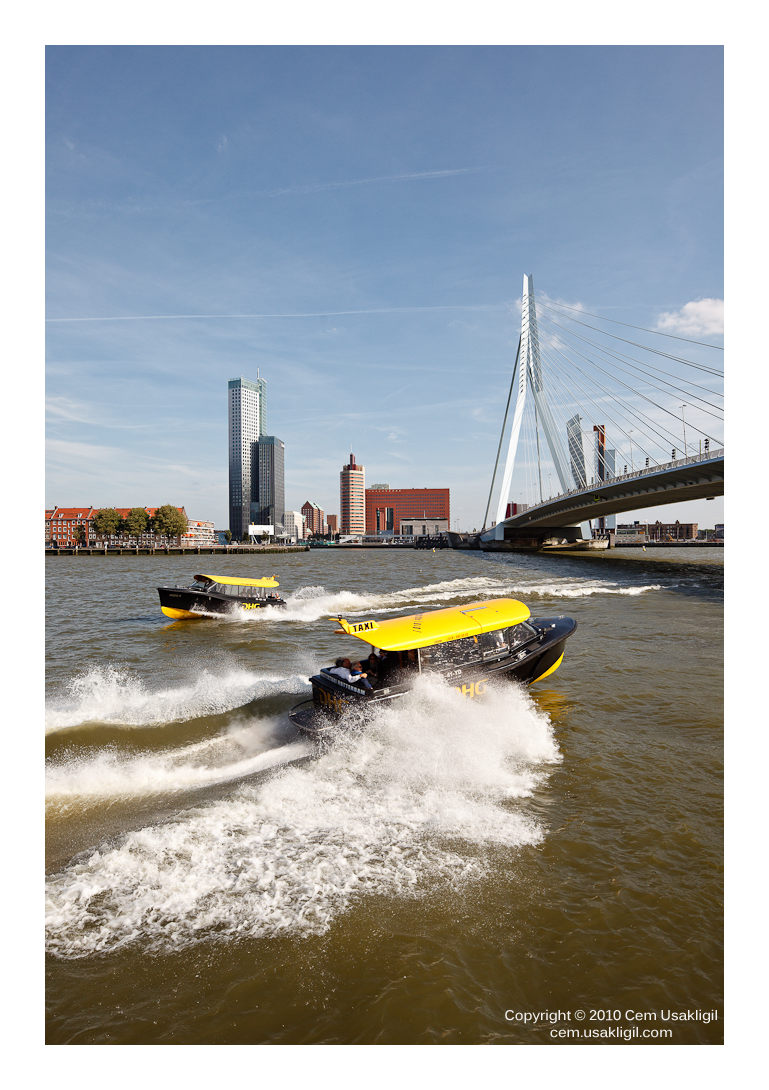
Place: Euromast (116 meters above ground), Rotterdam, Netherlands
Time: 21st of February, at around 8:30 PM
Weather conditions: Clear, with a strong wind blowing
Camera: Canon 400D (XTi)
Lens: EF-S 10-22 F3.5-4.5 USM
ISO 100, F/6.7, Focus at 22 mm, Exposure 15-30 seconds, RAW
Tripod: Manfrotto 055 MF4 with 468 MGRC2 ball head
6 frames taken left to right
Conversion into individual TIFF files by DxO
Stitching by Pano tools assembler
Converting into jpg and resizing in LR again

Since the wind was rather strong, I was glad that I had a reliable tripod with me. Even then, I had to push it firmly towards the ground during the shots. Also, the tower itself shakes as well, which makes it very difficult getting sharp picture at longer exposures. I have taken some shots using my EF 24-105 L IS F4 lens (@ F8.0 and 24 mm) as well, but they turned out to be much less sharper in comparison. Any ideas as to why? Is it the weight of the lens, or the size which makes it catch more wind?

All in all, I am satisfied with the results. The end panorama is some 12271 x 2246 pixels in size. I am posting it in a 1400 pixel wide version, and I'll also throw in a left and right part in 1400 pixels each since the 1400 version does not really do justice to the whole picture.

Please feel free to C&C, how can I improve from here? TIA.

b08224.jpg


Cheers,
 
Last edited:

Ferenc Harmat

New member
At-a-glance, it looks excellent!

Looks BEAUTIFUL to me.

Pretty long exposure, though... At this size looks very balanced and natural. Could you post a small crop of any area with some detail on it?

Very nice, indeed.
 

Cem_Usakligil

Well-known member
...Could you post a small crop of any area with some detail on it?
Hi Ferenc,

Thanks for the very kind compliments :). Here is a crop from the central area. Mind you, I had to do some successive resizes in order to open the image in LR, which has a nasty bug. It refuses to open images wider than 10000 pixels. So some minor IQ loss has been introduced:

b08224-crop.jpg


Cheers,
 
Last edited:

Ray West

New member
Hi Cem,

Excellent, love the swan, and the telephone? tower looks upright from that view, too.

Best wishes,

Ray
 

Asher Kelman

OPF Owner/Editor-in-Chief
Hi Cem,

Wonderful job! This makes Rotterdam get added to my must see list! Did you move the lens though its nodal point or just swing the camera?

One important advantage of the x 1.6 multiplier is the major decrease in vignetting by not using so much of the outside of the lens. Change in iilumination in overlapping segments is then minimal. With a larger 35mm size 5D one might have problems with the same shot.

Asher
 

Cem_Usakligil

Well-known member
Hi Cem,

Excellent, love the swan, and the telephone? tower looks upright from that view, too.

Best wishes,

Ray

Hi Ray,

I am impressed by your knowledge of Rotterdam. For the rest of us, I will mention the fact that the modern bridge which is lighted purple/violet is also known as the "Swan". Re. the "telephone" I have to admit you've lost me there :).

Cheers,

Edit: I now get what you've meant by "telephone" (was still trying to wake up properly when I've replied this morning). It is the KPN (previsouly Dutch PTT) building to the right of the swan which leans towards water/left normally :). I'll see if I can post some details of that building and of the swan another time.
 
Last edited:

Cem_Usakligil

Well-known member
....Did you move the lens though its nodal point or just swing the camera? ...

Hi Asher,

I've just rotated (swinged) the camera on the tripod. Did not do any fancy tricks with finding the nodal point and rotating through it. Haven't got the experience and equipment I'm afraid ;-).

Cheers,
 

Cem_Usakligil

Well-known member
....Here is a crop from the central area. Mind you, I had to do some successive resizes in order to open the image in LR, which has a nasty bug. It refuses to open images wider than 10000 pixels. So some minor IQ loss has been introduced...
I have now replaced this crop with a better one without the loss in IQ.
You may have to refresh the page or reload the particular image before you see any changes.

Cheers,
 

Michael Fontana

pro member
that looks better now!

Nice veduta (view), these panos offer a nice approach, how cities are build.
Did you had to touch up the sky, moving clouds, during long exposures?

I'm alwith astonished, when I see how well digicams perform under these conditions. It would have been a hell of a work to do this with film.
 

Cem_Usakligil

Well-known member
that looks better now!

Nice veduta (view), these panos offer a nice approach, how cities are build.
Did you had to touch up the sky, moving clouds, during long exposures?

I'm alwith astonished, when I see how well digicams perform under these conditions. It would have been a hell of a work to do this with film.
Hi Michael,

I didn't do any pre processing or post processing, just a straightforward RAW->TIF conversion in LR. I had the CF activated in the camera which does clean out the noise in exposures longer than 2 seconds.

I am now planning on a second attempt with some IQ improving actions in LR before converting into TIFs as an input to the Panorama Factory. I'll crop a bit of the sky in the final version as well.

Cheers,
 

Dave New

Member
I have taken some shots using my EF 24-105 L IS F4 lens (@ F8.0 and 24 mm) as well, but they turned out to be much less sharper in comparison. Any ideas as to why? Is it the weight of the lens, or the size which makes it catch more wind?

Just a guess, but did you leave the IS on, when using the 24-105 on the tripod? Older Canon IS lenses didn't deal well with having the IS on when on a tripod. It causes the image to 'wander' as the IS mechanism hunts, looking to correct vibration that isn't there. This can cause smearing of the image.

I don't know if the 24-105L IS is one of those lenses, but if you look in the manual that came with the lens, you should see a recommendation as to whether you should leave the IS on or not when it is mounted on a tripod.
 

Cem_Usakligil

Well-known member
Just a guess, but did you leave the IS on, when using the 24-105 on the tripod? Older Canon IS lenses didn't deal well with having the IS on when on a tripod. It causes the image to 'wander' as the IS mechanism hunts, looking to correct vibration that isn't there. This can cause smearing of the image.

I don't know if the 24-105L IS is one of those lenses, but if you look in the manual that came with the lens, you should see a recommendation as to whether you should leave the IS on or not when it is mounted on a tripod.

Hi Dave,

I had indeed left the IS option switched on. Despite the fact that as we were setting things up I had reminded my friends who were co-shooting to switch off their IS/VR options on their lenses. After that, I've forgotten to do the same myself, bummer!

Nevertheless, I have reprocessed the image from scratch. Mainly due to the fact that the Panorama Factory has created some serious IQ degredation at around the stitches of the photos, such as ghosting. Also, the overall exposure and sharpness were effected in a negative way. I have then done the stitching using the PhotoMerge action of PS CS3 (Beta). To my surprise, it has delivered much better results. I have adjusted curves locally (exposure, colour balance, contrast, USM). I have then made selective adjustments such as the wings a bit redder and the center a bit lighter, etc. Finally, I have added a poster style frame. Here is how it looks like now:

131623752-O.jpg


Cheers,
 
I now get what you've meant by "telephone" (was still trying to wake up properly when I've replied this morning). It is the KPN (previsouly Dutch PTT) building to the right of the swan which leans towards water/left normally :). I'll see if I can post some details of that building and of the swan another time.

Hi Cem,

Great panorama. I was also a bit puzzled by Ray's "telephone" looking upright, comment. However, he is well informed as he was apparently referring to this building (just a snapshot taken at the wrong time of day):
KPN.jpg


That image was taken from the Erasmus bridge AKA the Swan.

Bart
 

Asher Kelman

OPF Owner/Editor-in-Chief
Hi Cem,

Great panorama. I was also a bit puzzled by Ray's "telephone" looking upright, comment. However, he is well informed as he was apparently referring to this building (just a snapshot taken at the wrong time of day):
KPN.jpg


That image was taken from the Erasmus bridge AKA the Swan.

Bart

What a strange construction. There's the one arm holding the building up and an unusual thin wall of glass above one face! What is this all about?

Asher
 
What a strange construction. There's the one arm holding the building up and an unusual thin wall of glass above one face! What is this all about?

Hi Asher,

A large part of the Rotterdam city center was bombed flat, yes flat, at the beginning of WWII. As a result the city had to be rebuilt from the ground up. This proved to be an opportunity to inspire many architects to design new houses, office space, bridges, etc.. As a result, and continuing to this very date, Rotterdam is bustling with new architectural design and architects of international fame (e.g. Rem Koolhaas, and a list of his projects).

The KPN telecom tower (the leaning building above), is a project of another architect, Renzo Piano (if you go to his website and to all projects, then under the Netherlands you can find some background about this building). The angle of the facade is in perfect harmony with the slope of the bridge next to it, from where I took this image, as seen from the other side of the building.

Cheers,
Bart
 
Last edited:

Asher Kelman

OPF Owner/Editor-in-Chief
Hi Asher,

A large part of the Rotterdam city center was bombed flat, yes flat, at the beginning of WWII. As a result the city had to be rebuilt from the ground up. This proved to be an opportunity to inspire many architects to design new houses, office space, bridges, etc.. As a result, and continuing to this very date, Rotterdam is bustling with new architectural design and architects of international fame (e.g. Rem Koolhaas, and a list of his projects).

The KPN telecom tower (the leaning building above), is a project of another architect, Renzo Piano (if you go to his website and to all projects, then under the Netherlands you can find some background about this building). The angle of the facade is in perfect harmony with the slope of the bridge next to it, from where I took this image, as seen from the other side of the building.

Cheers,
Bart

Bart,

Thanks! Everyone knows they must visit the Empire State building in New York, Eiffel Tower in Paris and
Nelson's column in Trafalgar Square in London. Rotterdam's rich architecture should be added to that list! Likely to most modern Europeans it is already there! The bridge itself is a work of art. After Cem first introduced it to me, I had already lusted after the opportunity of enjoying from every angle. Now I can see there's so much more. I'll use your references to get educated! Thanks for further opening up my mind to the treasures I have missed!

Asher
 

Cem_Usakligil

Well-known member
Asher has asked me whether I had some more pictures of the KPN building
and the Erasmus bridge which I could share with you.
Who am I to refuse a kind request by a friend? So here it comes.

First, I want to show 3 panoramas:


f30565.jpg


f30613.jpg


c10494.jpg


Followed by three more pics in the next post....
 

Asher Kelman

OPF Owner/Editor-in-Chief
Asher has asked me whether I had some more pictures of the KPN building
and the Erasmus bridge which I could share with you.
Who am I to refuse a kind request by a friend? So here it comes.


f30565.jpg


f30613.jpg


These first 2 panos show views of the major European port of Rotterdam from the water. It's really immense and handles more container cargo than any other European port. This is a place I have been remiss in visiting. Theres an interesting Eurotower which I have yet to find, but of course the Erasmus Bridge is easy to pick out with its sky blue color, sensual curves and sinuous cables.


c10494.jpg


This last pano is my favorite as it spans from the Ersamus bridge on the left all the way to a gigantic spanning crane on the right. Along the way there are giant barges hugging the coastline and amid beautiful reflections of the buildings. The colors might be underestimated at first glance. This image would look even more magnificent with the ends copped just after the principal structures and then printed with the more attention to showing off the colors in the waters reminiscent of Venetian canals.

So Cem, this is a wonderful pictorial education and enticement to visit Europe again! What a grand delight.

Thanks for sharing!

Asher
 

Asher Kelman

OPF Owner/Editor-in-Chief
The panorama we just saw are so well made and especially the last one, serene and almost formal. These 3 new picture are so much more dynamic and full of verve!

Looking at these we feel amazingly alive! What a bright and lively set of surprises you show us.

... and the 3 pictures as promised:


f30754.jpg


f30685.jpg


f30573.jpg


Cem,

I must say these are all energized. The first by the angles of the cables in the bridge, another by the interplay of so many triangles in the makeup of the composition and last with the fast movement of the water taxis!

I'll have to take a beer and a sleeping pill tonight!

Asher
 

Asher Kelman

OPF Owner/Editor-in-Chief
Cem,

I have to ask a question which touches on both esthetic values and intellectual honesty.

f30685.jpg

How much would it hurt your feelings of "truth" to remove just that tall lamp post in the middle of the bridge. I'm amazed that folk build these great structures but don't include all the silly lights and stuff that get to clutter the grand view!

Asher
 

Cem_Usakligil

Well-known member
These first 2 panos show views of the major European port of Rotterdam from the water. It's really immense and handles more container cargo than any other European port. This is a place I have been remiss in visiting. Theres an interesting Eurotower which I have yet to find, but of course the Erasmus Bridge is easy to pick out with its sky blue color, sensual curves and sinuous cables.


This last pano is my favorite as it spans from the Ersamus bridge on the left all the way to a gigantic spanning crane on the right. Along the way there are giant barges hugging the coastline and amid beautiful reflections of the buildings. The colors might be underestimated at first glance. This image would look even more magnificent with the ends copped just after the principal structures and then printed with the more attention to showing off the colors in the waters reminiscent of Venetian canals.
Hi Asher,

The port of Rotterdam is really huge, the parts I am showing here is just a small fraction of it. What you can see in these pictures are residential and business areas, no actual port activity takes place in these neighborhoods. Perhaps Bart and/or I can revisit the actual port another time to show some pictures of it. One more thing for the to-do list ;-)

The "giant spanning crane" on the right is not a crane actually. It is the elevating railway bridge which has been put into disuse (and stays in the up position) since a railway tunnel has been built under the water/city many years ago.

Cropping further is fine. This pano is some 200 degrees wide and it has been created using equirectangular projection. It is one of my earlier attempts at pano photography back in 2007 and contains many small problems/niggles which I would have avoided if I did it again now. As a matter of fact, I actually think I should redo it for the middle section (i.e. the Venetian canals bit).

The problem with these ultra wide panos is that one has to see them really large on print to get that immersion feeling. Even when shown at 1600 pixels, these have already lost much of their magic I can tell you. I know that tools such as zoomify offer some solution to this problem but I am undecided about the real value of them. This is one situation where nothing beats a large print on the wall.


Cheers,
 

Cem_Usakligil

Well-known member
I have to ask a question which touches on both esthetic values and intellectual honesty.

How much would it hurt your feelings of "truth" to remove just that tall lamp post in the middle of the bridge. I'm amazed that folk build these great structures but don't include all the silly lights and stuff that get to clutter the grand view!
Hi Asher,

As long as my pictures are done for the sake of photography and not for the sake of journalism or documentation, I have no qualms at all about retouching them. So the question I have to answer first is whether this architecture picture can also be considered as a documentary. I've got the the feeling that it is a bit of both. So yes, I would not mind removing the lamppost. However; the picture is a detailed view of the architecture with pin sharp details of everything. Therefore I am afraid that the unsuspecting lookers might consider it to be telling them the absolute truth. And because of that, I would not want to remove the lamp post.

Besides that, I have actually considered removing the post myself. It is the immediate thought which one gets. However, I have decided that the lamp post actually anchors the image by introducing a sense of depth and by dividing the world of two competing high-rise buildings into two parts. It wards off the "aggressive" KPN building, as it were. So I have decided to let it in also due to aesthetics and not because of ethics.

Cheers,
 

James Cook

New member
Wonderful images! They make me want to spend time in Rotterdam too.

I'd be very interested in knowing how many images have been stitched in some of the panoramas.

And I must agree with you about the lamp post on the bridge. Without it, the image becomes a wide sweep and lacks the depth that the post brings to it. It seems to prevent everything from being swept into the vanishing point.
 

Cem_Usakligil

Well-known member
Wonderful images! They make me want to spend time in Rotterdam too.

I'd be very interested in knowing how many images have been stitched in some of the panoramas.

And I must agree with you about the lamp post on the bridge. Without it, the image becomes a wide sweep and lacks the depth that the post brings to it. It seems to prevent everything from being swept into the vanishing point.
Hi James,

Thanks a lot for stopping by. I have seen your gorgeous 360 pano the other day and I was very impressed. Shame on me that I did not leave a comment at that time, which I am going to remedy asap.

Regarding the stitching details, here it comes:
1) f30685: the pano of the KPN building with the lamp post in the middle:
Camera: 5DII
Lens: TSE 24mm II f3.5, shifted +7 mm (to the upper position)
Camera rotated around the entrance pupil of the lens to prevent parallax errors using RRS pano setup
4 vertical (portrait tiles) single row with +/- 50% overlap
Conversion from raw to tif using Capture One Pro
Stitching in PanoTools Assembler (which is one of the few programs which allow stitching using shifted lens positions along with the PTGui)
Projection used: Recti Perspective
FOV: H: 123 degrees V: 78 degrees

2) f30565: the pano of Maas river with the Erasmus Bridge on the right:
Camera: 5DII
Lens: TSE 24mm II f3.5, unshifted
Camera rotated around the entrance pupil of the lens to prevent parallax errors using RRS pano setup
7 vertical (portrait tiles) single row with +/- 50% overlap
Conversion from raw to tif using Lightroom 3
Stitching in PanoTools Assembler
Projection used: Cylindrical
FOV: H: 200 degrees V: 75 degrees (cropped a bit from below and right after)

3) f30613: the pano of Maas river with the incoming barge:
Camera: 5DII
Lens: TSE 24mm II f3.5, unshifted
Camera rotated around the entrance pupil of the lens to prevent parallax errors using RRS pano setup
3 vertical single row (landscape tiles) with +/- 50% overlap
Conversion from raw to tif using Lightroom 3
Stitching in PanoTools Assembler
Projection used: Equirectangular
FOV: H: 117 degrees V: 53 degrees

4) c10494: the UW pano from the Erasmus Bridge on the left to the elevated bridge on the right (the Venetian reflections as Asher refers to it):
Camera: 5D
Lens: EF 70-200L IS f4 @70mm
Camera rotated around the tripod base, no entrance pupil correction
22 vertical sigle row (portrait tiles) with +/- 50% overlap
Stitching in CS3
Projection used: automatic (I guess cylindrical)
FOV: H: +/- 200 degrees (cropped a bit from right after)

The last one was a technical challenge as CS3 would not allow me to stitch everything in one go so I had to do the whole in 3 subsections. As I wrote before, this pano contains some small errors which I could easily avoid now. A redo is in order :)

Hope this answers your questions? If not, ask away.

Cheers,
 
Last edited:

Asher Kelman

OPF Owner/Editor-in-Chief
Cem,

could you explain how you use the TSE 24 mm II when it's shited in conjunction with RRS pano head. (BTW which one and which ballhead) abd manage to rotate around the entrance pupil.

What correction for the shift?

Asher
 

James Cook

New member
Hope this answers your questions?

Well beyond my expectations, Thanks. You provided a lot of food for thought with it. And you proved beyond a doubt that you're far more meticulous than I am.
 

Cem_Usakligil

Well-known member
Cem,

could you explain how you use the TSE 24 mm II when it's shited in conjunction with RRS pano head. (BTW which one and which ballhead) abd manage to rotate around the entrance pupil.

What correction for the shift?

Asher
The RRS is made up of individual components. I have:
- the L-plate for the 5DII
- PCL-1 Panning clamp
- mini clamps (B2 FAB and B2 mAS) to mount the camera at a higher position with respect to the plane of the rail in order to prevent the front part of the rail coming into the view of the wide lenses. Another advantage is the ability to use the lens-plates for longer lenses (which are 90 degrees rotated).
- MPR-192 rail

The PCL-1 is mounted on my Manfrotto 468RC hydrostatic ballhead. The whole is on a Manfrotto 055MF4 carbon tripod.

My (shifted) single row pano workflow is as follows:

First thing to do is to level the MPR-192 rail mounted on the PCL-1, using the ballhead. A leveling base would improve the precision but it would add to the height of the whole. I shall probably replace the Manfrotto ballhead someday with the Manfrotto leveling base 338 and the pano head 300N above it (which has click stops for the rotation). For the leveling I use the DigiPas DWL80Pro digital spirit level which has a resolution of 0.05 degrees and can be calibrated easily.

Next, mount the camera in portrait (vertical) position on the MPR-192/mini-clamps, and set the MPR-192 to the preset position (to be determined in advance) on the PCL-1, in order to align the entrance pupil on the axis of rotation.

Rotate the camera through the whole width of the pano to see how much shift is required in total. I try not to exceed 7mm but one can go up to 12mm max if some slight IQ loss in the corners is acceptable. Mind you, we are then looking at extreme deformations of the shapes in the corners as the shifted lens at 12mm is equivalent to a 14mm UWA lens on a FF sensor. Adjust the vertical shift of the lens accordingly and make sure you remember it. I try to use 7mm as my standard so that remembering is not a big issue.

Last, but not least, either calculate the rotation needed in degrees for each frame to overlap the other at around 50%, or use the viewfinder of the camera to do it visually.

Take the pano left to right, using as many frames as needed. If needed, use multiple exposures for tone mapping (if the dynamic range is more than the camera can cope with. One can set the exposure on manual based on the lightest frame or one can leave the camera on aperture priority and let the exposure change between frames. I usually do the latter but may adjust some frames with exposure compensation by looking at the live view and the histogram. It all depends on the scene and the light.

Convert the raws into tif using an appropriate converter. I use C1 Pro, DxO Optics Pro or LR3 (depending on the lens used and the needs of a particular picture). LR3 gives very good results with almost anything. However the C1 Pro delivers better colors in reds and crispier pixels. DxO is excellent when I shoot with lenses contained in DxO's database. All aberrations are corrected automatically and the capture sharpening applied using deconvolution. Make sure that the color balance and the exposure of all the frames are (nearly) the same.

Create a new project in PanoTools Assembler and add the tifs to it. After that, create the needed control points between the images. Next step is the manual optimization of the most important parameters as follows:
- Optimize only yaw first
- Optimize only pitch next
- Optimize only roll last.
- Fix the y/p/r and optimize the e parameter (vertical shift). This is the most important step. By knowing the shift in mm (such as the 7mm), I can pre-calculate the value of the e and input it as a starting point prior to the optimization. In portrait position, the formula is 7mm divided by 36mm times the number of pixels of the sensor (of the long side). For my 5DII with the FF sensor which has 5616 pixels, when using an upwards shift of 7mm, the e is equal to -1092 (the minus denoting the upwards shift).
- Fix the e and optimize the b parameter (lens distortion)
- Fix the b and optimize the a&c parameters (lens distortion)
- Some further re-optimization might the needed if the average distance between control points is too high to make a good blended pano. Individually or in combination with some other parameters.
- Stitch using the desired projection method to taste.
- Export to blended tif (using the smartblend and the Sinc1024/Lanczos algorithm for the best quality resizing/warping of the tiles prior to stitching)
- Import to PS and crop and adjust sharpness, contrast, tones to taste.

Sorry for the longish explanation, I hope this helps?

Cheers,
 
Sorry for the longish explanation, I hope this helps?

Hi Cem,

There is enough information there to keep people busy for a while ;-), so its a great resource for those looking for some of the finer details of succesful stitching. I fully agree with your MO.

The basic point that triggered Asher's question is also answered: vertical lens shifting alone doesn't change the fore/aft position of the entrance pupil, but it must be compensated for in the stitcher (otherwise it will find a sub-optimal set of stitching parameters).

Currently there are a few stitchers that allow to address the additional degrees of freedom added by lens shifts (e.g. PTAssembler and PTGUI). It also allows to compensate for slight decentering of regular lenses, thus improving the overall quality of stitching. The next version of Autopano will also introduce that capability, at last. We'll have to see how well that works.

Cheers,
Bart
 
Top