Doug Kerr
Well-known member
In another thread (discussed in yet another), Asher described a technique for dealing, in Photoshop, with images that are "thin" in some or all areas - that is, are overly light without much "depth" of modulation.
The mathematical implications of this technique are quite clever, and I thought I would discuss them here (in a hopefully-benign way).
The technique
• Above the layer containing the image to be improved, place an adjustment layer. It can be any of several types - Curves, Brightness/Contrast, Levels, etc. We will not be actually using the adjustment it provides - that is, we leave it set at its default ("no adjustment") - so it really doesn't matter which of those it is. It is just a mindless pawn in a clever mathematical ploy.
• Set the blend mode of the adjustment layer to Multiply.
We will now see that the image is considerably "deeper and darker" all over.
We can then use a pixel mask on the adjustment layer to control what parts of the image receive this treatment - and how potently. Where the mask is transparent (white), the treatment is applied full force. Where the mask is opaque (black), the treatment is not applied at all. Where the mask is semitransparent (gray), the treatment is applied but not with full force.
If the problem areas of the image are in the minority, we may wish to start with the mask opaque (black) everywhere. If our settings are such that when we make an adjustment layer a mask for it is automatically created - and it will be transparent everywhere - we can just use the Invert button on the mask panel to make it all opaque. If no mask is automatically created, we can make one that is all opaque (black) to begin with by Alt-clicking on the Add a pixel mask icon on the masks panel.
Then we can paint on the mask with the color white, but with the brush set to a low opacity (maybe 25%). The effect is that each pass of the brush makes the mask a little more transparent (closer to white from black). Thus we will see the effect of the "treatment" slowly get greater and greater where we paint. (I find the "airbrush" mode of the brush nice for this work.)
How does this work
To understand how this works from a sort-of-mathematical basis, we have to use a perhaps-unfamiliar way of looking at the working of adjustment layers of this class, used for their normal purposes (to actually make image adjustments). In effect, the adjustment layer has as its "content" a copy of the pixels of the layer below, with the adjustment (for example, a Curves adjustment) applied everywhere. We cannot see this "secret load".
But wherever the mask on the adjustment layer is white (transparent), it "lets those pixels fully through" into the image buildup. Assume for the moment that the adjustment layer does not have blending mode Multiply but rather Normal. Then those full potency pixels "cover up" the pixels in the main image layer, and in those regions we see the pixels as affected by the adjustment. (We can, in this case, also think of this as the mask "letting through the adjustment. But that outlook will not work for our actual situation here.)
Where the mask is black (opaque), it does not let its adjusted pixels through at all into the image buildup. Thus, they don't "cover up" the pixels on the main image layer, and in such regions we see the unadjusted image.
Now, if in a region of the mask with transparency 40%, the adjusted pixels in the adjustment layer's secret load are let through with "potency" 40%, and participate that way in the image buildup. They "40% cover up" the pixels of the main image layer, which then participate in the image buildup at only 60% of par. Thus the adjustment, in effect, is works at "40% of full strength".
Now, with that outlook in hand, let's return to the real scenario of interest - with the blend mode of the adjustment layer at Multiply. Recall that (we will presume) we leave the "adjustment" set at "none". Thus the pixels in the adjustment layer's secret load are identical to the pixels in the main image layer.
Now, to follow the action, we'll start with a region in which the mask transparency is 100%, and look at some single pixel there.
For any given channel (say, R), the value for the "adjusted" pixel from the adjustment layer's secret load is "let through as is" and is then multiplied by the value for the unadjusted pixel from the main image layer. The result is the effective R value of the pixel in the composite image.
But since the R values of the two pixels are identical (no actual adjustment being applied in the adjustment layer), this result is just the square of that R value. (Note that for this to work numerically, we must work with R, G, and B on a scale of 0-1, not 0-255.). The R values of the composite image are different from the R values of the original image - the result of the treatment. (The implications of this change will be discussed shortly.)
Now, where the mask is opaque (black), the value of the pixel in the adjustment layer's secret load is not used, but rather the value R=1. (This is different from what would happen with the Normal blend mode.) The "lower" factor is the actual R value in the main image layer. Now the result of the multiplication is just the R value of the pixel in the Main image layer. The image has not been impacted by the "treatment".
Where the mask is 40% transparent, the "upstairs" factor in the multiplication is made 40% of the way between 1.0 and the R value for the pixel. The value is actually:
0.4 x R + 0.6 x 1.0
The "lower" factor is the actual R value in the main image layer (not, for example, 0.6 of it).
Thus, the "squaring" treatment is only partially applied.
What does that mean
Asher points out that when we do this, it is as if we have several copies of the image pixels, contributing their individual density to give a greater depth of modulation of the density.
In fact, if we care to think of density in the formal photographic way:
d=log (1/Y)
where d is the density and Y is the relative luminance of the pixel of interest, then in an area where the mask is white (transparent), and two identical pixels are "multiplied", the density of the composite will be exactly twice the density of either pixel. (I will spare you the mathematical proof, which is however very simple.) This is exactly what we would have if we sandwiched together two copies of the image as photographic transparencies.
Another outlook
It turns out that wherever we allow this "treatment" to proceed with full force, the result on the affected image is precisely as if the value of the gamma used in the gamma precompensation of the image had been cut to half that for the color space. Thus, when the "real" gamma exponent is used to expand from the nonlinear R, G, and B values to the primary values that we will see on the display, the image will be different from its "untreated" form - the visible tonal scale will be "over-expanded". In particular, as R, G, and/or B decrease, the visible image "gets darker quicker than normal" - just what we want for a "thin" image.
Suppose we don't want so much?
Suppose when we are done painting, and then thoughtfully reconsider our result, we conclude that we have applied the "treatment" a little too much overall .
Its overall effect can be throttled back by setting down the opacity of the adjustment layer.
Can we do this another way
Suppose we, for religious reasons or something, did not want to use the Multiply blend mode. Can we do this same thing some other way?
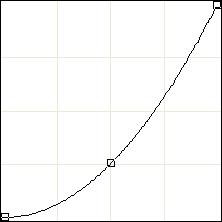
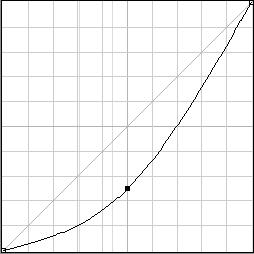
Absolutely. We in fact use the Curves layer, but this time with the blend mode Normal. But now we actually exercise its real function, and "bow the curve down substantially". If we do that in a certain way (easy to do), the result is as if as if the value of the gamma used in the gamma precompensation of the image had been half that for the color space. This is exactly the same result as with the technique using the adjustment layer, with "no adjustment", as an inert pawn with a Multiply blend mode.
Interestingly enough, in Picture Publisher (my normal image editor), in the Curves panel, there is a slider one can use to change the curve to produce the same effect as the reduction (or increase) of the gamma apparently used in the image gamma precompensation, compared to the actual gamma of the color space. This is in fact how I, in most cases, "darken" an image.
************
Yes, this note happened at this time of the morning because I improvidently had a bowl of potato chips before going to bed, with no insulin to process them with.
My serum glucose is now below 200 mg/dL, and I'm going back to bed.
Best regards,
Doug
The mathematical implications of this technique are quite clever, and I thought I would discuss them here (in a hopefully-benign way).
The technique
• Above the layer containing the image to be improved, place an adjustment layer. It can be any of several types - Curves, Brightness/Contrast, Levels, etc. We will not be actually using the adjustment it provides - that is, we leave it set at its default ("no adjustment") - so it really doesn't matter which of those it is. It is just a mindless pawn in a clever mathematical ploy.
• Set the blend mode of the adjustment layer to Multiply.
We will now see that the image is considerably "deeper and darker" all over.
We can then use a pixel mask on the adjustment layer to control what parts of the image receive this treatment - and how potently. Where the mask is transparent (white), the treatment is applied full force. Where the mask is opaque (black), the treatment is not applied at all. Where the mask is semitransparent (gray), the treatment is applied but not with full force.
If the problem areas of the image are in the minority, we may wish to start with the mask opaque (black) everywhere. If our settings are such that when we make an adjustment layer a mask for it is automatically created - and it will be transparent everywhere - we can just use the Invert button on the mask panel to make it all opaque. If no mask is automatically created, we can make one that is all opaque (black) to begin with by Alt-clicking on the Add a pixel mask icon on the masks panel.
Then we can paint on the mask with the color white, but with the brush set to a low opacity (maybe 25%). The effect is that each pass of the brush makes the mask a little more transparent (closer to white from black). Thus we will see the effect of the "treatment" slowly get greater and greater where we paint. (I find the "airbrush" mode of the brush nice for this work.)
Note that Asher's description has us starting with an all-white mask, initially allowing the treatment to be applied full-force across the image, and then painting on the mask with black to diminish or completely suppress the treatment as appropriate.
How does this work
To understand how this works from a sort-of-mathematical basis, we have to use a perhaps-unfamiliar way of looking at the working of adjustment layers of this class, used for their normal purposes (to actually make image adjustments). In effect, the adjustment layer has as its "content" a copy of the pixels of the layer below, with the adjustment (for example, a Curves adjustment) applied everywhere. We cannot see this "secret load".
But wherever the mask on the adjustment layer is white (transparent), it "lets those pixels fully through" into the image buildup. Assume for the moment that the adjustment layer does not have blending mode Multiply but rather Normal. Then those full potency pixels "cover up" the pixels in the main image layer, and in those regions we see the pixels as affected by the adjustment. (We can, in this case, also think of this as the mask "letting through the adjustment. But that outlook will not work for our actual situation here.)
Where the mask is black (opaque), it does not let its adjusted pixels through at all into the image buildup. Thus, they don't "cover up" the pixels on the main image layer, and in such regions we see the unadjusted image.
Now, if in a region of the mask with transparency 40%, the adjusted pixels in the adjustment layer's secret load are let through with "potency" 40%, and participate that way in the image buildup. They "40% cover up" the pixels of the main image layer, which then participate in the image buildup at only 60% of par. Thus the adjustment, in effect, is works at "40% of full strength".
Now, with that outlook in hand, let's return to the real scenario of interest - with the blend mode of the adjustment layer at Multiply. Recall that (we will presume) we leave the "adjustment" set at "none". Thus the pixels in the adjustment layer's secret load are identical to the pixels in the main image layer.
Now, to follow the action, we'll start with a region in which the mask transparency is 100%, and look at some single pixel there.
For any given channel (say, R), the value for the "adjusted" pixel from the adjustment layer's secret load is "let through as is" and is then multiplied by the value for the unadjusted pixel from the main image layer. The result is the effective R value of the pixel in the composite image.
But since the R values of the two pixels are identical (no actual adjustment being applied in the adjustment layer), this result is just the square of that R value. (Note that for this to work numerically, we must work with R, G, and B on a scale of 0-1, not 0-255.). The R values of the composite image are different from the R values of the original image - the result of the treatment. (The implications of this change will be discussed shortly.)
Now, where the mask is opaque (black), the value of the pixel in the adjustment layer's secret load is not used, but rather the value R=1. (This is different from what would happen with the Normal blend mode.) The "lower" factor is the actual R value in the main image layer. Now the result of the multiplication is just the R value of the pixel in the Main image layer. The image has not been impacted by the "treatment".
Where the mask is 40% transparent, the "upstairs" factor in the multiplication is made 40% of the way between 1.0 and the R value for the pixel. The value is actually:
0.4 x R + 0.6 x 1.0
The "lower" factor is the actual R value in the main image layer (not, for example, 0.6 of it).
Thus, the "squaring" treatment is only partially applied.
What does that mean
Asher points out that when we do this, it is as if we have several copies of the image pixels, contributing their individual density to give a greater depth of modulation of the density.
In fact, if we care to think of density in the formal photographic way:
d=log (1/Y)
where d is the density and Y is the relative luminance of the pixel of interest, then in an area where the mask is white (transparent), and two identical pixels are "multiplied", the density of the composite will be exactly twice the density of either pixel. (I will spare you the mathematical proof, which is however very simple.) This is exactly what we would have if we sandwiched together two copies of the image as photographic transparencies.
Another outlook
It turns out that wherever we allow this "treatment" to proceed with full force, the result on the affected image is precisely as if the value of the gamma used in the gamma precompensation of the image had been cut to half that for the color space. Thus, when the "real" gamma exponent is used to expand from the nonlinear R, G, and B values to the primary values that we will see on the display, the image will be different from its "untreated" form - the visible tonal scale will be "over-expanded". In particular, as R, G, and/or B decrease, the visible image "gets darker quicker than normal" - just what we want for a "thin" image.
Suppose we don't want so much?
Suppose when we are done painting, and then thoughtfully reconsider our result, we conclude that we have applied the "treatment" a little too much overall .
Its overall effect can be throttled back by setting down the opacity of the adjustment layer.
Can we do this another way
Suppose we, for religious reasons or something, did not want to use the Multiply blend mode. Can we do this same thing some other way?
Absolutely. We in fact use the Curves layer, but this time with the blend mode Normal. But now we actually exercise its real function, and "bow the curve down substantially". If we do that in a certain way (easy to do), the result is as if as if the value of the gamma used in the gamma precompensation of the image had been half that for the color space. This is exactly the same result as with the technique using the adjustment layer, with "no adjustment", as an inert pawn with a Multiply blend mode.
Interestingly enough, in Picture Publisher (my normal image editor), in the Curves panel, there is a slider one can use to change the curve to produce the same effect as the reduction (or increase) of the gamma apparently used in the image gamma precompensation, compared to the actual gamma of the color space. This is in fact how I, in most cases, "darken" an image.
************
Yes, this note happened at this time of the morning because I improvidently had a bowl of potato chips before going to bed, with no insulin to process them with.
My serum glucose is now below 200 mg/dL, and I'm going back to bed.
Best regards,
Doug
")